You may be thinking, global filtering? Don’t we have that ability already? Why do I need to write code to do that? In Tableau Desktop, global filtering is typically defined as setting a quick filter to control all worksheets on a dashboard that use a common data source. In some workbooks, especially workbooks with a single data source, that may be sufficient. In workbooks with multiple data sources, dashboard actions can be configured to target multiple worksheets or even multiple tabs, as long as they are in the same workbook. But what if you want to use a single control to filter multiple workbooks? That’s what I call “truly global,” and that’s where the Tableau JavaScript API comes to the rescue.
Disclaimer: I am no JavaScript wizard. My goal in this post is to help you understand how the JavaScript API can enable things that simply aren’t possible in Tableau Desktop.
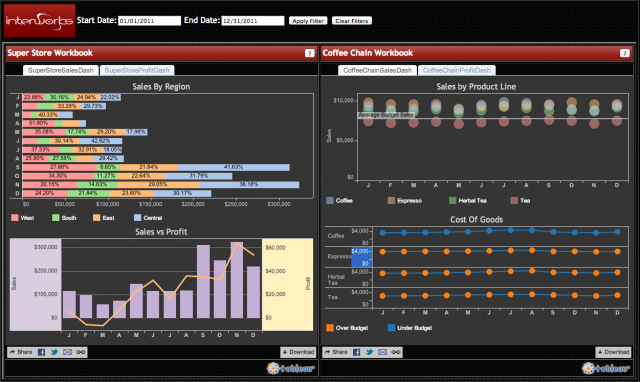
In this example, I’ve set up two workbooks. Both workbooks use different data sources and each workbook contains a common field named “Date.” I’ve used the JavaScript API to embed both workbooks in a simple HTML portal.
You can check out the end product by clicking the image below:
Now let’s walk through the major JavaScript components required to use the JavaScript API to interact with a workbook. To keep the post short and sweet, I’m only using code for one workbook here. You can download the code in its entirety to see how it works across multiple workbooks. You’ll find the HTML file attached towards the bottom of this post.
Make the Viz Interactive
Set the options for the workbook and make the worksheets interactive. The JavaScript API is designed to work with “Worksheets” opposed to “Workbooks.” In our option code, we define which sheets are interactive with a function that looks like this:
onFirstInteractive: function () {
superStoreActiveSheet1 = superStoreViz.getWorkbook().getActiveSheet().getWorksheets()[0];
superStoreActiveSheet2 = superStoreViz.getWorkbook().getActiveSheet().getWorksheets()[1];
}
The dashboard we are working with contains two worksheets. We select each worksheet by “index” and assign a variable to each worksheet. The code for the second workbook follows the same pattern.
Filter the Viz
Select the values for the filter selections and pass them in to the active worksheets. In this example, we have input fields for “Start Date” and “End Date.” We use JQuery to get the values of those fields and pass the values into the active worksheets when the user clicks the “Apply Filter” button like this:
$(‘#applyDateFilter’).click(function(){
superStoreActiveSheet1.applyRangeFilterAsync(“Date”, {
min: new Date($(“#startDate”).val()) ,
max: new Date($(“#endDate”).val())
});
superStoreActiveSheet2.applyRangeFilterAsync(“Date”, {
min: new Date($(“#startDate”).val()) ,
max: new Date($(“#endDate”).val())
});
});
Listen for Tab Changes
Add an event listener to watch for the workbook tab switch and pass the filter selections to the new “Active Sheets.” Event listeners allow us to tell the code to watch for a specific action or event to happen. Once the specified event occurs, we can tell the code to execute a function or functions. When the tab is changed, we have to redefine the “Active Sheets” and pass in the selected filter values.
$(listenToSuperStoreTabSwitch);
function listenToSuperStoreTabSwitch() {
superStoreViz.addEventListener(tableauSoftware.TableauEventName.TAB_SWITCH, onSuperStoreTabSwitch);
}
function onSuperStoreTabSwitch(){
superStoreActiveSheet1 = superStoreViz.getWorkbook().getActiveSheet().getWorksheets()[0]; superStoreActiveSheet2 = superStoreViz.getWorkbook().getActiveSheet().getWorksheets()[1];
superStoreActiveSheet1.applyRangeFilterAsync(“Date”, {
min: new Date($(“#startDate”).val()) ,
max: new Date($(“#endDate”).val())
});
superStoreActiveSheet2.applyRangeFilterAsync(“Date”, {
min: new Date($(“#startDate”).val()) ,
max: new Date($(“#endDate”).val())
});
}
And there you have it! As always, please don’t hesitate to reach out to me if you have any questions.
Happy coding!


