Ah, the month-on-month comparison. I’m not going to bore you with a sermon on the ins and outs of monthly comparisons, but I do want to explain what this particular variation accomplishes.
In my previous post on comparing an incomplete week to the same days of the previous week, we covered why I was pursuing a fairer and arguably more accurate method of comparing time periods. Well, it turns out that along with comparing weeks, we also needed to compare months!
We are going to use Tableau’s date functions to create a monthly comparison that considers all the days of our current month against those same days from the previous month. Okay, let me phrase that in an example. If today is April 14, then I want to compare the values of April 1 through April 14 to the values of March 1 through March 14.
Comparing a current month to a previous month is fairly straightforward in Tableau, and all we need to do is build additional logic to limit the days allowed to contribute to the previous month’s total.
Step 1: Calculate the Maximum Date in Your Database
This is the foundation that all our date calculations will be based upon. The maximum date reflects the most recent date associated with data in your database.
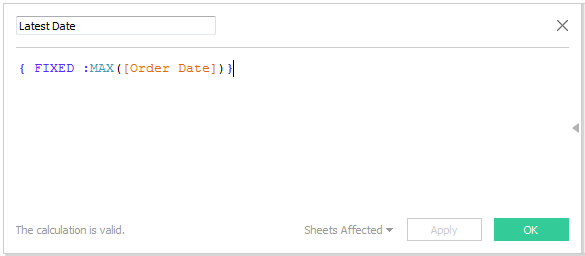
You can think of the formula as saying, “Let’s fix this value to always be the highest date in the database.”
Step 2: Calculate the Start of the Most Recent Month
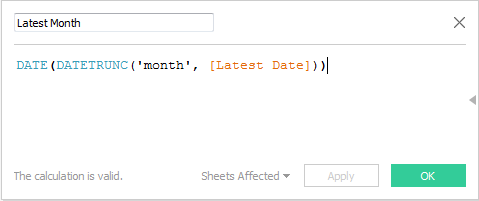
DATETRUNC essentially allows us to zoom out from any given date, and in this particular case, it is used to determine the exact month on which the provided date occurred. The DATETRUNC function is front and center in nearly any date-related task I do with Tableau.
The DATE function appears only because I don’t want this date stored as a DATETIME field. I don’t have a time stamp in this data set, so I only need to capture the date. It’s a personal preference.
Step 3: Calculate the Start of the Previous Month
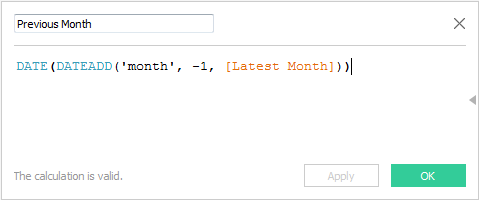
DATEADD allows us to add time intervals to our date fields. If I want to calculate the previous month, then my interval is negative (move backward relative to the date) rather than positive (move forward relative to the date).
Translated into regular English, this formula says, “Let’s find the date that is exactly one month earlier than the Latest Month.”
Step 4: Calculate a Desired Metric for the Previous Month ONLY and its Relevant Days ONLY
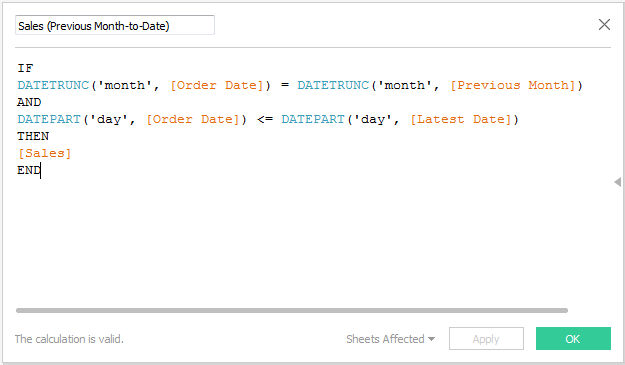
This formula says, “If the order date happened in the same month as the Previous Month, and the day of the month is less than or equal to the day of the month of the Latest Date, then capture the sales number.”
DATETRUNC is doing us the favor of only allowing dates which took place during our desired month, while DATEPART further limits that subset by only letting dates through if the day of the month was less than or equal to that of our current month.
Now that we have our previous month’s sales numbers, we can verify that everything came through as intended.
Step 5: Test to Make Sure the Calculation Does What You Want
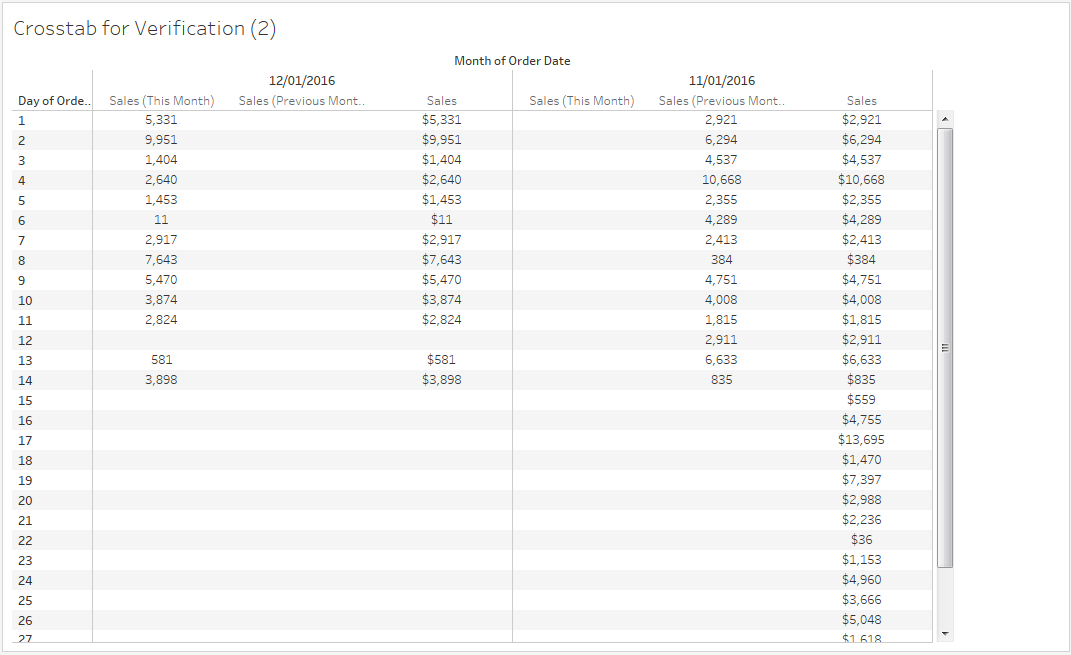
The formula we just created is reflected by the middle column of each pane in the table above. We can see that there are only sales values for days which occurred in the Previous Month. Additionally, the previous month only has sales values for days up until the most recent day of This Month.
The current month does not have data beyond the 14th, so our formula does not capture data for any day beyond the 14th.
We now have a calculated field that can be used to create an accurate comparison of our current month’s performance versus the previous month’s performance on a completely equal scale!
From here, you can get much more complex in how you use this information as well as how you visualize it, but that gets into tedious specifics. I hope this gives you a starting point from which you can build valuable month-on-month comparisons!

