Tableau 9.2 has many great features, but one of my favorite is Mapbox integration. For years, we’ve been able to build maps in Tableau, but we’ve been limited to a default set of maps. Now, with Mapbox, you can build beautiful, exciting maps for your audience with little extra effort.
With built in Tableau integration, using Mapbox maps couldn’t be easier! First, go to Mapbox.com and signup for an account. Mapbox offers free accounts, but also has a paid model if you plan on getting a lot of traffic. If you would like to use one of their preset maps, all you need now is your access token (located in the middle right column on your profile).
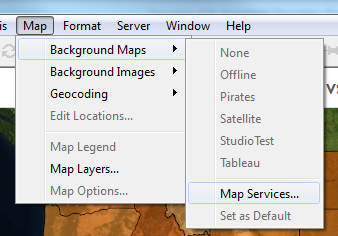
In Tableau, go to Maps -> Background Maps -> Map Services to add a Mapbox map. On the Map Services page, click Add and select Mapbox Maps.

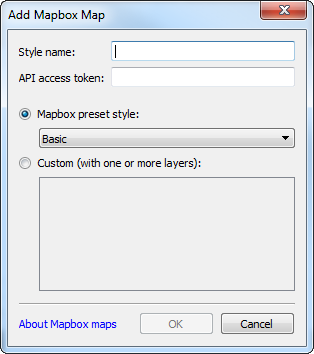
Copy/paste your access token into the API Access Token area. You can put whatever you’d like in Style name. This is for reference in Tableau only and does not need to match up with anything on the Mapbox side.
At this point, you can choose from one of the preset styles, or a custom style if you have created one:

After selecting your map, simply go back to the Map -> Background Maps drop-down to select your new map style.
Advanced Options
If the standard preset maps do not offer you enough options, you can use Mapbox Studio Classic to create new maps for use in Tableau. The non-Classic studio version does not work with Tableau out of the box, so for now, we will need to use the Classic version.
Once maps are published to your account using Studio Classic, they can be added using the Custom area of the Add Mapbox Map window.
The Map ID required to select the correct Map is available in the Settings tab of Mapbox after uploading your map to Mapbox’s server.
It is that easy! With a few simple steps, you can create and utilize beautiful maps in Tableau, too!

