
This blog post is AI-Assisted Content: Written by humans with a helping hand.
Implementation tricks and practical advice for restricting rows and protecting columns with user attributes.
The first part of this series covered the fundamentals: What row-level security (RLS) and column-level security (CLS) are in Sigma, where each one is configured, and how a basic rule is written. This second part picks up where that left off and deals with what you run into once the basics are in place:
- Advanced RLS formulas
- The CLS union behavior
- User attributes
- Embedded workbooks
Pushing RLS Further with Dynamic Values
Formulas that Resolve Per User
Unlike Tableau, Sigma lets you assign the values that enforce RLS dynamically. Thanks to that flexibility, Sigma supports more advanced constructions, as long as the formula returns a Boolean result. Some examples that worked on my tests are the following:
Contains(CurrentUserAttributeText("City-Test"), [City])
Useful when a single user attribute holds several values as a comma-separated string, for example, an attribute like “Dallas, Austin, Houston”, rather than just one. Instead of an exact match, Contains() checks whether the row’s City value appears anywhere inside that string. So a user whose City-Test attribute lists multiple cities sees every row whose City matches any one of them, not just rows matching a single value.
Lower(SplitPart(CurrentUserEmail(), "@", 2)) = Lower(SplitPart([Email], "@", 2))
This variant matches on email domain rather than the full address, which is handy when you want to scope access by organization rather than by individual.
Enforcing RLS Inside Custom SQL
If your table is built from a custom SQL query rather than a no-code data model, you can enforce RLS directly in the WHERE clause. The #formula directive is what makes this possible: Wrapped in double curly braces as {{#formula …}}, it lets you drop a Sigma function, including system functions like CurrentUserEmail() and CurrentUserAttributeText(), straight into a raw SQL statement, and Sigma evaluates it before the query runs. Each {{#formula …}} block resolves to a single value, so you need one block per value you want to inject.
select * from EXAMPLES.COLD_PROVISIONS.EMPLOYEES WHERE EMAIL <> {{#formula CurrentUserEmail()}} and {{#formula CurrentUserAttributeText('City-Test')}} LIKE '%' || CITY || '%'
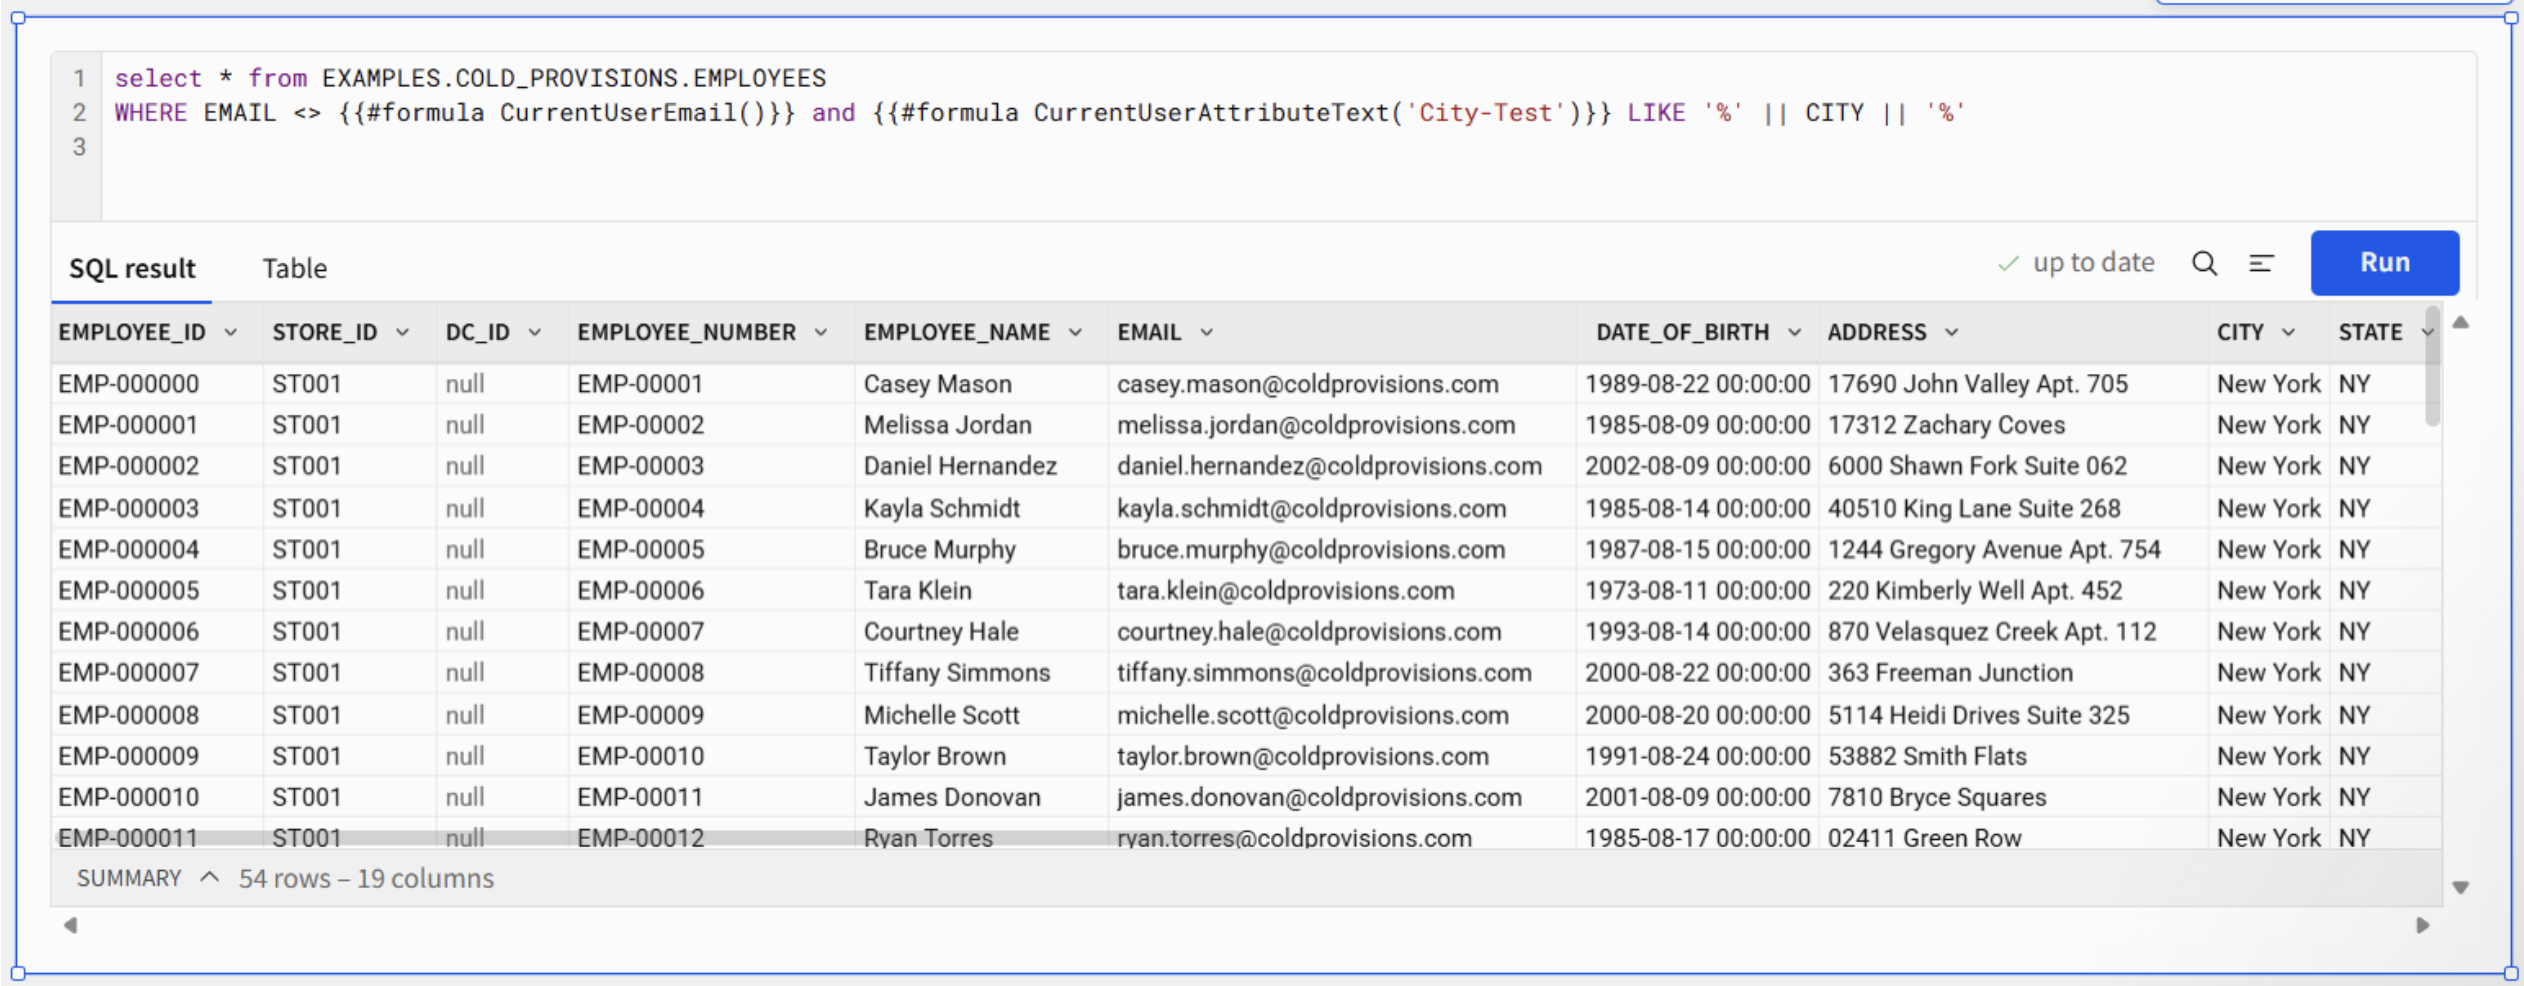
Above: Example of the implementation of RLS in a table using custom SQL. Note that it is possible to call different formulas at the same time to enforce the RLS rule.
How CLS Rules Combine: The Grant Always Wins
This is the single most important, and most commonly misunderstood, behavior in CLS: When multiple rules apply to the same user and column, Sigma evaluates them as a union. If any rule grants access, that user can see the column, even if another rule would have denied it.
Example: A “No one can view” rule and a “Financial Leadership team can view” rule both apply to the same column. The members of Financial Leadership can still view it. There is no way to layer a “deny” rule on top of a “grant” rule for the same user; the grant always wins.
This “grant-always-wins” pattern isn’t unique to CLS, it governs access across Sigma: Folder/document access is additive (the highest grant always applies, and can’t be downgraded by a weaker one), and data/connection permissions work the same way, applying cumulatively so the most permissive grant wins.
This is the opposite of how RLS behaves: RLS has no automatic union or intersection; you decide that yourself with or/and inside a single formula. With CLS, the union is automatic and cannot be overridden, which means the only reliable way to restrict a column is to make sure no rule anywhere grants that user access to it. When auditing CLS, check every rule that touches a column, not just the one you just added.
Creating User Attributes, and Using Them Well
User attributes are named values assigned to individual users or teams that Sigma evaluates at query time to determine what data a user can access or how their experience is customized.
Each attribute has:
- A name, the unique identifier you reference in formulas. Per Sigma support, the User attribute name field has a limit of 255 characters, though this isn’t stated in the public documentation.
- An optional description
- An optional default value used when no value is explicitly assigned.
As of the publication date of this post, the recommended practice is to assign a default value to the attribute as soon as it is created. That default value then applies to all existing users, unless a different value is explicitly assigned to specific users or teams. Attribute values assigned directly to users override values assigned to teams.
With the user attribute defined, we can assign it a value and apply it to a selection of users as needed.
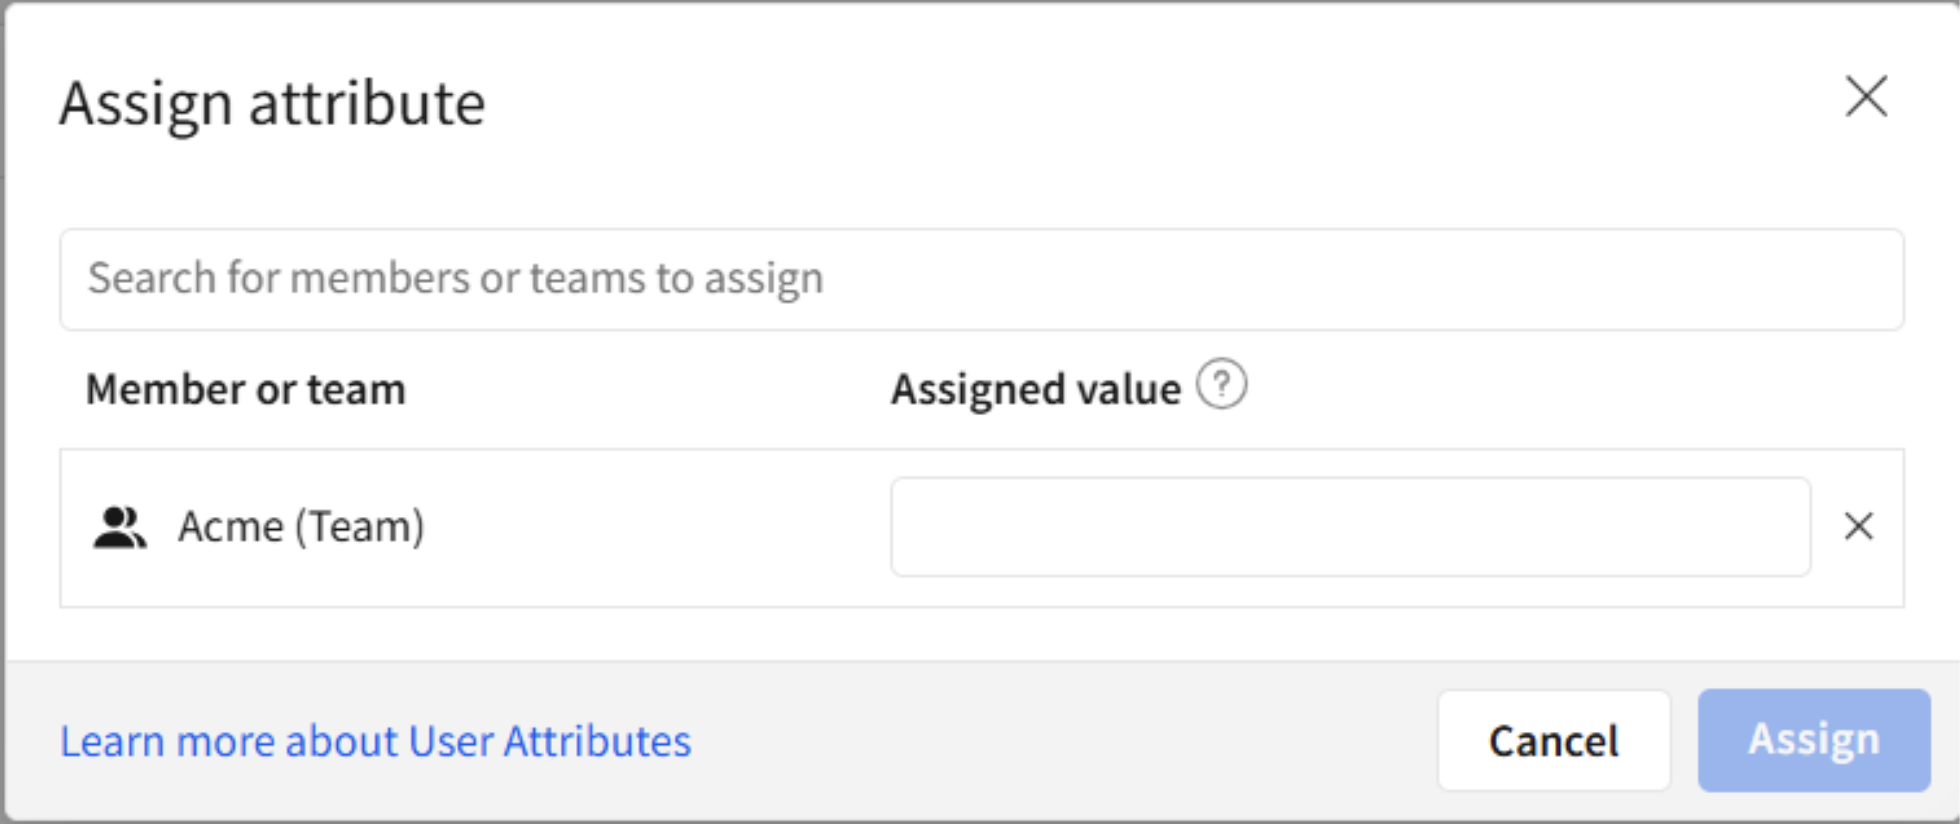
Above: Dialog box to assign an attribute with a specific value for a team or user.
Think about user attributes as environment variables that can be assigned to users and groups in Sigma. These variables also have no limit on the length of the value they hold, so you can store long strings. For example, a comma-separated list of cities: “Dallas,Portland,New York,Miami” which you can then parse and process with Sigma formulas at the cell level.
Attribute Creation using API Calls
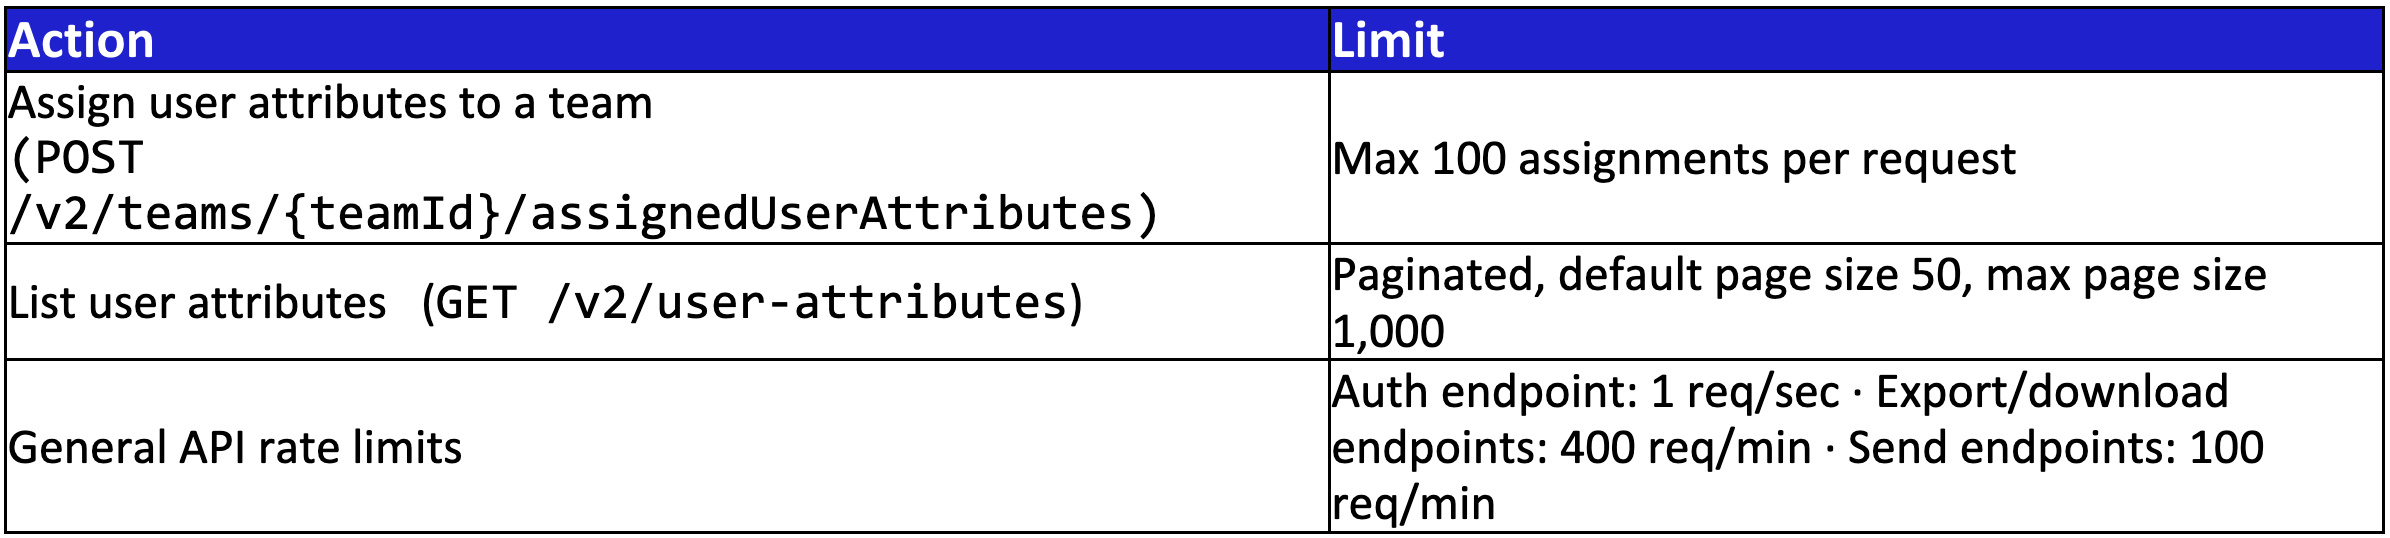
That said, there’s one place limits do apply: If you’re creating or assigning attributes programmatically through Sigma’s API rather than by hand in the Administration portal, a few hard limits kick in. Assigning attributes to a team is capped at 100 assignments per API request, so bulk rollouts across many teams need to be batched. Listing existing attributes is paginated, with a default page size of 50 and a maximum of 1,000. And like any Sigma API call, attribute-related requests are subject to the platform’s general rate limits (for example, the authentication endpoint is limited to one request per second). None of this affects how attributes behave once they’re set, it only matters if your team is automating attribute management at scale.
Important Remarks About Using User Attributes for RLS and CLS
The advantage here is that these values are stored in the Administration portal, not in the workbook. For that reason, they are accessible from any workbook, but only accounts with “Manage user attributes” permissions enabled can create or manage user attributes through the Administration portal. One way around this is that user attributes can also be created and assigned programmatically through the Sigma REST API.
There is no maximum number of attributes we can create and assign to users. However, Alpha Queries fetches a page of user attributes 25 at a time. In practice this means that your workbook could fail to read some user attributes if at a certain moment you surpass that number. In reality, I don’t think anyone will ever need to read more than 25 user attributes at once!
Finally, remember that both the attribute name and its values are case sensitive. Overlooking this detail can break the rule in the data model or its use downstream in a workbook.
RLS and CLS in Embedded Analytics
In a normal Sigma session, Sigma looks up a user’s teams and attribute values in the Administration portal, because that person already has an account there. An embed has no Sigma login to look those values up from, so the host application has to state who the viewer is itself. That statement travels inside the signed JSON Web Token (JWT), in the form of claims.
Claims for Identity, URL Parameters for Convenience
JWTs offer a secure way to embed content that can be accessed by both external users (users who do not have a registered account in Sigma) and internal users (users who access Sigma directly through their Sigma account). There are two distinct ways to pass information into an embed, and only one of them is appropriate for security.

Because URL parameters are unsigned, they must never be used to enforce RLS or CLS; a user could simply edit the URL to grant themselves broader access. See Embed URL parameters for the full list of supported (non-security) parameters, and Set control values in a URL for pre-populating filters as a convenience. For that reason, user attributes are the recommended way to implement RLS and CLS in embedded workbooks.
What Sigma does with that statement depends on whether it recognizes the person. The email in the sub claim is the deciding factor: If it matches an existing Sigma account, Sigma just uses that account’s stored teams and attributes, the same as any normal login. If the email is new, Sigma provisions a lightweight account for that person on the spot, using whatever the token says, this is what makes embeds work without any manual setup per viewer, and it’s also why the claims matter so much: For a first-time embed user, the token isn’t just describing their access, it’s creating their identity in Sigma.
The Relevant JWT Claims
Every secure embed token already carries two required claims: Sub, the user’s email address, and exp, the token’s expiration. Two further claims are optional, and they are the ones that matter for security:
- teams: the Sigma teams the embed user belongs to, passed as a JSON array. This is what CurrentUserInTeam() and any team-based CLS rule read.
- user_attributes: a set of key-value pairs, one entry per attribute. This is what CurrentUserAttributeText() reads.
A payload fragment carrying both claims looks like this:
"teams": ["Customer ABC", "Sales Manager"],
"user_attributes": {
    "Region": "West",
    "CustomerID": "12345",
    "Role": "Analyst"
}
There is no fixed maximum number of entries in the user_attributes claim; it accepts as many key-value pairs as your JSON contains. The keys must match the user attribute names defined in Sigma exactly, because both attribute names and their values are case-sensitive, even a casing difference is treated as a different attribute.
Two Details that are Easy to Get Wrong
The claims should be sent only for embed users who don’t already have a Sigma account. If the subject id (sub) matches an existing internal user, Sigma ignores teams, user_attributes, and account_type entirely and falls back to that account’s own stored values. Including them for an internal user doesn’t do anything useful, but it does create ambiguity about which identity the token is meant to describe, so the embedding application’s token-generation logic should omit these three claims whenever the viewer is a known internal Sigma user.
The claims must be generated per-user, not per-session. Sigma’s documentation is explicit on this: the claims describe who the user is, not what one particular session is allowed to see. Concretely, the same person should never receive a token carrying “Region”: “West” on one visit and “Region”: “East” on another. The values need to be identical every time that user loads the embed.
This works the same way for both internal and external users, but the source of truth differs. For internal Sigma users, the attribute lives in Sigma’s Administration portal (or is synced from your IdP), an admin updates it there, and the new value applies the next time that person logs in.
For embed users, Sigma has no independent record at all; the value lives in your host application’s own user database, and the fix is to update it there. Your backend will pick up the new value automatically the next time it mints a token for that person, and every session afterward will reflect it consistently.
In practice, this plays out as a one-time setup followed by fully automated repetition: A developer writes the token-signing logic once, using a single client secret generated once for the application. From that point on, the embedding application’s server mints a freshly-signed token every time a user logs in, one shared secret, one new token per person per session, with no manual step in between.
From the data model’s point of view, none of this is visible: CurrentUserAttributeText() resolves the same way whether the value came from the Administration portal or from a JWT claim. The full list of claims is in Sigma’s JSON web token claims reference.
Wrapping Up
What makes this approach worth the setup effort is how little of it you have to repeat. A rule written once in the data model travels with the data into every workbook built on top of it, and because it resolves at query time, one workbook can serve dozens of audiences without a copy per team. Onboarding a new customer, region, or department becomes a value assigned in the Administration portal rather than a new asset to build and maintain.
The embed story is the same story. Because the data model never asks where an identity came from, the security you designed for internal users carries over to external ones at no extra cost, which leaves you with one model to reason about instead of two. That is the real advantage: security stops being something you rebuild for every new use case and becomes something you configure once and then stop thinking about.
Getting there is the fun part, at least for me.
Related
