
This blog post is Human-Centered Content: Written by humans for humans.
Many Sigma users start by creating a new workbook and pulling in warehouse tables as their data source. This often means doing extra prep work, joining tables, renaming columns or building aggregations, all within each workbook. That logic stays locked in the workbook, making it non-reusable and leading to repeated work and inconsistent reporting.
Data models solve this by letting you define your data transformations and business logic in one central place. You can then reuse these models across Sigma, eliminating redundancy and ensuring consistent, trusted metrics. The idea behind their conception is to streamline model creation, enabling data teams to work quickly without the burden of complex code, while still delivering governed analytics to stakeholders. Data teams can build data models in Sigma to give business users access to well-structured, controlled data sources, streamlining analysis and making it easier to generate insights.
Intended Audience
This post is put together for any user looking to create reusable, governed datasets for analysis can benefit from using Data Models. Whether you need to visually join and enrich warehouse tables without writing SQL, or you’re responsible for delivering consistent metrics to business stakeholders, Data Models offer a single, streamlined solution. This includes data analysts and analytics engineers who handle data modeling, curation or transformation within Sigma.
However, to access and use Data Model features in Sigma, users must have an account type with the appropriate permissions, specifically, the ability to create, edit, and publish datasets and data models. For further information we suggest to visit the section Create and Manage Account Types in Sigma’s public documentation available here.
Initial Steps
The overall experience for a typical Sigma user is essentially the same, whether they’re building a workbook or a data model. This is possible because the data modeling pages look and behave like the workbook’s development environment.
To start with the creation of the data model, the steps, in practice, remain the same as for the workbook. The users must go to Sigma homepage and click Create New > Data Model, and then start adding data tables.
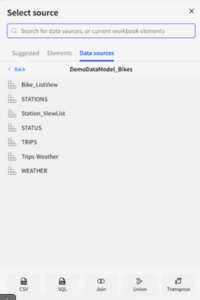
Figure 1: To add tables to the data model the options are the same as in the workbooks.
Once a table is selected, three groups of configuration settings appear in the panel on the right side of the screen. Two of these are largely like their counterparts in workbooks. The properties tab allows you to configure the data source and define how columns are grouped and displayed. The format tab controls cosmetic settings, such as font size, colors, content alignment, headers and titles.
However, unlike tables in workbooks, tables in data models include a third, specialized set of tools found in the modeling tab. This tab provides options for source visibility, defining relationships, setting up metrics, managing column-level security and configuring materialization.

Figure 2: Table configurations options available in data models. Under the modeling tab, it is possible to tweak visibility, relationships, metrics, column-level security and materializations. These are tools not present in workbooks.
Data Visibility and Security
Firstly, there is a switch for controlling the visibility of the table. This is one of the first characteristics that distinguish data modeling in Sigma. We can decide which fields or tables are available to the end users when the data model is published. One option is to use the switch displayed above which hides the whole table to be used as a source. Despite this, its data can be read from any other published table that pulls information from it via a join, a union or any child object.
Alternatively, we can decide to hide certain columns because they are not necessarily useful for the primary use of the table, but still, they store valuable data that could be necessary in the future. In this situation, we can opt for just hiding the column. In practice, the calculated fields that use the specific column will still be functional, but users can’t read or use hidden fields unless they add it back as a source column. To hide a column just right click over it and pick hide column from the context menu
An utterly different option is the column-level security (CLS) setting that appears in the configuration panel. Here, we are deciding on the username or team that will get access to the field. Keep in mind that the ultimate purpose of the data models is to enable data sharing and reutilization thus security tier control to ensure sensitive information is accessible only to authorized users becomes paramount.
Setting up CLS in data models ensures consistent security policies across all downstream analyses and workbooks. Any updates to CLS rules in the data model are automatically applied to all elements that reference it.
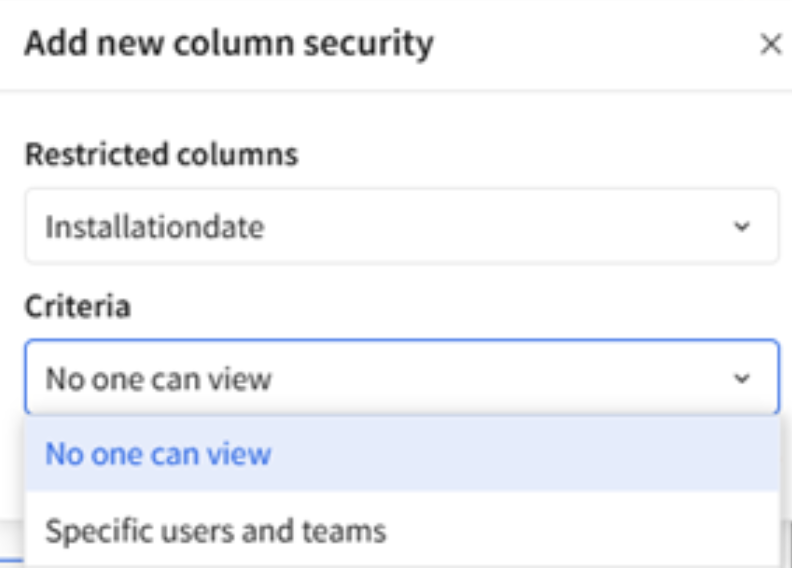
Figure 3: To the date when this blog is published, under the column security options we can choose from two alternatives. Either no one can view, or specific users and teams can view.
There are some best practices that are suggested by the Sigma when it comes to applying column-level security.
- Column-Level Security (CLS) policies are passed on from parent to child elements. To ensure consistent protection across all downstream elements, it’s best to apply CLS at the root or original parent element.
- Applying CLS rules at the team level is more efficient and scalable than setting them per user. New team members will automatically inherit appropriate security policies.
- Periodically review and update CLS settings to keep them aligned with organizational changes and compliance requirements.
Table Relationships
Data models serve as a starting point for Sigma builders to explore and analyze data. Predefined relationships simplify the access to extra fields that are related to the entity published so users don’t have to interact directly with raw warehouse tables or views. This allows builders to work more quickly and efficiently by reusing established modeling logic instead of building everything from the ground up.
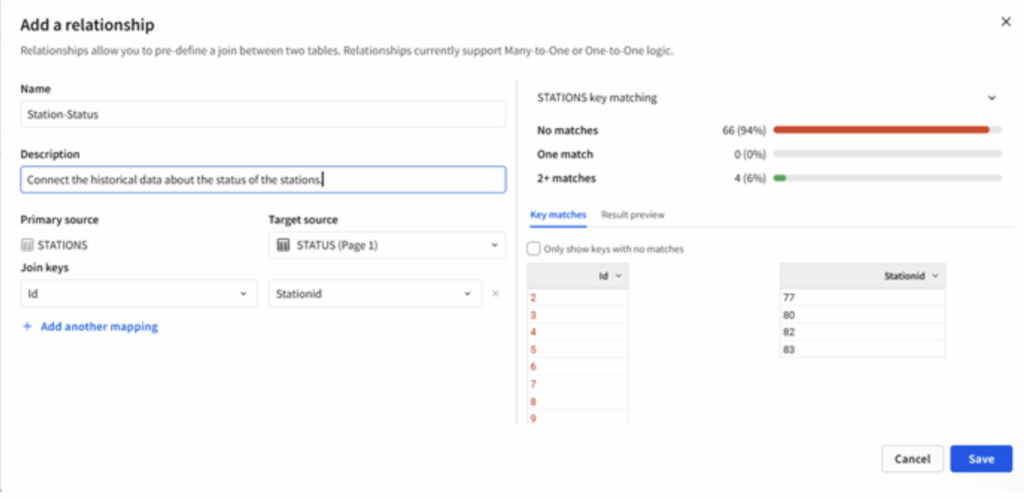
Figure 4: Menu for setting up relationships between entities. Note the information displayed on the right-hand side of the screen. Sigma provides developers with extra visual information to understand the level of matching in the datasets.
There is a caveat here: Relationships in Sigma are directional and only support many-to-one or one-to-one joins, which means every row in the source table must have only one possible result in the target table.
For the end user, using a table with defined relationships means they can access additional source columns that would otherwise be unavailable. It doesn’t matter if the related tables are visible as sources or not, if a relationship with the main table exists, the user is allowed to pull in those columns because the relationship makes it possible.
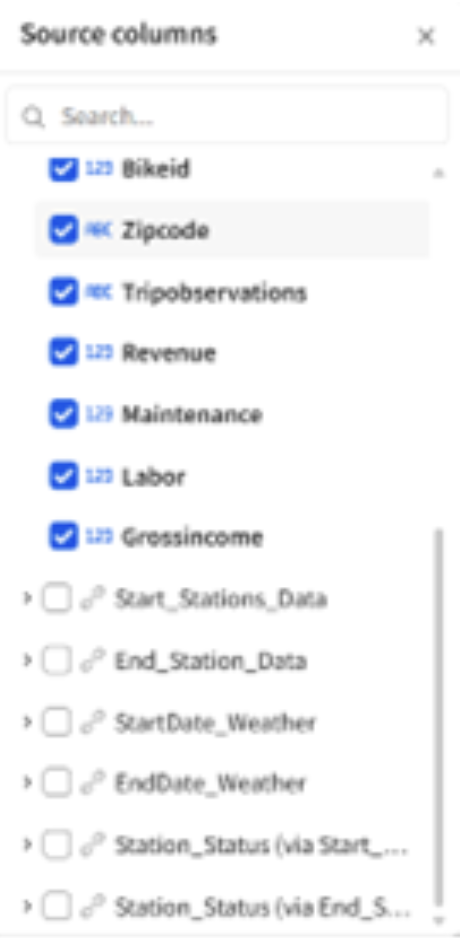
Figure 5: The person using the data model can get access to the columns in other related tables directly from the add source column option.
Should I use a Metric or a Calculated Column?
Metrics are flexible, reusable calculations tied to a specific data source and its columns. They return aggregated results and can be applied across any grouping level within that source. Because metrics are defined at the data source level, they can be reused across multiple elements that reference the same data model, dataset or database table.
Calculated columns, on the other hand, are fixed and tied directly to the individual data element (like a table or model) where they’re created. These columns compute values for each row (unaggregated) or at a specific, static level of grouping. Their logic is locked to the element and isn’t automatically shared elsewhere.
If you need to update a calculated column’s logic, you’ll have to manually modify it in every element where it’s used. With metrics, you only need to update the definition once at the source level, and the change will apply across all elements that use that metric.
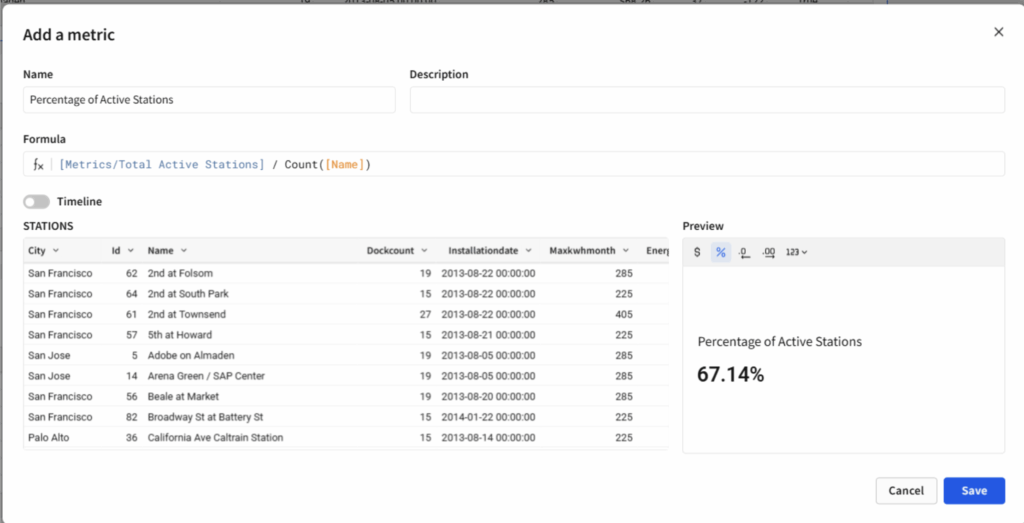
Figure 6: Screenshot of a model window to create or edit metrics. Sigma incorporates the feature of presenting the metrics as KPI in the data model main window hence there is an option to format its presentation and to display a timeline with the behavior of the metric along time. Particularly interesting is that metrics can be called inside other metrics like regular calculated fields.
Metrics operate within specific constraints that are important to understand.
- Metrics don’t automatically pass through joins, unions or to child elements that are built on a specific grouping level rather than all source columns. If you want a metric to be available in a child element of a joined table, you’ll need to define it on the output of that join.
- Metrics are also limited to a single data source. If the same calculation is needed across different data sources or throughout your organization, you’ll have to define the metric separately in each relevant data model, dataset or database table. This means also that if you create a dataset from another dataset or a database table that contains metrics, those metrics won’t carry over automatically. You’ll need to recreate them manually in the new dataset.
- There are some formula limitations as well, metrics don’t support window functions or join functions.
- Metrics can’t be referenced directly in dynamic text. To include a metric value in dynamic text, you’ll need to first create a calculated column that references the metric, and then use that column in your text formula.
All in all, metrics define business logic at the aggregation level, making them ideal for KPIs and executive dashboards. They promote consistency by standardizing calculations across the organization and automatically apply to any workbook using the data model. With metrics, grouping and aggregation are handled centrally, eliminating the need to manage them separately in each element.
Data Caching: Materializations
The core idea of improving performance by storing pre-computed data, commonly known as caching, has existed for decades, evolving through various optimizations over time. Materialization is one form of caching, where query results are stored in a table within the data warehouse and refreshed periodically, typically on a daily schedule. By accessing this pre-aggregated or pre-calculated data, queries run significantly faster than if the results were recalculated with each execution. This option to be enabled needs to be configured by the system administrator because materializations are stored in a separate data warehouse that is dedicated to these purposes.
If you are interested in digging deeper into materializations in Sigma, its advantages and how to set up the system ready, I suggest you give a read to the materials available in Sigma’s Documentation website where the topic is covered more in depth. However, we are covering the topic here because the data models interface shares a link to enable the user to very straightforwardly set up a materialization schedule for the tables included in his model.
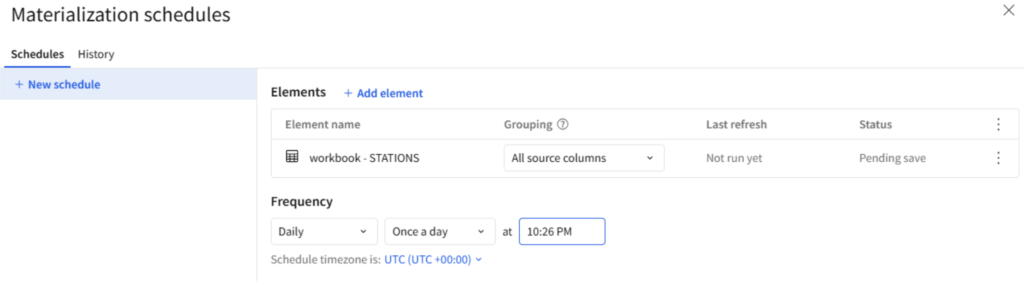
Figure 7: The interface for materializations in data models.
Again, like in the case of metrics, there are some practical limits when it comes to using materialization with data models. When you add, modify or delete a metric in a data model that is materialized, or has materialized child elements, the changes won’t take effect until a new materialization job runs. However, the updated materialized data can be used immediately if the new or modified metric only uses columns that are already referenced by existing metrics, and it doesn’t introduce any new column references.
Publishing and Sharing the Data Model
One final and mandatory stage we need to cover in this blog is the process of putting the model in production to be used in downstream applications and workbooks. However, before publishing the model, it is highly useful to share additional context and information about the data to make it more understandable, trustworthy and actionable. This is especially for users who may not be familiar with the underlying data sources or logic. Context helps users interpret visualizations correctly, understand the meaning behind metrics, and avoid misinformed decisions. Besides, the AI-powered natural language query (NLQ) interface Ask Sigma uses that very information as another input data to answer the queries it receives.
In this case, Sigma offers two features that help to deliver background data to the end users: The badges and descriptions. Badges can be found by clicking under the document menu, in File > Select badge. When we set a workbook or data model to the ENDORSED state, we are guaranteeing that data model is finished and ready to use. Subsequently, the ENDORSED badge icon will appear before the data model name.

Figure 8. Modal window to set the badge.
Another complementary option is the description of the data model. We can include a custom description for your data model that appears in various places, such as the overview section and as a tooltip when hovering over the model’s name in the document menu. This explanation can serve multiple purposes: Outlining recommended usage steps, sharing best practices, adding searchable metadata, identifying the model’s authors or contacts, and offering additional context to help users understand and work with the model more effectively. To write the description, click on the menu option “About this data model.”
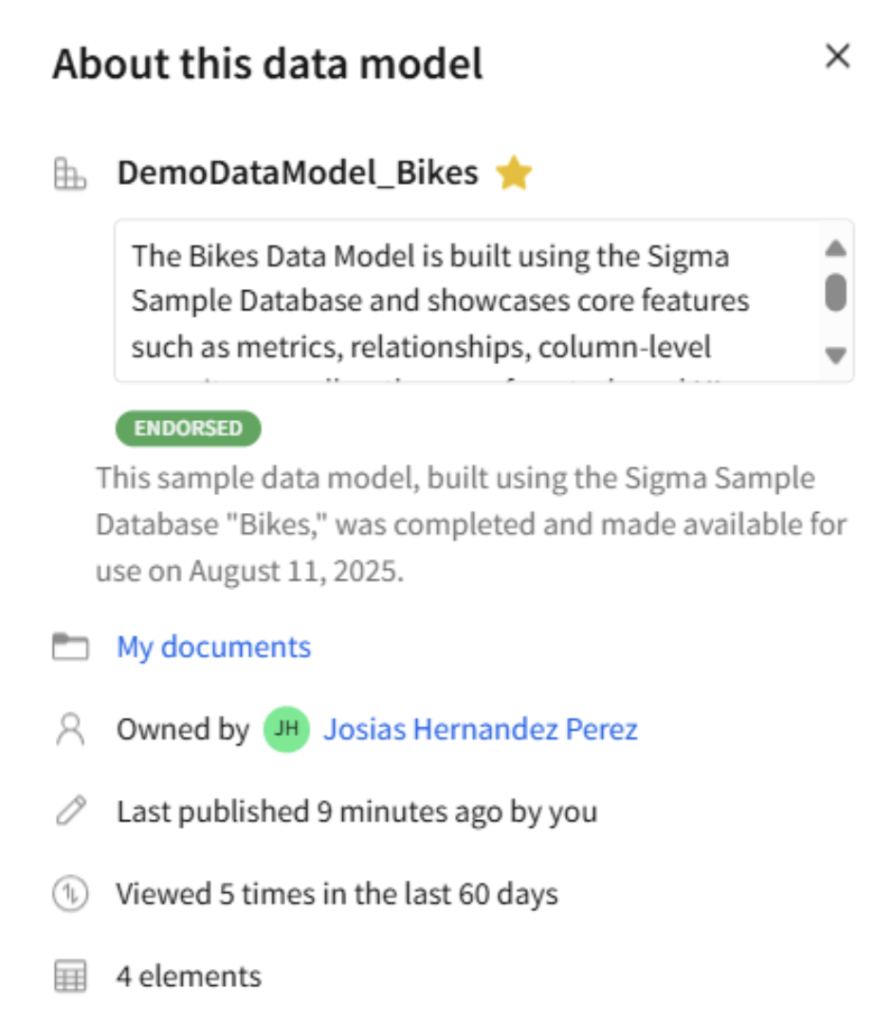
Figure 9: Modal window to set the description.
I personally found it very nice that, once the data model is published, the end user can get a quite comprehensive depiction and understanding about the data source he/she is getting access to. I am pretty sure that many of us have come across projects that are poorly documented and have to pace back and forth across our office, trying to guess the meaning of the columns and the calculations. It’s a nightmare for any developer.
That is why this next feature is one of the clearest signs that Sigma was designed by developers, for developers. Check the published version of our sample data model below. The visualization you see is called the data model overview page and it provides details about each reusable element in the data model for improved data visibility and management.
From there, we can get an overall idea of the tables included, their columns, what the metrics for each table are, who is the owner of the model, location, relative time stamp of the last update and number of reusable elements the model contains.
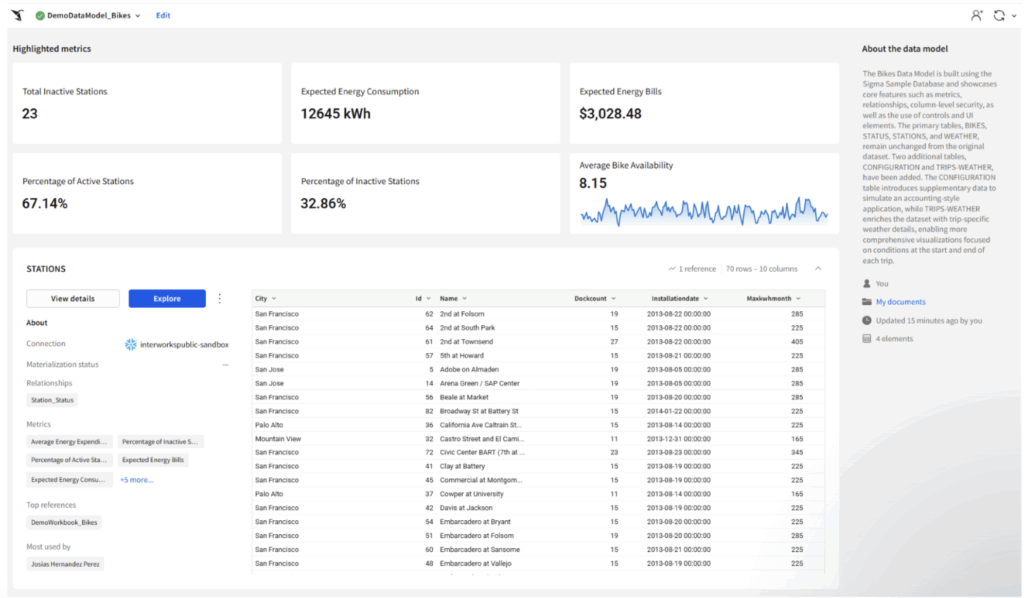
Figure 10: Picture of the published data model. The interface aims to convey the users with a friendly summary of the data available and the main metrics. By default, only six metrics can be displayed at a time.
If you click on the button, “View Details” that sits beside “Explore,” it opens a modal window containing system-generated insights about the data structure, quality, distribution and lineage for the reusable element. Here, a few main tabs standout: columns, metrics, controls, and lineage.
The columns tab provides key structural details, such as column names, data types, formats and descriptions, alongside descriptive statistics that offer insights into data quality, distribution and variability. Controls help to understand how the data has been filtered within the data model and lineage helps to identify where the data originates so as where it is used. I liked the metrics tab a lot because in a very single place it explains all the metrics by name, their formulas, the description and even to explore their timeline, if it is available. Isn’t it great?
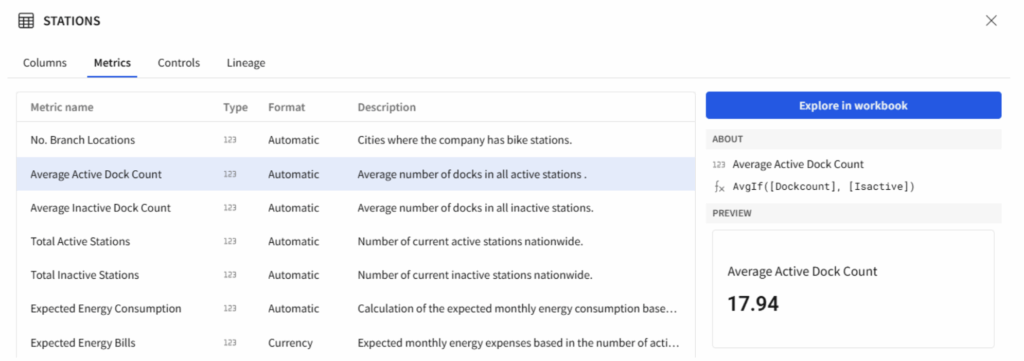
Figure 11: Sample of the content displayed on the metrics tab.
The final step is to grant access and share the dataset with users. To do this, click the document name in the data model header to open the document menu, then select Share. The sharing window allows you to give access only to users within your organization, either individually or by team, not to the public or anonymous users. Permissions are limited to either view or edit, and you can include a custom message in the email notification sent to recipients.
Practical Testing Highlights
There are some interesting facts I got from the process of testing the features mentioned in this post that I think are worth mentioning.
First, the element bar that is available for workbooks appears in the same position for the data models. This allows us to insert controls in the data model for data filtering purposes, but they are not displayed once the model is published except for the exclusions (or inclusions) they perform which do affect the data set that the final users get. The same happens with the UI controls like images, texts and dividers. You can use them extensively in the data model but for aesthetic/informational purposes that are visible only for the data model’s owner.
Figure 12. Screenshot displaying the data model from the developer’s perspective. The UI and data filtering controls are available only for developers to enhance the view and filter the data. The final user of the data model does not have any power to change that unless he/she is granted with the appropriate permissions.
Second, there is no limitation in the type of tables users can create in data models, but not all table types are published alike and hence accessible for the end users. I am specifically referring to the input tables, either the linked or the blank ones.
Through my exploration of Sigma, when I realized that input tables were available to insert them in my data model my idea was to create a semantic layer that could not only ease the process of displaying reports but also collecting data. For my surprise everything worked very well in the development stage, but there was no way to make the input tables receive new rows or update the current ones once they were published and tested in a workbook.
Wrapping up my Experience with Sigma’s Data Models
Sigma’s data modeling is designed to be fast and intuitive, allowing data teams to build models without dealing with complex code or extra overhead, so they can deliver governed analytics quickly. Business users don’t need to worry about how the data is structured behind the scenes. They can focus on analysis and even contribute to the data model directly through Sigma’s user-friendly interface. In my experience testing these features, building data models remains as a seamless experience with no major intricacies given the simplicity of the user interface.
Key takeaways here to keep in mind: On the one hand, the metrics centralize business logic by defining consistent calculations ensuring accuracy across dashboards and reducing duplication. Materializations, on the other hand, improve performance by precomputing and storing query results, which speeds up load times and reduces strain on the data warehouse. Third, column-level security enhances governance by restricting access to sensitive fields based on user roles, allowing organizations to maintain compliance and protect confidential data while still enabling broad data exploration. Finally, relationships offer a powerful way to connect datasets without writing SQL, enabling more intuitive and scalable analytics. Together, these features empower teams to build robust, efficient and secure BI solutions.
I hope this blog inspires you to start exploring Sigma’s data modeling features. If you’re thinking about building your semantic layer projects in Sigma, don’t hesitate to reach out — we’d be happy to help you get started.