
Row Access Policies are a convenient way to apply row-level security to multiple tables or views in one go. You simply create one policy and can apply that to as many objects as you like. Best of all, if you need to make adjustments, you only need to make them in one place.
Row-Level Security
But first, a quick introduction to Row-level Security (RLS). In RLS, you grant access to specific records according to previously defined restrictions. These restrictions either depend on a Context Function or a Condition Expression Function.
- Context Functions are provided by Snowflake and give access to the context in which the statement is executed. A popular function to use for RLS is IS_ROLE_IN_SESSION(). This is returning the active role in the current session and is used to restrict access based on the role with which the user is querying the table.
- Condition Expression Functions like CASE() are based on logical operations and are usually combined with a mapping table which provides details about the access restrictions.
The result of these functions is a BOOLEAN value, where TRUE simply means “show this row” and FALSE “do NOT show this row.” One common use-case is the restricted access based on regional data, which I will show in my example below.
Privileges and How to Manage Access Policies
There are three privileges to be aware of when working with row access policies:
- CREATE a new row access policy.
- APPLY, enables a role to add and drop policies to a table or view.
- OWNERSHIP. Only one role can hold this privilege. It grants full control over the policy and is required to alter most properties of a row access policy.
A combination of privileges might be necessary to add policies. The APPLY privilege, for example, can only be executed by a role which also holds the OWNERSHIP of the database object to be secured, unless it is granted on the account level. For more detailed information, please refer to the Snowflake documentation on Row access policy DDL.
To manage access policies, there are several governance approaches with which the responsibilities can be divided between teams to support segregation of duties. The following table outlines the change in responsibilities for a centralized, hybrid or decentralized governance architecture.
| Centralized | Hybrid | Decentralized | |
| Create policies | Governance team | Governance team |
Developer team
|
| Apply policies to columns | Governance team | Developer team | Developer team |
How to Implement Basic Row Access Policy
Now I will give you an example on how to create and apply a row access policy. This policy is based on a combination of the above mentioned context and conditional expression functions and is depending on the role and a mapping table. As mentioned above this policy will manage access based on regional information.
Step 1: Grant Privileges
First, we need to make sure the necessary privileges are in place. For a centralized approach, all is handled by the governance team. For the hybrid approach, this will be divided between the governance and the developer team. The code examples will show both approaches:
-- a governance role will have the ability to create row access policies
USE ROLE securityadmin;
GRANT CREATE ROW ACCESS POLICY ON SCHEMA <schema_name> TO ROLE <governance_role>;
-- for a centralized approach:
-- a governance role will also have the ability to apply a policy
GRANT APPLY ROW ACCESS POLICY ON ACCOUNT TO ROLE <governance_role>;
Step 2: Create a Mapping Table
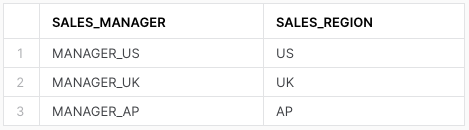
We then need a mapping table to define which role can see which data records. For this example, we will provide data for three regional managers who will only be able to see records from their respective regions.
-- create a mapping table
CREATE TABLE sales_manager_regions (
  sales_manager varchar,
  sales_region varchar
);
Step 3: Create the Row Access Policy
Now to the main part: creating the policy. This is done by the governance team. Access is granted based on sales manager regions by referencing to a mapping table and the currently used role. In other words, if the sales manager for region US is selecting from the table, they only get the rows from region US and cannot see any other regions.
In line 5, we provide the signature and return value of the policy. The signature contains one or more attributes that must be considered to determine whether the row is accessible or not. These are the columns to which the policy will be attached to in the next step. Since we can attach the policy to multiple tables or views, the name of the attribute can differ from the column name, but the datatype has to match. The return value will always be BOOLEAN as this is the above mentioned equivalent to TRUE “show this row” and FALSE “do NOT show this row.”
Starting in line 6, we have the CASE statement which provides the functionality of the policy. Lines 9 and 10 give full access to one specific role. Here the global manager can see all records. From line 13 on, we match the records from the mapping table with the current role and the value of the region column from line 5.
In line 21, we add the default return value with FALSE which is considered a best practice to catch cases where we have no match.
-- create a simple row-level policy using a mapping table
USE <governance_role>
CREATE OR REPLACE ROW ACCESS POLICY <rls_policy_name>
AS (region varchar) RETURNS BOOLEAN ->
CASE

  -- provide full access to the global manager
  WHEN ( IS_ROLE_IN_SESSION('<global_manager_role>'))
  THEN TRUE

  -- provide access based on the mapping of role and region
  WHEN EXISTS (
    SELECT 1 FROM sales_manager_regions
      WHERE IS_ROLE_IN_SESSION(sales_manager)
      AND region LIKE sales_region
    )
  THEN TRUE

  -- always default deny
  ELSE FALSE

END;
Step 4: Apply the Row Access Policy
The last step will be to apply the policy to a table. For the centralized governance approach, this is also handled by the governance team. With the hybrid approach, the developer team which is also the owner of the table will have the privilege to apply the policy. Remember the necessary permissions for this command was either APPLY ROW ACCESS POLICY on the account level or a combination of APPLY for the specific policy and OWNERSHIP of the protected object.
-- for the hybrid governance approach:
-- a developer role will have the ability to apply the policy
GRANT APPLY ON ROW ACCESS POLICY <rls_policy_name> TO ROLE <developer_role>;
-- apply the policy to a table or a view
USE <role_with_enough_privilege>
ALTER TABLE <table_name>
ADD ROW ACCESS POLICY <rls_policy_name> ON (<column_name>);
Step 5: Check the Result
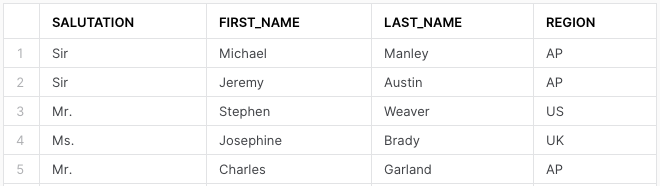
The global manager now has full access to all regions:
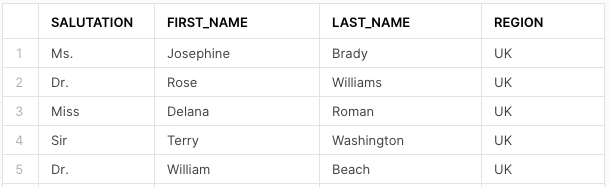
The UK manager for example can only see records from the UK region:
How to Check for Existing Policies
Now, how do we know which policies exist or to which object they are attached?
To check which policies exist in the schema you can simply list them with SHOW ROW ACCESS POLICIES;. You can also add a scope to adjust the search via SHOW ROW ACCESS POLICIES IN DATABASE; or even SHOW ROW ACCESS POLICIES IN ACCOUNT;. But be aware that you will only see policies you have access to, i.e. you have either OWNERSHIP or APPLY privileges to it.
For detailed information about one policy, you can use DESCRIBE ROW ACCESS POLICY <policy_name>; to see the signature and the functionality used. Or query the policy reference table function in the information schema with SELECT * FROM TABLE(<db_name>.INFORMATION_SCHEMA.POLICY_REFERENCES(POLICY_NAME => 'my_policy')); to see where the policy has been attached to. You can also see this in the table or view definition.
To check on a higher level, you can use the Snowflake database with SELECT * FROM SNOWFLAKE.ACCOUNT_USAGE.ROW_ACCESS_POLICIES; to list all row access policies in the account and SELECT * FROM SNOWFLAKE.ACCOUNT_USAGE.POLICY_REFERENCES; to see to which objects they are applied to. For the second query, it might take up to two hours to be visible.
One useful command in this context is the EXECUTE USING query. If you are using the CURRENT_ROLE() in the policy, you can emulate a specific role to test if the policy is working as it should.
EXECUTE USING POLICY_CONTEXT(CURRENT_ROLE => <test_role>) AS SELECT * FROM <table_with_RLS>;
Things to Consider When Working with RLS
- RLS can only be assigned to Tables and Views.
- At Runtime Snowflake creates a dynamic secure view of the database object, applies the RLS policy and shows what evaluates to TRUE.
- RLS is evaluated before column-level security (column masking).
- A given table or view column can be specified in either a row access policy signature or a masking policy signature. In other words, the same column cannot be specified in both a row access policy signature and a masking policy signature at the same time.
To speed up the performance when using row-level policies or RLS in general, you should be aware of the following points:
- Reference as few columns as possible. This produces better runtime as all referenced columns need to be scanned.
- Try to use simple SQL queries. A simple CASE statement may be better than a mapping or lookup table.
- Subqueries in a policy may cause errors.
- Clustering by filter attributes can speed up the performance.
- Statistics like COUNT() or MAX() will be slower on tables with RLS in place.
Wrap Up
I hope this blog post will help you implementing RLS using row access policies. For a more detailed look, please refer to the official Snowflake Documentation:
If you are also interested in column-level security, please check out the recent blog post of my colleague Austin Schwinn. He is describing masking policies, which use a similar approach: Snowflake Masking Policies Demystified.
If you want to learn more or need help with Snowflake or your data pipelines, please reach out to us at InterWorks.