
Fivetran‘s custom connector enables customers to create an ingestion process for data sources that are not currently offered by Fivetran’s service. This is accomplished by creating a function in Amazon Web Services (AWS), Microsoft Azure or Google Cloud Platform (GCP) using a programming language such as Node.js, Python or Java to name a few. The creation of a custom connector can be complex but once it is up and running it is fairly low maintenance. Fivetran handles a lot of the heavy lifting with incremental data updates, data de-duplication, logging and more. The basic architecture of a custom connector is as follows:
- The Fivetran custom connector sends a request to the cloud function.
- The Cloud Function sends a request to the source Application Programming Interface (API).
- The source API sends a response to the Cloud Function.
- The Cloud Function processes the response in preparation for delivery to Fivetran.
- The Cloud Function sends a properly formatted response to Fivetran.
- Fivetran loads the data into the desired destination.
In this post, I will review how to create a custom connector using AWS Lambda. The embedded code examples are also written in Python.
Prior to starting the development process for a Cloud Function, it’s critical to familiarize yourself with the documentation of the API and the potential limitations of your Cloud Function (more on this later). The core pieces of information to look for when reading API documentation are the API Endpoint(s), Authorization, Headers, Parameters and the Request Body. Keep in mind that it may take several endpoints to access the necessary data. After reading through the API’s documentation, you can start development of the Cloud Function in VS Code, or you can plan how to write your script by leveraging Postman.
A key piece to think through when writing a Cloud Function is how Fivetran’s request is formatted and how the Cloud Function’s response is formatted. Each of these will have to be processed by a different software and it is important to understand how to work with these variables. Fivetran’s request is a JSON object with the following key-value pairs:
- Agent -> A strictly information object that contains the function connector name, the external ID and schema name.
- State -> A JSON object that contains identifiers from the most recent function execution. In essence this is a bookmark that allows Fivetran to easily execute incremental loads. This object cannot be NULL and Fivetran expects an updated state in each response object.
- Secrets -> An optional JSON object that houses API keys or passwords for upstream access. This is more secure than storing the API tokens or passwords in your code since Fivetran automatically encrypts these secrets at rest.
Below is an example request from Fivetran’s custom connector documentation.
{
  "agent": "<function_connector_name>/<external_id>/<schema>",
  "state": {
    "cursor": "2018-01-01T00:00:00Z"
  },
  "secrets": {
    "apiToken": "abcdefghijklmnopqrstuvwxyz_0123456789"
  }
}
An additional piece to consider when setting up your custom connector is what the initial state should be. Fivetran sends and empty state object on the initial sync. If you need to start at a specific point in time, then there will need to be additional logic built into your function that handles the historical data load. Below is a barebones example of how to accomplish this within the Lambda function:
def lambda_handler(req, res):

  # Check to see if the state variable contains data (important for the initial sync)
  # Setup variables that are to be extracted from STATE
  if len(req['state']) == 0:
    state_variable_1 = 'value_1'
    state_variable_2 = 'value_2'
    state_variable_n = 'value_n'
  else:
    state_variable_1 = req['state']['state_variable_1']
    state_variable_2 = req['state']['state_variable_2']
    state_variable_n = req['state']['state_variable_n']
On the flip side, you must setup the Cloud Function’s response so Fivetran can properly process the data load. The Cloud Function’s response is also a JSON object with the following key-value pairs:
- State (mandatory) -> A JSON object that contains the updated state value(s). This piece is mandatory.
- Insert (mandatory) -> Specifies the data to be loaded to the destination. Fivetran automatically infers the data type of each column.
- Delete (optional) -> Specifies the data to be deleted.
- Schema (optional) -> Enables the developer to configure the primary key column(s) for each table. This must be consitent as it enables Fivetran to complete data de-duplication during the loading process. If this is not configured, then Fivetran will append the data in the destination.
- hasMore (mandatory) -> This comes in handy particularly with a Cloud Function housed in AWS Lambda. This Boolean indicator tells Fivetran whether to make a call to ingest more data or not. Fivetran will continue making call if hasMore=True until it receives hasMore=False.
Below is an example response from Fivetran’s custom connector documentation. This variable will be returned by the lambda_handler and processed by Fivetran.
{
    "state": {
        "transaction": "2018-01-02T00:00:00Z",
        "campaign": "2018-01-02T00:00:01Z"
    },
    "insert": {
        "transaction": [
            {"id":1, "amount": 100},
            {"id":2, "amount": 50}
        ],
        "campaign": [
            {"id":101, "name": "Christmas"},
            {"id":102, "name": "New Year"}
        ]
    },
    "delete": {
        "transaction": [
            {"id":3},
            {"id":4}
        ],
        "campaign": [
            {"id":103},
            {"id":104}
        ]
    },
    "schema" : {
        "transaction": {
            "primary_key": ["id"]
        },
        "campaign": {
            "primary_key": ["id"]
        }
    },
    "hasMore" : true
}
Before configuring the connection between Fivetran and your function, I want to take a second to review a key limitation in AWS Lambda and how to negate it. AWS Lambda functions have a strict limit of fifteen minutes execution time. This can be problematic during the historical sync since the application might be making hundreds of thousands to millions of API requests. A workaround for this problem is to add logic into you Cloud Function that returns an updated state along with data to be loaded by Fivetran prior to the AWS Lambda function timing out. This component must be housed in the lambda_handler as it is stateless and is useful when iterating through a massive amount of API request. The logic goes like this:
from datetime import date,  timedelta, datetime

# Variables that store the lambda function start_time & max_time_difference
# AWS Lambda has a 15 min execution limit
# We want to return 'state' of the function to Fivetran before timeout
# This prevents an error & allows Fivetran to pickup where it left off in the function
start_time = datetime.now()
max_time_difference = timedelta(minutes = 1)

current_time = datetime.now()
time_difference = current_time - start_time

if time_difference >= max_time_difference:
    hasMore = True
    break
else:
    # Make your API reques & append the object to a list
NOTE: Keep the max_time_difference value low so you do not have a payload over 6 MB (this is the hard limit for AWS Lambda’s payload size). Also be sure to configure your AWS Lambda timeout to be greater than your max_time_difference.
Once your application is written and functioning, it is time to start configuring the connection between Fivetran and AWS. The process is as follows:
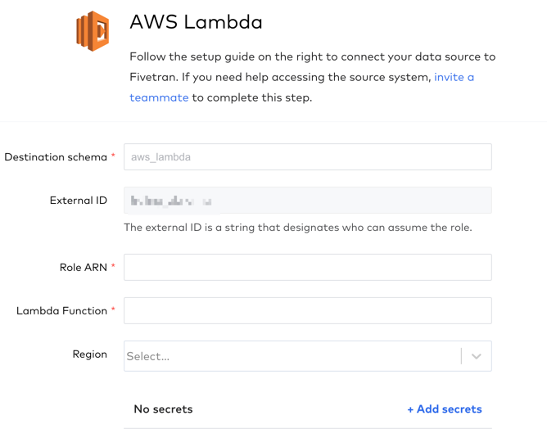
1. Set up a new connector and search for “AWS Lambda.” Select the AWS Lambda option and click Continue Setup.
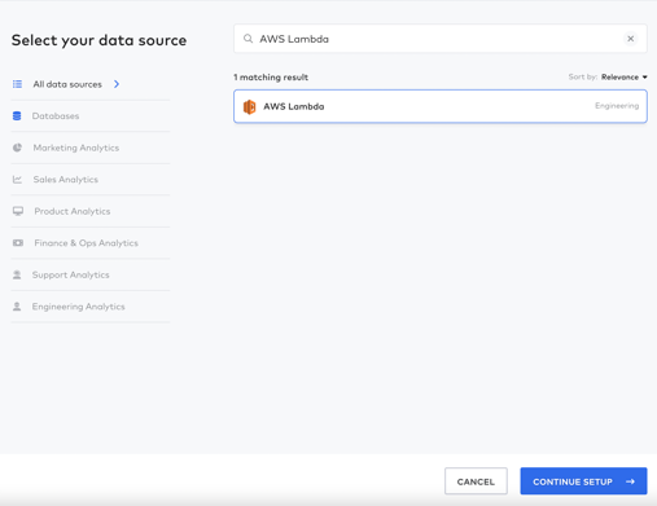
a. Enter the destination schema name. The default value is aws_lambda.
b. Make a note of the External ID. This will be used later to connect Fivetran to AWS.
c. NOTE: You will fill out the Role ARN, Lambda Function, Region, Secrets (if applicable) and Sync Method in a bit.

2. Create an IAM Policy in AWS.
a. Open the Amazon IAM Console.
b. In the left pane under Access management, select Policies.
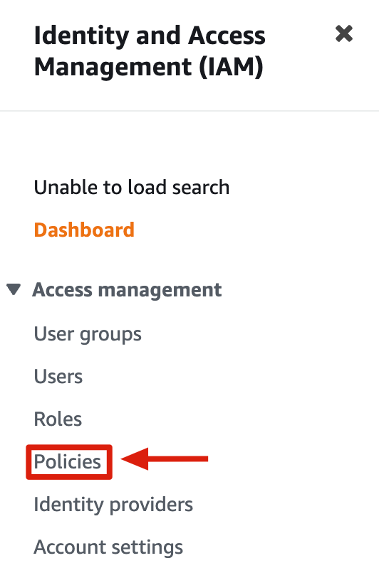
c. Click Create Policy on the left side of the screen.

d. Go to the JSON tab and copy / paste the following policy:
{
   "Version": "2022-07-13",
   "Statement": [
       {
           "Sid": "InvokePermission",
           "Effect": "Allow",
           "Action": "lambda:InvokeFunction",
           "Resource": "*"
       },
       {
           "Sid": "AccessS3bucket",
           "Effect": "Allow",
           "Action": [
               "s3:Put*",
               "s3:Get*",
               "s3:Delete*"
           ],
           "Resource": [
               "arn:aws:s3:::<bucket-name>",
               "arn:aws:s3:::<bucket-name>/*"
           ]
       }
   ]
}
NOTE: If you’d like to sync directly, then remove Sid: Access S3 Bucket. If you’d like to sync through an S3 bucket replace the <bucket-name> with the bucket name.
e. Go to the Review Policy window to enter a Policy Name and Description.
f. Click Create Policy.
3. Create an IAM Role in AWS.
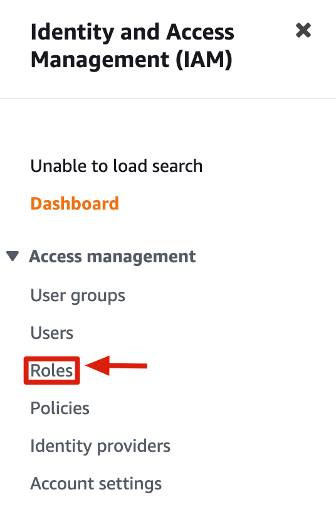
a. Go back to the Amazon IAM Console.
b. In the left pane under Access management select Roles and click Create Role.
c. In the Create Role window, select AWS Account, Another AWS Account then copy / paste Fivetran’s account ID (Account ID -> 834469178297), then select Require External ID and enter the external ID you noted in step 1.

d. Click Next to go to permission and select the Policy Name that you created in Step 2.
e. Click through Tags (unless you’d like tags), then click to Review.
f. Name your new role and click Create Role.
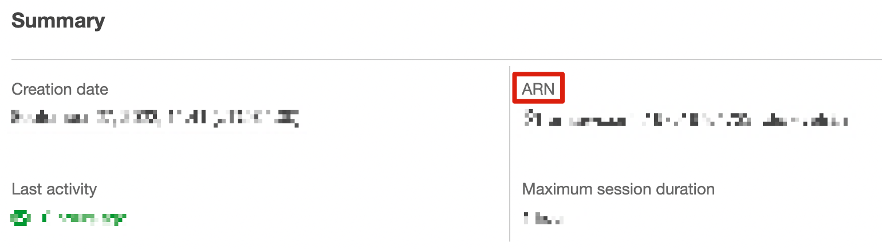
g. Click the role you created to visit the Summary page.
h. Write down the Role ARNfor configuration later in the process.
4. Lambda function to AWS:
a. I recommend writing your cloud function in VS Code so you can seamlessly deploy the function to AWS with any pertinent packages you may have used. This video provides a thorough overview of the deployment process.
b. NOTE 1: Follow this documentation from Fivetran for details on setting up the Lambda Function.
c. NOTE 2: When updating the Trust Relationship for the Lambda Function be sure to update the proper line with your External ID from Step 1.
d. NOTE 3: Be sure to test your Lambda Function by sending a sample request within the AWS Console and seeing what the response is.
5. Finish configuration in Fivetran.
a. Copy / paste your Role ARN from Step 3 into the Role ARNfield.
b. Enter the name of your Lambda Function from Step 4 into the Lambda Function field.
c. Select your Region.
d. Optional -> Add any secrets that may be needed upstream.
e. Select Sync Directly or Sync through S3 bucket.
f. Finally Save & Test the connection.
Now that you have finished configuring the connection between Fivetran and your AWS Lambda Function, Fivetran will test the connection. If the connection passes each test, then Fivetran will initiate the initial sync to begin loading your data to the specified destination. Then, you will be able to use this data for anything from data transformation to the development of BI dashboards.
If you’d like to learn more about Fivetran custom connectors or believe your business could benefit from having this setup, feel free to reach out to us at InterWorks here.