
SSH-Agent and OpenSSH are tools in Windows that can be used to authenticate to remote Git repositories, such as GitLab, GitHub, Azure DevOps, etc. Once set up as a service that stores your various SSH keys, this can facilitate authentication without entering a password each time, removing the irritation of entering a password every time you wish to push/pull/etc. from a Git repository.
Prerequisites
- The OpenSSH Client optional service must be enabled on your machine, and OpenSSH must be added to your PATH environment variable. You can read how to do that here.
- A remote Git repository that you wish to access. We will use a GitLab repository for this article; however, the process will be similar for other Git management providers.
- Git must be installed on your machine.
How to Install the SSH-Agent Service in Windows
Using an elevated PowerShell window (run as admin), execute the following command to install the SSH-Agent service and configure it to start automatically when you log into your machine:
Get-Service ssh-agent | Set-Service -StartupType Automatic -PassThru | Start-Service

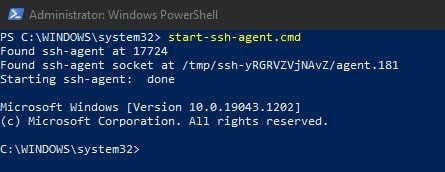
To avoid needing to restart your system to get the service running for the first time, execute this command:
start-ssh-agent.cmd
Setting up an SSH Key Pair to Access a Git Remote Provider
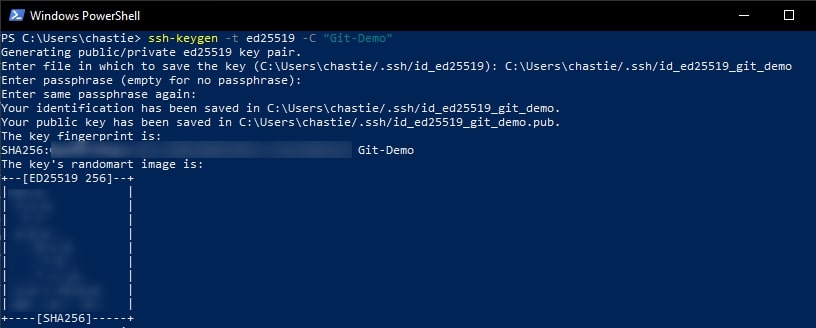
Using a command line tool such as Bash or PowerShell, you should be able to follow these steps to create a local SSH key pair. For our example, we will create an ED25519 key, but you can create other keys such as an RSA.
Create a new SSH ED25519 key, giving it a useful comment:
ssh-keygen -t ed25519 -C "Git-Demo"
By default, the file will be stored in your local user’s SSH repository in Windows. You can choose another storage location if you wish or rename the file by entering a new file path to save the key. Leave it blank to stick with the default.
In our example, we rename the file from the default id_ed25519 to id_ed25519_git_demo:

You can also add a password if you like or leave this blank:

You will then be shown the key’s randomart image to confirm creation:
Copy the contents of the public key to your clipboard. You can read this key with the following command:
cat path\to\ssh\key.pub
For example, our code is likely:
cat C:\Users\chastie/.ssh\id_ed25519_git_demo.pub
Note: We access the public key with the .pub suffix.
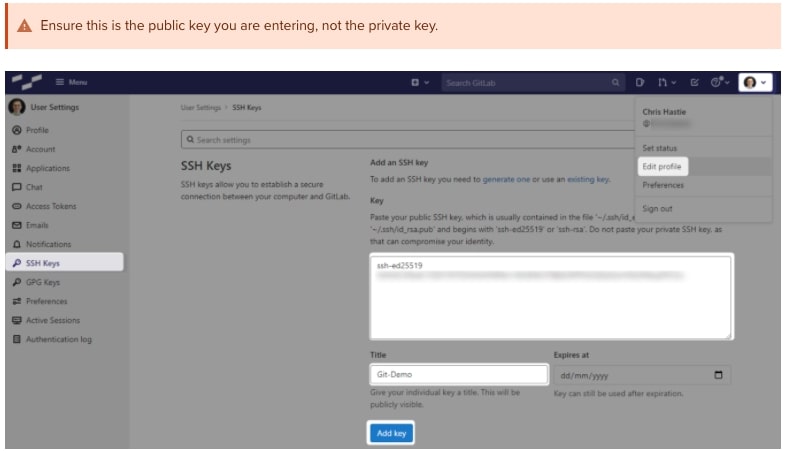
A sample is shown here. You can then select this and copy it with a right-click of your mouse:

In GitLab (or the appropriate location of your Git remote repository), you can now add this public key to your user profile. In GitLab, you can do this by adding it under the SSH Keys section of your user settings:
Test that you can connect to the repository when using the SSH private key directly with this command:
ssh -i path/to/ssh/private/key -T git@host
For example, our command could be:
ssh -i C:\Users\chastie/.ssh\id_ed25519_git_demo -T git@gitlab.mycompany.com

or

ssh -i C:\Users\chastie/.ssh\id_ed25519_git_demo -T git@github.com

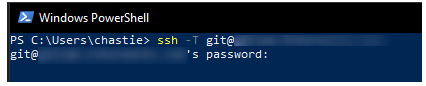
We have now established an SSH key pair that can authenticate to our Git remote provider. It remains to set this up in the SSH-Agent service to automatically provide access. We can demonstrate the issue by attempting the same connection, but without specifically naming the SSH key, with the command below:
ssh -T git@host
As we can see, if we execute this command without specifying an SSH key, we are prompted for a password:
Adding the SSH Key to the SSH-Agent Service
Our goal is to be able to connect to a Git repository without entering a password. At this stage, we have a working SSH key pair and the SSH-Agent service installed and running.
Execute the following command to add your SSH key to your SSH-Agent service:
ssh-add path/to/ssh/private/key
For our example, our command could be:
ssh-add C:\Users\chastie/.ssh\id_ed25519_git_demo

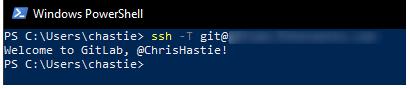
We can now test our connection to our Git remote provider without specifying a key and connect successfully:
ssh -T git@host
Configuring Git to Leverage the Windows SSH-Agent

In an elevated console (run as admin), execute the following command to modify your existing Git configuration to leverage the windows OpenSSH service as the core SSH command:
git config --global core.sshCommand C:/Windows/System32/OpenSSH/ssh.exe

Congratulations! You have now set up your environment to automatically authenticate to your Git remote provider through an SSH key pair, without using passwords. If you wish to facilitate access to any other Git remote providers, simply follow the same steps to generate a key pair ( as outlined above) and add it to your existing SSH-Agent service.