
This blog post is Human-Centered Content: Written by humans for humans.
In my very first Sigma blog, I will show you how to create a dynamic sales spreadsheet with a custom “Create Note per Row” and comment history workflow.
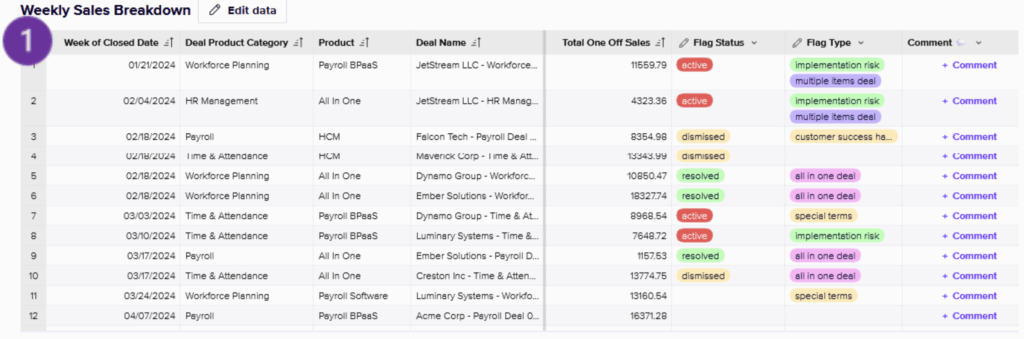
 The idea came through my recent client project within a finance team. We had a weekly sales breakdown table showing closed deals, product lines, ARR (annual recurring revenue), bookings, etc. The team wanted to do more than just view numbers: They wanted to flag deals, add follow-up comments and open a comment history without leaving the page.
Sigma’s writeback capabilities combined with Snowflake were a lightbulb moment. The core idea was simple: Keep the table clean by storing comments separately and using actions and modals to connect the two. Importantly, a comment thread should not be a single editable cell that overwrites history. For chat-style trail we need each comment to become a new row. Below is the final structure diagram, but let’s go through it step by step!
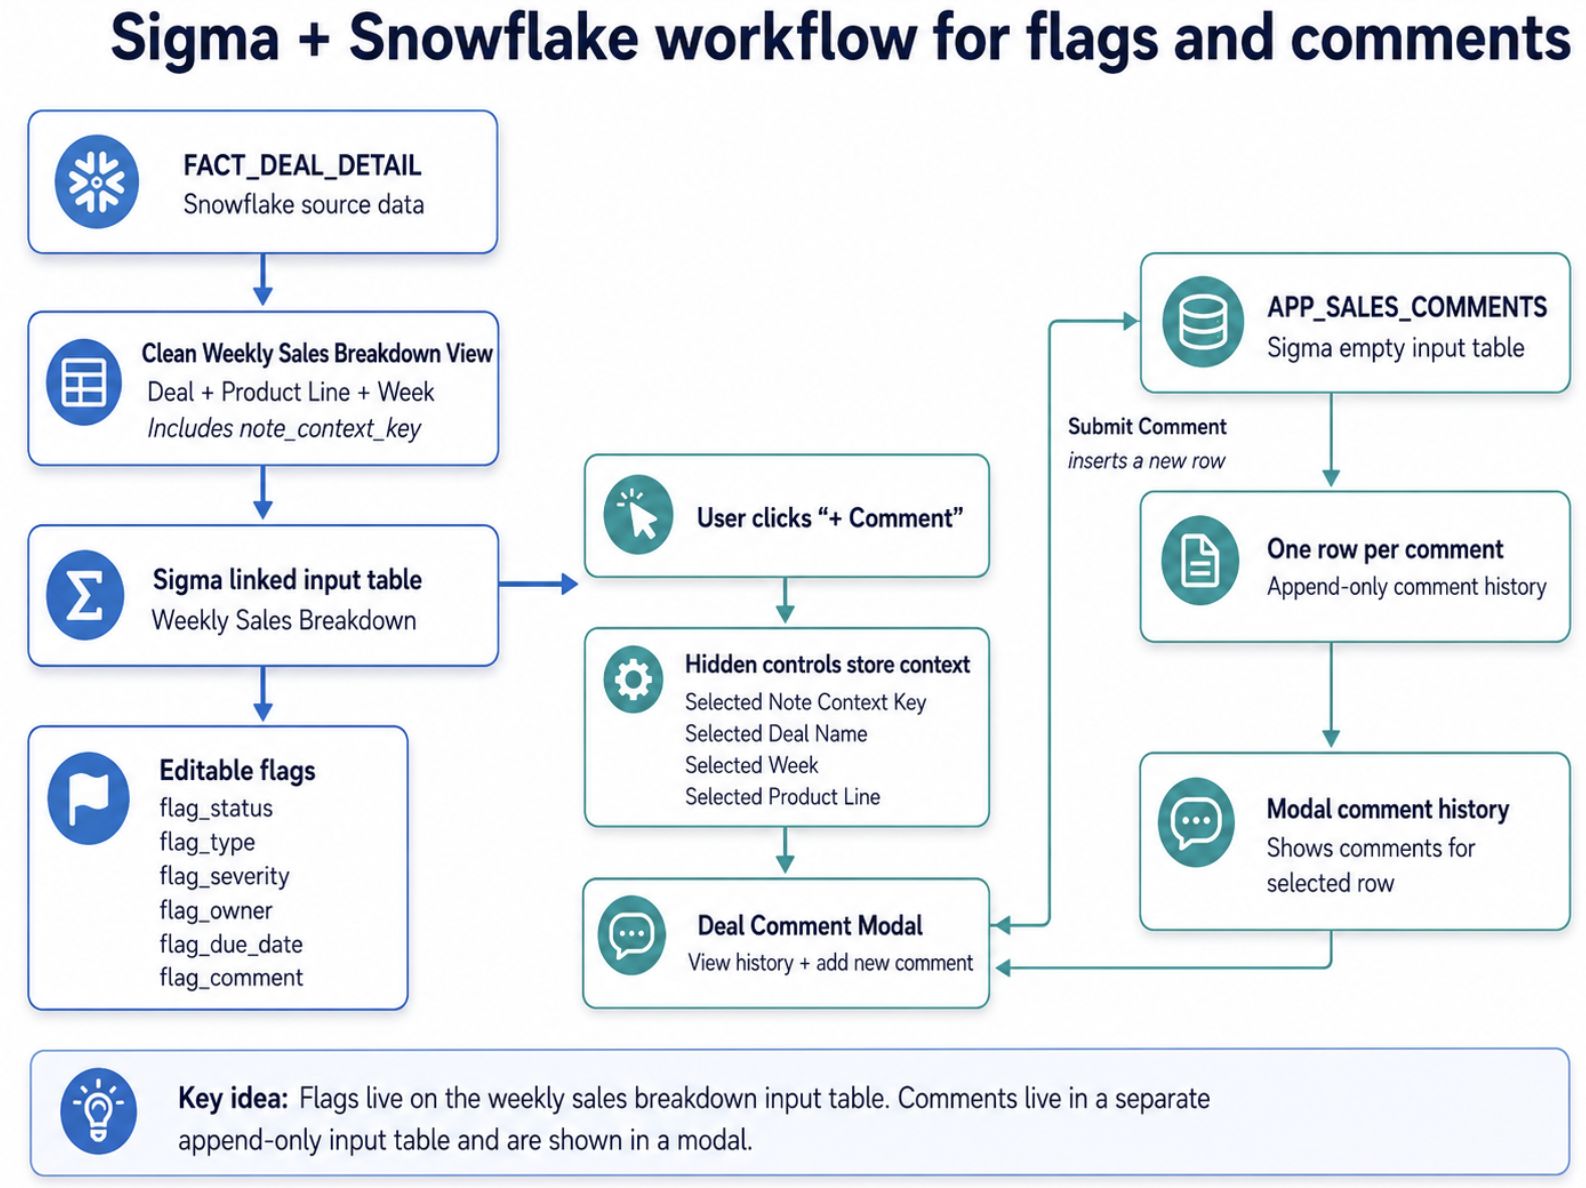
Here is the final build pattern that we need to run through:
- Snowflake clean weekly sales view
- → Provides sales rows at deal + product line + week grain
- Sigma linked input table
- → Lets users add flags to existing sales rows
- Sigma empty input table: APP_SALES_COMMENTS
- → Stores one row per submitted comment
- Warehouse view on APP_SALES_COMMENTS
- → Exposes the submitted comments back to Snowflake/Sigma in a clean queryable format
- Modal
- → Lets users add comments and view comment history
- Hidden controls
- → Pass the selected row context into the modal
The Key Design Decision: What Does a Comment Attach To?
The source fact table (fact_deal_detail) combines some sales and retention metrics along with a fiscal calendar and product dimensions. The view created on top of that table takes the granularity of deal + product line + week of closed date and importantly, adds a note_context_key. This detail is crucial since it will create a stable hidden join key between our Weekly Sales Breakdown table and another table where we write back the comments as new rows. It tells Sigma, when I click on this row show only the comments that belong to this exact row. The key is generated from deal_id, deal_product_line and week_of_closed_date (e.g. Acme + Workforce Planning + 2025-07-20).
Create a Clean Weekly Sales Breakdown View in Snowflake
First we are building a clean Snowflake view. The important fields are “hubspot_deal_id_text” and “note_context_key.” I cast hubspot_id to text since Sigma actions were not picking up the integer, while note_context_key is the hidden key used to filter the modal history.
SELECT
    week_of_closed_date,
    hubspot_deal_id,
    TO_VARCHAR(hubspot_deal_id) AS hubspot_deal_id_text,
    deal_name,
    deal_product_category AS product_line_for_notes,
    total_arr,
    bookings,
    sales,
    MD5(CONCAT_WS('|',
        'deal_product_week',
        TO_VARCHAR(hubspot_deal_id),
        deal_product_category,
        TO_VARCHAR(week_of_closed_date)
    )) AS note_context_key
FROM ...
Build the Weekly Sales Breakdown Input Table
An input table is Sigma’s way of letting users write data back from a workbook into the warehouse. In this build, we use one linked input table for the weekly sales rows and flags, and a separate empty input table for the comment history.
Linked input table = one editable row per existing sales row.
Empty input table = users create new rows, which is ideal for logs, or chat history in this case.
For the first table we want existing sales data and users to be able to add flags and click on individual rows to add comments, therefore a linked input table from the clean weekly sales breakdown view. Include any source fields that will be relevant to your audience to review, in my case: deal name, week, product line, ARR. For the flags, I added additional columns flag_status and flag_type.
Sigma supports governance features such as data validation, permissions, and system-generated metadata for input tables. Data validation in my case is used for each of those flag columns to provide an allowable list of entries when a user clicks on a row to make a selection. For example, the flag_status column only allows the options “active,” “resolved” and “dismissed.”
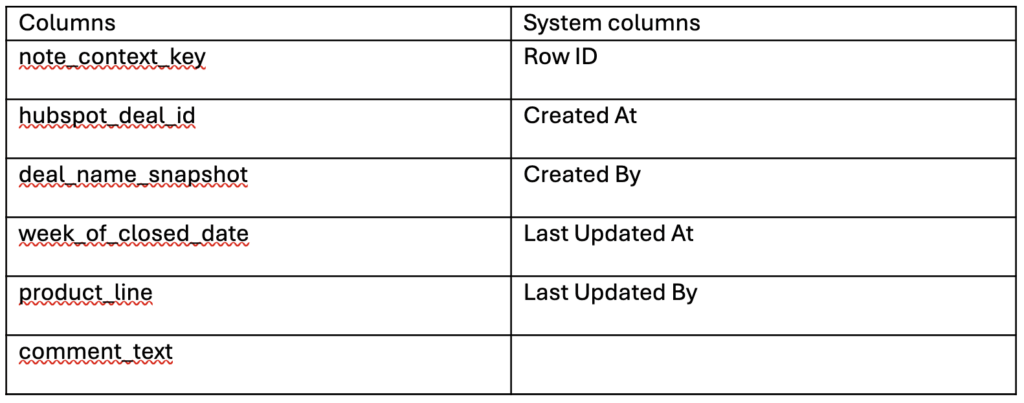
Create the Comments Input Table
For comments we will create an empty input table, let’s call it APP_SALES_COMMENTS. This table is not meant to be the main user interface. It is the backend storage for comment rows. Users will write into it through a modal. As an overlay it will let our users add or review comments without leaving the main sales table.
Where Does the Chat History Come From?
Now that we have an input table it is still unclear, where does the chat history come from?
Every time a user submits a comment in the modal, Sigma inserts a new row into that input APP_SALES_COMMENTS table.
So, the history is simply: one submitted comment = one row in APP_SALES_COMMENTS.
The reason we can query it in Snowflake as:
SELECT *
FROM SIGMA_DATAAPP.SIGMA_WRITEBACK.APP_SALES_COMMENTS
…is because I also created a warehouse view for that input table. Sigma warehouse views are queryable views saved to the data platform and can be created from input tables, tables, pivot tables, charts, and other elements. The chat history comes from the APP_SALES_COMMENTS empty input table; SIGMA_DATAAPP.SIGMA_WRITEBACK.APP_SALES_COMMENTS is the warehouse view that exposes those submitted comment rows back to Sigma/Snowflake for reporting and filtering.
APP_SALES_COMMENTS input table = where Sigma writes the submitted comments
SIGMA_DATAAPP.SIGMA_WRITEBACK.APP_SALES_COMMENTS = the warehouse view that lets Snowflake/Sigma query those comments
Why Do We Need the Warehouse View Layer?
This was one of the most important decisions in the app build. The input table is where users write data, but the warehouse view is how we read that written-back data cleanly.
When a user submits a comment, Sigma writes the row into the APP_SALES_COMMENTS input table. Behind the scenes, Sigma stores input table data in its own writeback structures, which are not ideal to build reporting logic on directly. By creating a warehouse view, we get a stable, readable Snowflake object with the business columns we care about, such as note_context_key, comment_text, Created At, and Created By.
In simple terms:
- APP_SALES_COMMENTS input table = Where the user writes comments
- SIGMA_DATAAPP.SIGMA_WRITEBACK.APP_SALES_COMMENTS warehouse view = Where Sigma/Snowflake reads those comments back for reporting, filtering and modal history
This separation is what makes the chat history reusable. The modal writes into the input table, while the comment history table reads from the warehouse view and filters it using the Selected Note Context Key.
The full flow is then:
- User submits comment in modal
- New row inserted into APP_SALES_COMMENTS input table
- Warehouse view exposes the comments in Snowflake
- Modal history table reads from the warehouse view
- Selected Note Context Key filters the history to the current deal/product/week
Use Hidden Controls to Pass Row Context
The last step from the flow above is still cryptic but the problem is straightforward: When a user clicks on a row, Sigma needs to remember which row was clicked. We do that with hidden controls. Below the screenshot of hidden controls I made, and I say hidden because I bundled them all in a container and moved to a hidden page in my workbook. Plus, there is the row-click Actions sequence on top of the field where the user types in comments.
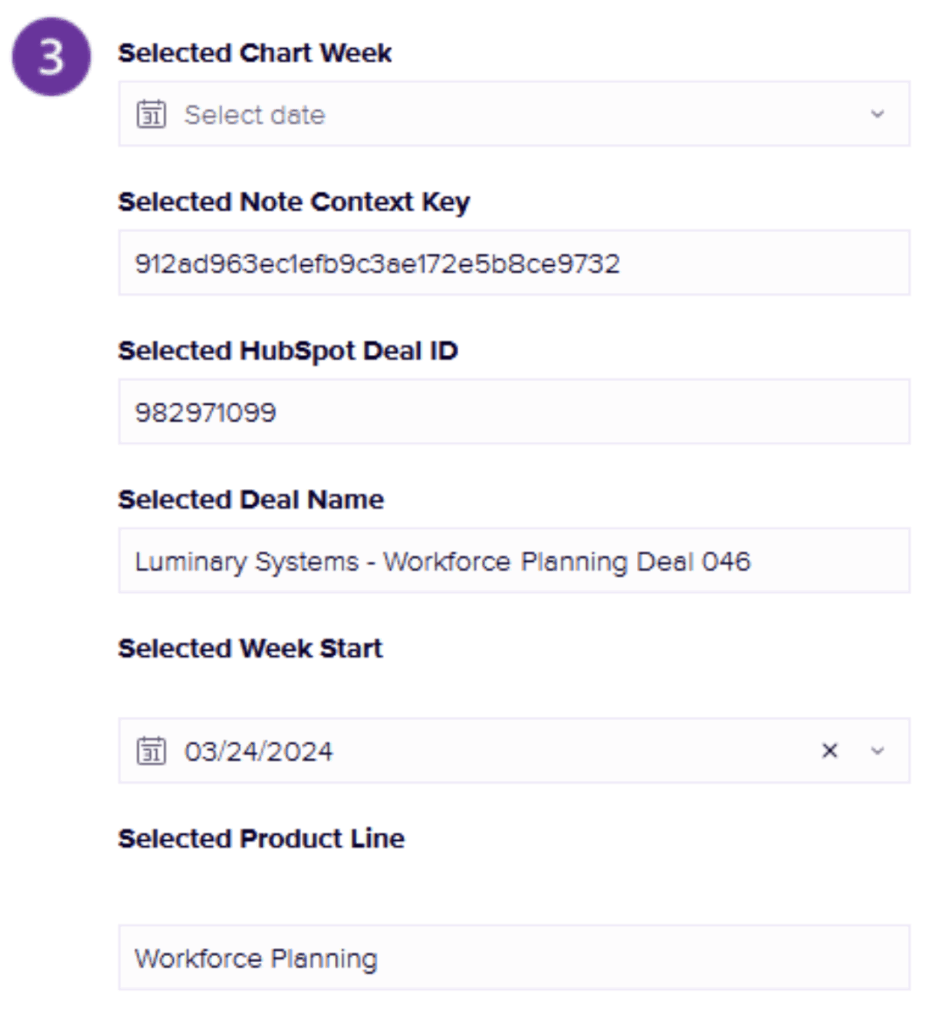
Row click action sequence:
- Set Selected Note Context Key =note_context_key
- Set Selected HubSpot Deal ID =hubspot_deal_id_text
- Set Selected Deal Name =deal_name
- Set Selected WeekOfClosed Date = week_of_closed_date
- Set Selected Product Line =product_line_for_notes
- Open the comment modal
Filter the Comment History With a Control Target
This is a key step in our build. Let me explain the issue: A normal filter will not work well in our chat history table visible when modal pops up. Wherever I clicked on the table, the modal history showed all comments: Not exactly the best user experience. The reliable method was to use the hidden Selected Note Context Key control as a target. The key difference is that a normal filter is configured manually on the table, while a control target lets the selected row action dynamically update the filter value. In this build, the Selected Note Context Key control acts like a parameter. Here’s the setup:
- Control: Selected Note Context Key
- Target element: Comment history table
- Target column: note_context_key
Now, when a user selects a row, the control updates and the history table automatically filters to only that row’s comments.
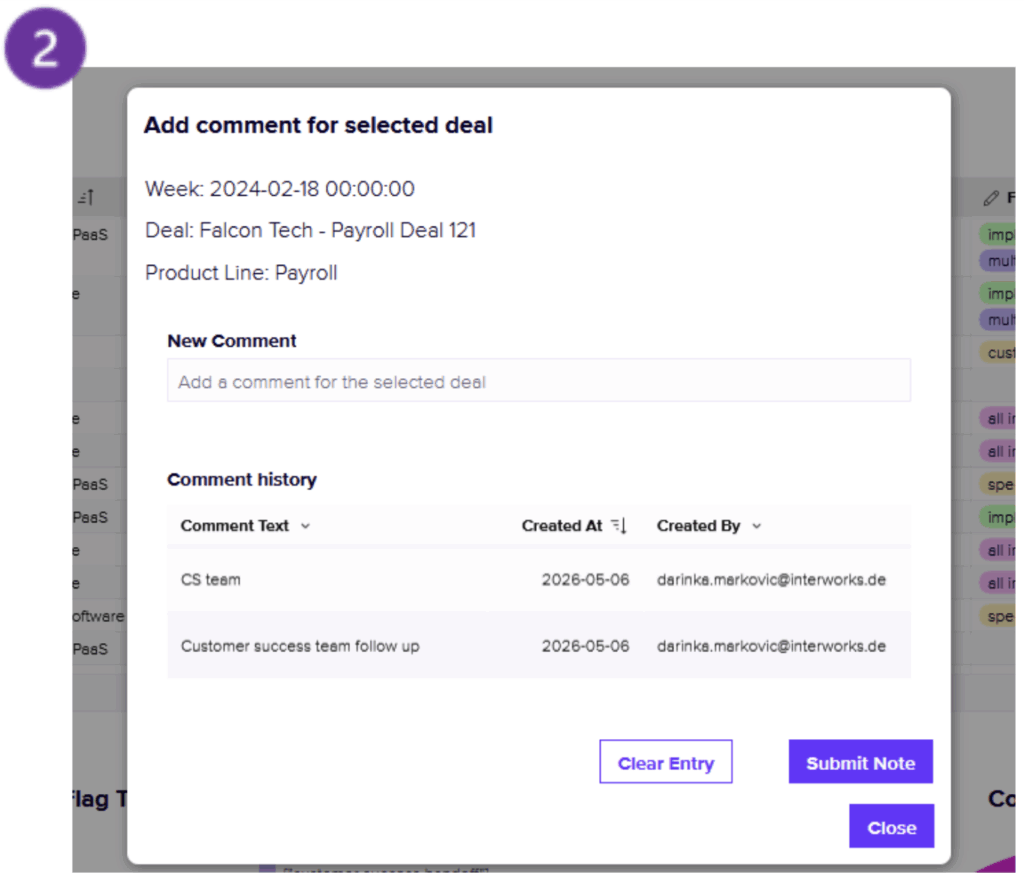
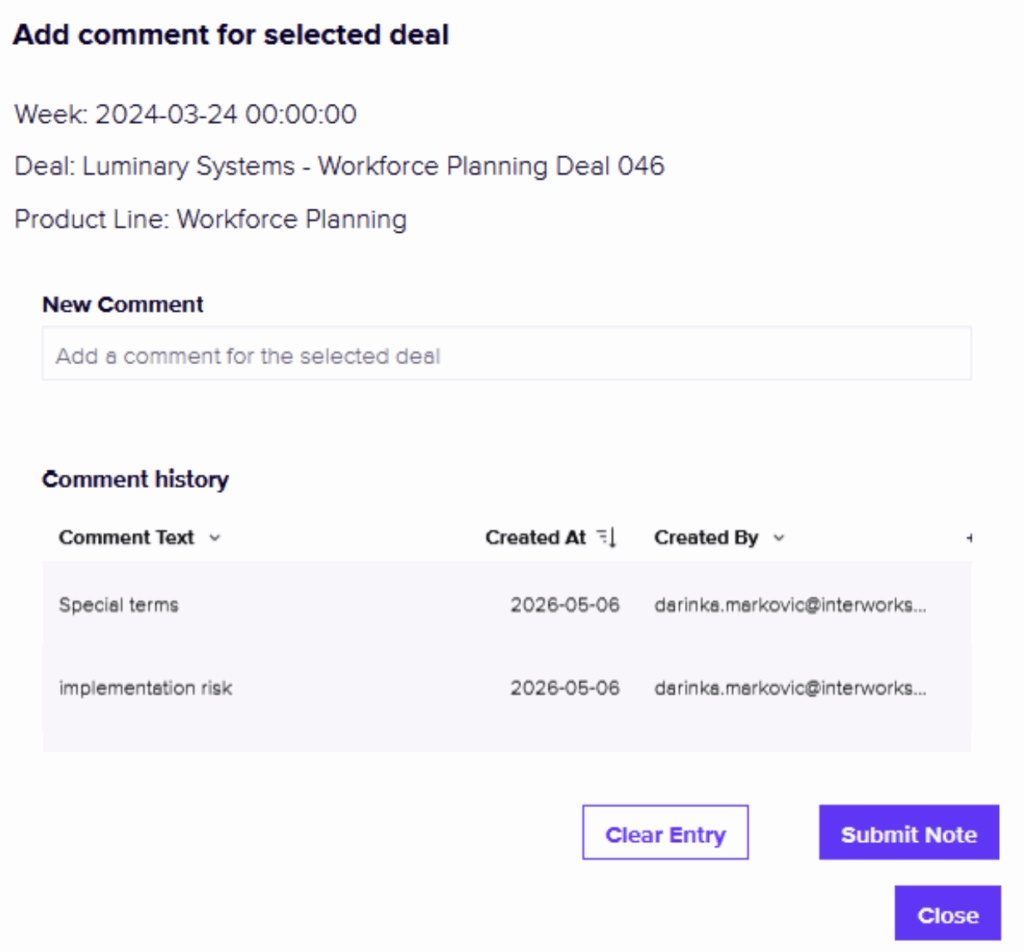
Build the Comment Modal
Inside the modal, I added:
- A small header showing the selected deal context
- A comment history table sourced from the APP_SALES_COMMENTS warehouse view, so it can read all submitted comment rows cleanly from Snowflake.
- A text input control called New Comment Text
- A Submit Comment button
- A Clear Entry button
- A Close button
The history table shows Created At, Created By and comment_text. It is targeted by the Selected Note Context Key control, so it only shows comments for the selected row.
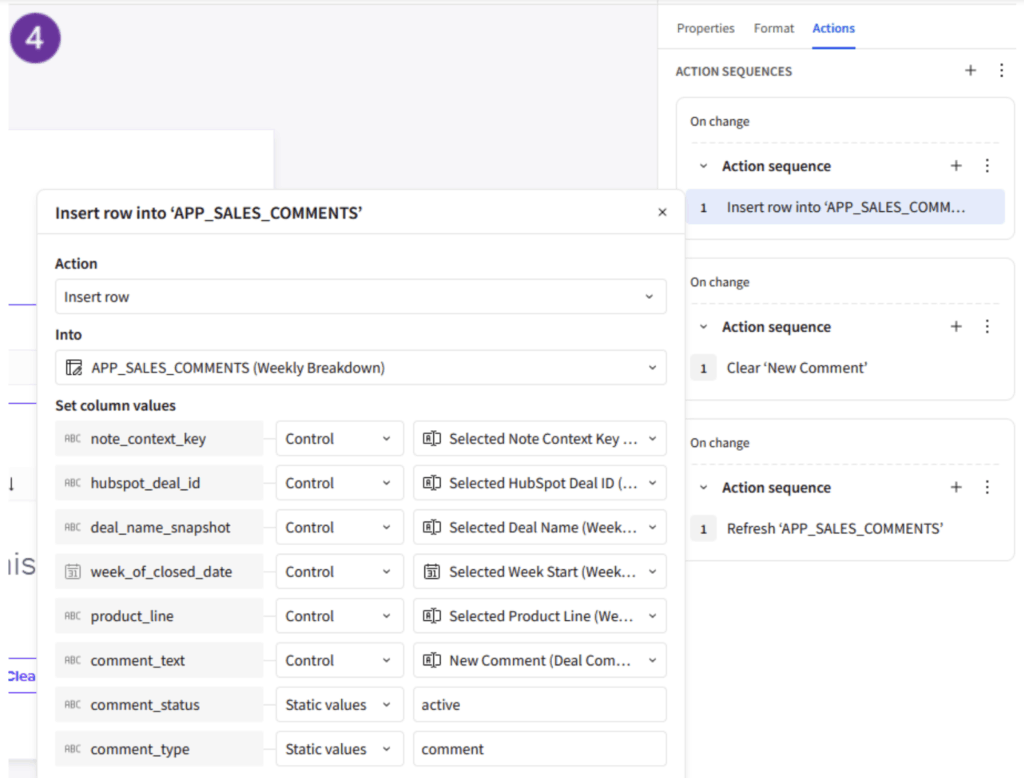
Configure the Submit Comment Button
Button action:
On click → Insert row into APP_SALES_COMMENTS
Mapping:
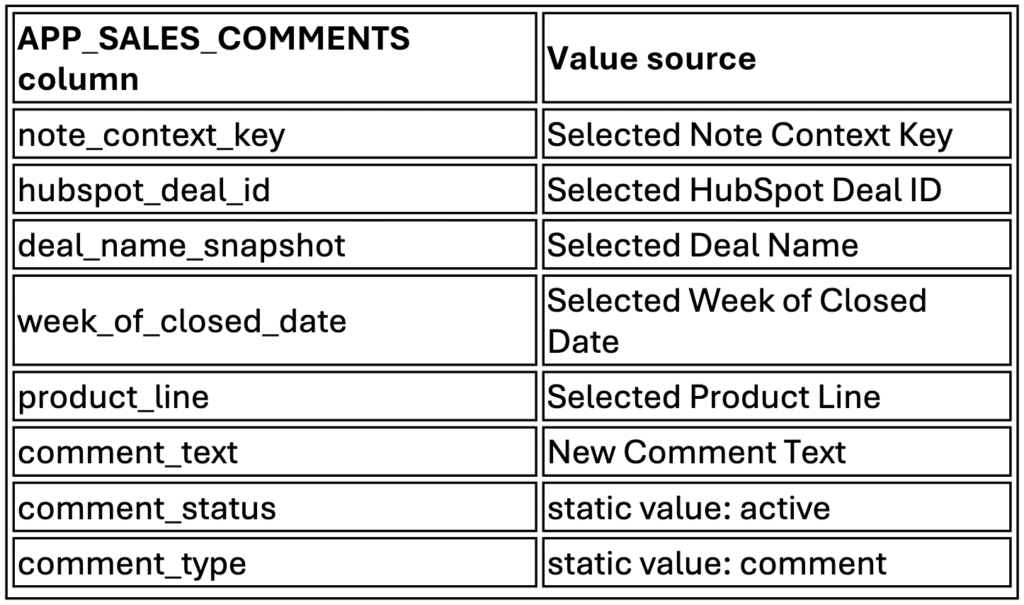
After the insert action, I added a refresh step so the comment history updates immediately, plus Clear Entry and Close buttons for a smoother user experience. Importantly, Clear Entry should not delete all saved comments, it only clears unsent text written in the modal box.
Also keep in mind that a writeback app needs to have permissions concept. Before publishing, check who can edit the input tables. In my case, workbook users could add comments and update flags, but the raw comments input table was not meant to be the primary interface. Users interact through the modal instead. Also keep controls and raw tables like APP_SALES_COMMENTS on hidden pages.
Troubleshooting Lessons
Here are some of the issues I hit in my build:
- Issue: HubSpot ID was greyed out when used in hidden controls to pass row context
- Fix: Add hubspot_deal_id_text and use text for controls
- Issue: Modal history showed all comments
- Fix: Target history table with Selected Note Context Key
- Issue: Changing an input table source broke things and a big lesson learned to keep close track of the lineage in Sigma
- Fix: Do not replace the input table; build downstream views or new elements
- Issue: I was unsure when or how to use an input table and a warehouse view
- Fix: Think of the input table as the write layer and the warehouse view as the read layer. Users submit comments into the input table; the modal history reads those comments back through the warehouse view.
If you’re following along here is also a quick testing checklist:
- Click a weekly sales row and confirm hidden controls populate.
- Submit a test comment.
- Confirm a new row appears in APP_SALES_COMMENTS.
- Confirm the modal history only shows comments for the selected note_context_key.
- Click another row and confirm the history changes.
- Test Clear Entry and Close.
Happy data app building!