Take control of metadata while developing a visualization by employing these CALCULATED FIELD techniques. They make a workbook self-documenting, improve ease of navigation and enable searching of calculated fields. These methods will provide structure during development as well as documentation for future desktop publishers:
Apply Metadata Tags to Calculated Fields
This allows for quick identification of type of calculated field and functions being performed. This also allows for the fields to be found in a search.
Create Meaningful Calculated Field Names
This makes the first 14 positions communicate what the field’s intentions are.
Utilize Comments:
- In calculated fields using //
- Using the Default Properties > Comment
Folders in Tableau 8.1
Organize calculated fields in Folders.
Apply Metadata to Field Names
Tagging
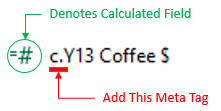
Tableau calculated fields are denoted with “= “ field notation to the left of the field name. To make a calculated field searchable, simply prefix or suffix the calculated field with a metadata tag (Figure 1).
Figure 1: Tableau Calculated Field symbol with metadata tag

For an example, let’s use the Tableau Coffee Chain dataset. If a calculated field were needed for 2013 Coffee Sales, the calculated field may look like this:
if year([Date]) = 2013 and [Product Type] = ‘Coffee’ then [Sales] else 0 end
A good name would be “2013 Coffee Sales Dollars,” a better name with meta tag would be “c.Y13 Coffee $.”
Searching Made Easy
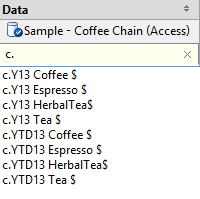
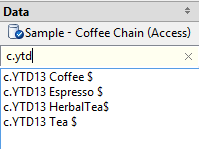
Using the Tableau search feature to find a calculated field is possible when metadata tags are used in the field name. Simply utilize search functionality anywhere in Tableau on the tags embedded in the calculated field. For example:
Figure 2: Tableau search examples using metadata tags
|
Example 1: Find all the calculated fields with the “c.” tag.
|
Example 2: Find all the YTD calculated fields; search “c.ytd”
|
Example Metadata Tags
Find a naming method that works for you and your project. The key is to stay consistent and develop your own personal style and tags. You’ll thank yourself in the future when you’re performing maintenance or upgrades to the workbooks and dashboards. The calculated fields will be easy to navigate and interpret. Here are a couple of my go-to tags.
Figure 3: Meta Tag examples: a couple of go-to tag names that one can use.
| Tag | Meaning | Description | Example |
| c. | Calculated Field | Calculated Field |
c.Y13 Coffee Sale$ c.Y13 Coffee Profit $ |
| d. | Display Control | Display Control |
d.Apply Red to Negative results d.Show Bar Chart |
| f. | Filter | Filter | f.Region North > $1K Sales |
| n. | Navigation |
Calcualted Field used for |
n.GoMainDash n.MainMenu-Detail Sales |
| tc. | Tableau Calculation |
Calculation that leverages |
tc.CurrentYear Units tc.PreviousYear Units |
|
cy. py. |
Year Reference |
Current Year i.e. 2013 Previous Year i.e. 2012 |
cy.YTD Gross Sales Dollars py.YTD Net Sales Units |
Meaningful Field Names
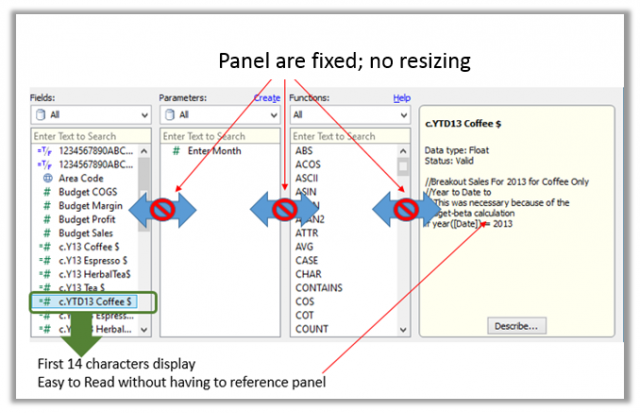
Create a field name that accurately describes the field. The name of the field should describe the purpose of the calculated field without having to view/edit the contents. It is recommended to front-load the field name as Tableau’s calculated field window does not show more than the first 14 characters of any field name (Figure 4). The window is not resizable. That’s why it’s ideal to put as much information in the front of the field name.
Figure 4: Tableau’s calculated field window does not display more than 14 characters in the “Fields” panel.

Tableau Comments: The Other Metadata
Comments should not be used to describe “how” something is done, but rather “why.” Use this approach to documenting calculated fields. You can document calculated fields via embedded tags and default properties.
Embedded Comments in Calculated Fields
In the calculated field’s editor, comments can be place in-line by preceding the comment with “//” (figure 5). Don’t comment on the obvious, just comment on the relevant programming information. These comments will show up in the Worksheet > Describe Sheet (Ctrl+E).
Figure 5: Tableau’s calculated field edit window. Using //Comments.

Default Property > Comments
Using Tableau’s property comments allows the publisher to place comments in a rich text tooltip window when hovering over a calculated field (Figure 6). This is a handy way to tell collaborative publishers when and how to use a certain calculated field.
Figure 6: For “c.Y13 Coffee $” field, a rich text Default Property > Comment is activated on hover.

Conclusion
Take control of your metadata! Use tagging to describe calculated fields and allow for quick searching. The end result will allow an author to orientate themselves quickly when they return to their work months or years later. Using tagging and commenting practices during workbook development requires minimal effort.


