Please note that Portals for Tableau are now officially known as Curator by InterWorks. You can learn more at the official Curator website.
If one is great, more must be better, right? Well, if you answered yes then you probably like the idea of a high availability (HA) setup. If you’re reading this and thinking I’m just making up terms right now, an HA setup is a fancy way of describing the using of multiple servers to host your portal so that if one is overloaded or crashes, your other one takes over and the portal keeps on serving. This blog post will describe how to configure your portal in this manner.
Portals Database
Portals for Tableau uses a small database to house your portal’s configuration. If you’re reading this, chances are high that you already have numerous databases configured to run as HA. You can use that same setup for the portal’s database. If, by chance, you don’t already have an in-house solution, you could look into technologies like Amazon Aurora.
Portals Filesystem
The portal stores uploaded files to the storage/app/ folder in your portal’s web root directory. To enable files to be available across each HA node, you’ll want to share this folder with each, making sure they all have read and write permission. You can use technologies like NFS or others to enable the sharing of this folder.
Portals Cache
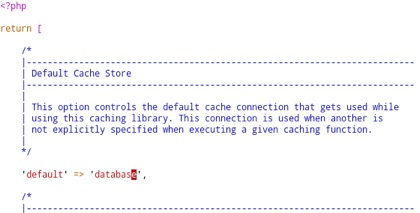
By default, the portal’s caching systems are filesystem based. In an HA setup, you can change this to be database by editing the config/cache.php configuration file in the web root directory of each of your portals. Just change the default setting from file to database:

Portals Session Management
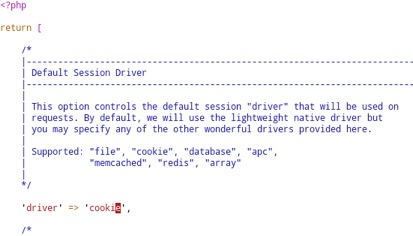
By default, the portal’s session management is also stored on the filesystem. In an HA setup, this can be changed to cookie-based sessions by modifying the config/session.php configuration file in the web root directory in each of your portals. Just change the driver setting from file to cookie:

Portal Upgrades
Since you’re only sharing the storage directory, and portal upgrades affect other directories, portal upgrades won’t automatically apply to both. As a result, it’s probably best to create DNS records for each node in your HA setup, so you can upgrade each portal explicitly from the portal’s backend user interface.
The first node you upgrade from the portal’s backend will update the version number, so the one-click upgrade button will disappear from any subsequent nodes since they think they’re already at the most recent version. As a result, you’ll either want to use the manual upgrade button for all nodes, or you can use the following API endpoint for the nodes:
https://portalnode2.yourcompany.com/api/v1/portal/upgrade?apikey=YOURKEYHERE&version=latest

