
Summary/Purpose
This article is meant to give an overview of Veeam 6.0 on VMware, give other users an idea of our experiences, provide some general recommendations, and to provide a recommendation to adjust the Backup Proxy Transport setting to fix a processing speed issue that is present with Veeam 6.0 with version 6.0.0.153 and hotfix 6.0.0.158.
Executive Summary
For those of you a bit more experienced with Veeam, here are the key points to take away from this article.
- Veeam 6.0 backups and replication are much more efficient than Veeam 5.0 backups and replication.
- If you have multiple proxies or are planning on having multiple proxies at some point in the future, make sure you manually assign them in both the backup job and replica job. Do not leave these to automatic selection as you could run into performance issues.
- If you are running replication via the Local Network or on the WAN, make sure you set your target proxy to Network.
Overview
To our excitement here at InterWorks, Veeam Backup and Replication 6.0 was released earlier this month. This was because of the new advanced replication with the streamlined failover and real failback. So what does this mean? If your replication job fails and you have change block tracking (CBT) enabled, you no longer have to seed the entire job on failure. When you run the job again, it picks up from where it failed.
Veeam 6.0 Backups Results
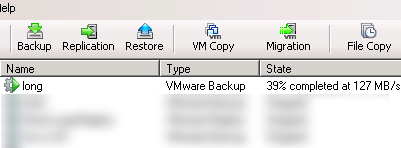
We immediately installed one of our environments to 6.0.0.153 to begin testing backups. On the first pass-through, we achieved anywhere from 1-10Mbps for the processing rate (pre-hotfix). Post hotfix, we’ve been seeing 5-20 Mbps on the first pass-through. We ran into a couple of random failures, but we weren’t worried. Why? With Veeam 5, you either had to reprocess the entire VM or with certain failures you had to reseed the entire job. With Veeam 6.0, you resume where the failure occurred. So how does this translate into time saved? With Veeam 5 with “automatic retry” enabled, if we had a file server with 1TB of data fail, sometimes we would see the job run an extra 8-12 hours. With Veeam 6, the worst case scenario we’ve seen is that the job takes 1 additional hour
After running the job a few times, we started to see much higher speeds ranging from about 120-500Mbps. Overall, we saw our total job times for backups get reduced about 2 hours.
Veeam 6.0 Replicas Results
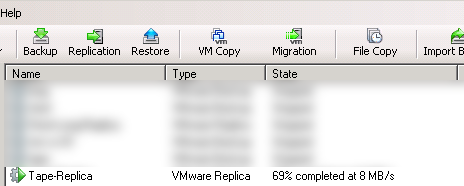
Veeam has made some great improvements with version 6 once we got everything up and running. As with any new product, there are still a few items that need to be tweaked, but once everything was configured, we saw great improvements from Veeam 5 for the replication. Pre-hotfix, we were seeing speeds of only 1-5Mbps for every job on a 1 gigabit network.
Post hot-fix, we started seeing 5-10Mbps. After a few phone calls with Veeam, sending some logs, and 2 weeks of tests, we got the replication job working to where we were seeing job run times get dramatically reduced several hours and getting the 120-500Mbps processing rates.
Configuring Veeam 6
Veeam 6 has made a few big changes to their replication. There are a few new options such as low connection bandwidth, but a big change that should be noted is Backup Proxies. With Veeam 5, the recommended configuration for replication was to have 2 servers with Veeam installed on each server. Although in Veeam 6 you still need 2 servers (source server and target server), you no longer need to have Veeam installed on both servers. Instead you install a Backup Proxy.
If you have the resources available, I would recommend the following:
- Dedicated backup server with Veeam installed. This by default will act as the source proxy. Minimum recommended specs of 4GB ram and 2 cores from Veeam.
- Recommended dedicated backup server. This will operate as the target proxy. Minimum recommended specs of 4GB ram and 2 cores from Veeam. If you don’t have resources for a dedicated server, I would go with the next server that has ample resources and is not processing a lot of data.
- I recommend creating your legacy replications jobs from scratch and reseeding. For the issues we experienced, Veeam recommended that we recreate all our legacy jobs.
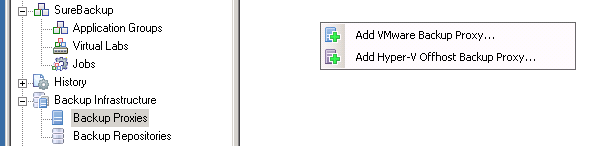
Configuring Veeam 6 – Backup Proxies
As mentioned earlier, with Veeam 5, it was recommended to have 2 servers with Veeam installed on each server. The quick overview of this is that you would have a source server (pushes the replica’s) and a target server (pull’s the replicas). Veeam has made this process much simpler in version 6. Now, you need to only have Veeam 6 installed on the source server (server you will push replicas from). For most businesses, it is much more practical to run backups and replications from the same Veeam setup so you don’t have to purchase additional licensing or have multiple setups.
You’ll want to have both a Source Proxy and Target Proxy. If you do not have a “VMware Backup Proxy” (installed with Veeam), you’ll want to make sure you add a local proxy. If you are not running Veeam on a dedicated server, you’ll want to make sure that your Source Proxy is installed on a server with a good amount of resources and does not process a lot of data.
To Install the Proxy:
- Expand Backup Infrastructure
- Right Click on Backup Proxies
- Add Backup Proxy
You will need the credentials for an account that has local administrative privileges on the server you are selecting as your proxy.
Important Note*: By default, your Transport Mode will be set to Automatic detection (recommended). After many hours of troubleshooting, Veeam had us adjust the Transport setting to Network.
After a job had been executed several times, when we had this option on Automatic, we saw processing speeds (on a gigabit network) running anywhere pre-hotfix from 500KB/sec to 5MB/sec and post-hotfix 5-20MB/sec. Once this transport setting was adjusted to Network, we immediately saw it our processing speed hit 20-250MB/sec.
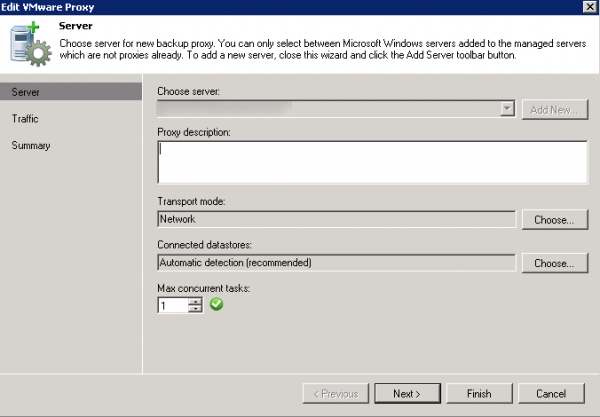
Although Veeam is still working to fix this issue, they have had a handful of environments where adjusting this setting fixed the processing rate. We have seen the same results in a few of our environments as well.
The next section, traffic, allows you to configure throttling to limit your bandwidth. You can choose to have this turned on indefinitely or scheduled.
Configuring Veeam 6 – Replication Jobs
Note: This portion of the article assumes you already have your ESX hosts configured.
To configure your replication job:
- Expand Backups & Replication
- Right click on Jobs
- Add Replication
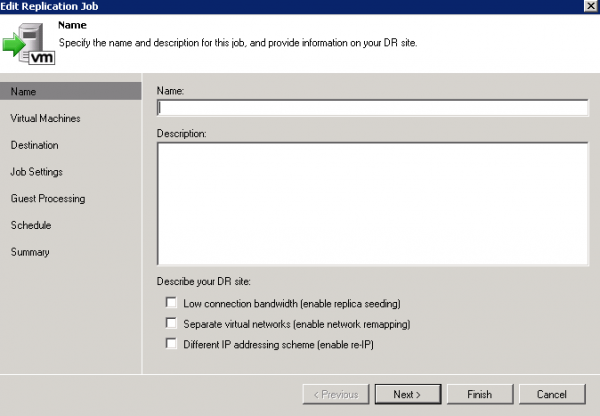
Next, you’ll add what virtual machines you would like to replicate. Although you can add all the VM’s at once, I recommend adding them 1 at a time if you have low bandwidth. There are a couple of advantages to adding them one at a time especially if you have a ton of data.
- If you’re replicating some of your backups, you don’t want to overlap times.
- If you add them one at a time, you can have a controlled environment for your replicas.
- If you are using something like thin provisioning and you are working out space usage on each datastore, you can always adjust your replication job later. If you add the VM to the job and need to adjust your VM’s later, its more difficult to adjust your settings later.
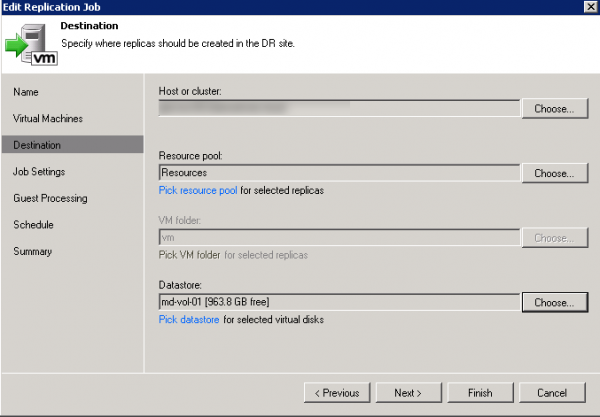
Pick your host cluster and the datastore you want to select. If you have other options to select such as your resource pool, go ahead and do so.
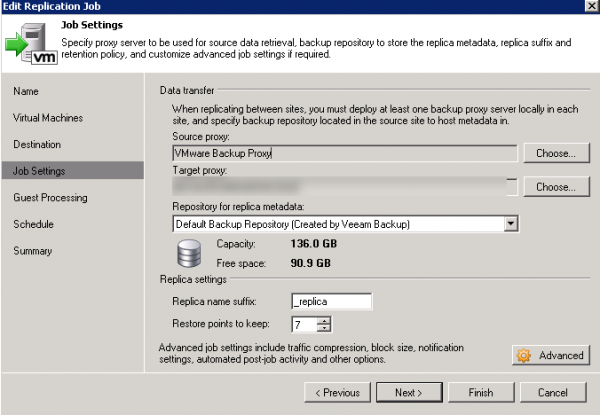
Next under Job Settings, you will need to assign your Source Proxy and Target Proxy. Now remember we had to set up the backup proxies earlier? These are the servers that will be processing the replications, so it is recommended that you manually select your proxies.
If you have a dedicated backup server, you will most likely be okay to use your VMware Backup Proxy as the Source Proxy without performance issues. Veeam recommends you have a dedicated server for the Source Proxy, but we haven’t seen any hits to the performance with it being the VMware Backup Proxy.
In terms of your Target Proxy, make sure you select the proxy that is located on the same network (or on the same host) as the target you want to replicate.
In the next few steps you can enable application-aware image processing, adjust your schedule, and review. Veeam has good documentation on these portions within Veeam itself, so these steps should for the most part be self-explanatory.
Additional Sources Used: http://go.veeam.com/v6-backup-replication. Accessed December 20, 2011.