
For the second post in my continuing series on Snowflake, I wanted to expand on some concepts covered in my JSON post. Last month, I walked you through how to work with JSON in Snowflake and discussed the process Snowflake uses to flatten JSON arrays into a format that can be easily queried. For this post, I want to talk about what happens before we can access the power of Snowflake with ANY data. This week we’re going to talk about loading data into Snowflake, which due to its cloud nature, requires a different process than standard or legacy database systems.
Snowflake supports a handful of file formats, ranging from structured to semi-structured. Layered on top of the file formats are the protocols we can use to bring that data into Snowflake. Since Snowflake has a multi-cloud architecture (Amazon Web Services, Microsoft Azure and a goal of Google Cloud support in the future), we luckily have a few options to get our tables loaded. I’m going to spend a bulk of the time today talking about how to perform a simple AWS S3 load.
AWS
Loading from an AWS S3 bucket is currently the most common way to bring data into Snowflake. The entire database platform was built from the ground up on top of AWS products (EC2 for compute and S3 for storage), so it makes sense that an S3 load seems to be the most popular approach. Loading data into Snowflake from AWS requires a few steps:
1. Build and Fill an S3 Bucket
To begin this process, you need to first create an S3 bucket (if you’re unfamiliar with this process, look here). Something I really like about the way Snowflake interacts with these S3 buckets is that the bucket can contain any of the supported file formats and Snowflake will allow you to specify what to pull out. Snowflake allows you to specify a file format with the copy command, meaning that whether my project utilizes JSON, CSV, Parquet or a mixture of all three, I can organize my data into a single S3 bucket for each project I am working on.
2. Build Snowflake Table and Load from S3
Now that we’ve built and filled our bucket with data, we want to bring it into Snowflake. We can go ahead and build the tables we want that data to reside in. Since Snowflake uses standard SQL language, and this is simple enough. One thing that is important to note about the table creation is that if you have semi-structured data, it does not require a dedicated table. You can load structured and semi-structured data into the same table.
For my example, I grabbed some JSON that contains Countries and their Country Codes. I also grabbed a CSV containing some detailed information about these countries. After uploading each of these to my S3 bucket, I can begin pulling them into Snowflake to populate this table:
3. Build a Stage
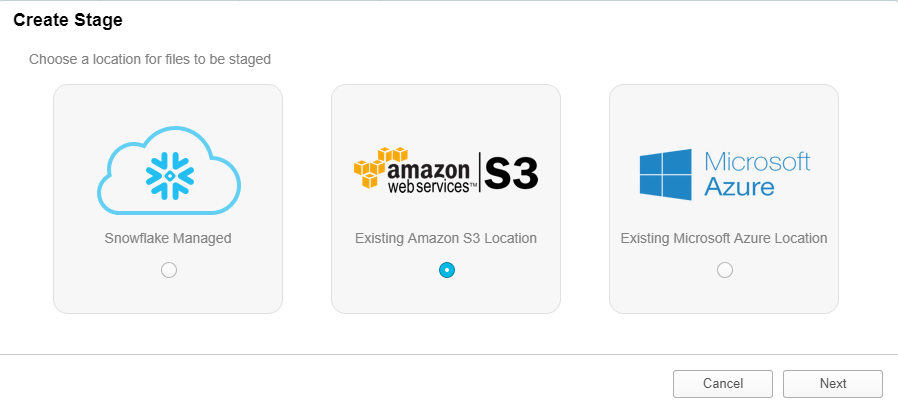
In the database segment of the UI, I have a section for Stages. This is where I can build a stage using the UI. As you can see above this is pretty straightforward, I selected S3 because that is where my data currently resides. After selecting S3, I am taken to a menu to give Snowflake the information they need to communicate with my S3 Bucket. The main point of confusion on this menu is the URL textbox. All that you need to insert here is the name of your S3 bucket. Snowflake will use your AWS Key ID and Secret Key to locate the correct AWS account and pull the data. The URL should look something like this:
S3://[YOUR BUCKET NAME]/[DIRECTORY IF NEEDED]
You can also select at the bottom left-hand of the menu to Show SQL. This is a good way to get an understanding of how to interact with Snowflake’s tools programmatically. I tend to prefer building stages in the worksheet, the code looks like this:
CREATE STAGE "HCALDER"."TESTINGSCHEMA".LoadingBlog URL = 's3://iw-holt'

CREDENTIALS = (AWS_KEY_ID = 'PostingYourKeyontheInternetisBad'

    AWS_SECRET_KEY = '******************');
4. Copy Data to Your Table
Now that I have a stage built in Snowflake pulling this data into my tables is extremely simple. I built a table that contains 6 columns, one for my JSON data, and 5 for the other information contained in my CSV file. To copy from my stage all that was needed is this snippet of code:
COPY INTO [TABLENAME] ([COLUMN]) FROM @[STAGENAME]

FILE_FORMAT=(TYPE= 'JSON' STRIP_OUTER_ARRAY= true)

PATTERN= '.*.json';

               COPY INTO [TABLENAME] ([COLUMNS]) FROM @[STAGENAME]

FILE_FORMAT=(TYPE= 'CSV')

PATTERN= '.*.csv';
One thing that I want to call out here is that I ran two separate commands to populate my table. I ran the first statement above to load my JSON data into the variant column and then modified it to pull out my CSV data for the second go round. Please check out this page from the Snowflake docs that gives all the details you’ll need on the different file_format options. Some can be tricky. It also gives you all the information you would need to save the file format for future use.
Also, notice how I used Regular Expressions on the final line to pull out all JSON and CSV files from my bucket, you can also use this method with other RegEx patterns and is a good way to pick up the pace on your data loading.
The benefits of loading from S3 are substantial; the amount of storage available is virtually infinite and the dependency is incredible due to data replication across Amazon’s regions. Now that you know how to pull data into Snowflake, I’m going to ease your mind about working with different kinds of files. Loading different file formats is easier than you think.
File Types
I’m going to quickly walk you guys through some tips on how to take advantage of the tools Snowflake gives us to load different types of data files and discuss a little bit about what you should be aware of when loading different file types.
CSV (Any Delimited File)
Working with CSV data is simple enough. When building the table, be sure to have proper data types predefined and ensure that your file is clean enough to pull in. Snowflake gives you quite a few options to customize the CSV file format. Here is the doc outlining each and every Snowflake option for the CSV file format. Don’t worry, I won’t make you go read that – the most common changes will be your FIELD_DELIMITER and SKIP_HEADER options. Here is a sample copy statement you can use for your own data loading:
COPY INTO [TABLENAME] ([COLUMN]) FROM @[STAGENAME]

FILE_FORMAT=(TYPE = 'CSV' FIELD_DELIMITER = ’|’ SKIP_HEADER = 1)

PATTERN= '.*.csv';
JSON
JSON has been our first adventure into semi-structured data. I’m not going to go too in depth on this, but if you would like more information check out my blog post all about JSON in Snowflake. Similar to CSVs, there is a multitude of things you can specify in the copy statement. I recommend using the STRIP_OUTER_ARRAY option for most JSON files due to the standard collection process, but it is not always necessary. Here’s another copy statement for JSON data:
COPY INTO [TABLENAME] ([COLUMN]) FROM @[STAGENAME]

FILE_FORMAT=(TYPE = 'JSON’ STRIP_OUTER_ARRAY = TRUE)

PATTERN= '.*.json’;
XML
Full disclosure: XML in Snowflake is weird. It can be annoying and is really the only piece of the entire database that is a little quirky to work with it. Loading is the same as other semi-structured data; it’s querying against it that gets a little bit tricky. Since the purpose of this post is to talk about loading, I’ll save you guys from a five-page tangent on how to query XML (coming soon?). One thing to note is that Snowflake does have quite a few options available for working with XML data. As far as I am aware, the default XML file format has been sufficient for everything I’ve tested. Here’s an example copy statement to bring XML data into Snowflake:
COPY INTO [TABLENAME] ([COLUMN]) FROM @[STAGENAME]

FILE_FORMAT=(TYPE = ‘XML’)

PATTERN= '.*.xml’;
Avro
Now that we’ve played with JSON and XML data, I can show you how easy it is to load and work with Avro and essentially every other semi-structured data format that Snowflake supports. The thing to keep in mind with any semi-structured data is that you must load this data format into a table containing a VARIANT column. After building a table that fits my requirements, all I do to load my table with Avro data is this:
COPY INTO [TABLENAME] ([COLUMN]) FROM @[STAGENAME]

FILE_FORMAT=(TYPE = ‘AVRO’)

PATTERN= '.*.avro’;
Avro differs from JSON and CSV because it only supports one additional file format option, which is COMPRESSION. After pulling in our Avro file, we can query against it the same way we worked with JSON data last week.
SELECT

[VariantDataColumnName]:[AvroKey]::[DataType] [NewColumnName]

FROM [TableName];
ORC
If you can’t tell, I’m starting to get excited. I could literally copy and paste the above paragraph to describe working with ORC data in Snowflake. Variant table … query with SQL … rewire your brain to actually enjoy working with semi-structured data … and “boom” we’re done. To query ORC data, you can copy the statement for Avro. One thing that is important to keep in mind is that ORC does not have any supported file format options, so your copy statement should always look like these first two lines. Here’s another fancy copy statement:
COPY INTO [TABLENAME] ([COLUMN]) FROM @[STAGENAME]

FILE_FORMAT=(TYPE = ‘ORC’)

PATTERN= '.*.orc’;
Parquet
I wish I had more to tell you guys, I really do. Parquet is going to be the exact same procedure. Snowflake has really done an incredible job creating a static experience with MOST semi-structured data (XML, I hate you). Here is a Parquet copy statement:
COPY INTO [TABLENAME] ([COLUMN]) FROM @[STAGENAME]

FILE_FORMAT=(TYPE = ‘PARQUET’)

PATTERN= '.*.parquet’;
Similar to JSON, ORC, and Avro, we can query parquet with the same SQL statement.
Why Do I Care?
To be completely honest, just looking at an Avro, Parquet or JSON file kind of gives me anxiety. I’m a simple man who likes to look at simple, structured data. Loading data into a database can quickly become a cumbersome task, but with Snowflake all of the normal headaches are removed from the process. Snowflake makes it so easy to load, parse and create semi-structured data out of almost anything. The world of opportunity this opens for businesses is exponential. In my mind, Snowflake opens up the world to, “If we have the data, we load it and use it. Nothing is off limits.”
I hope you enjoyed learning more about Snowflake’s loading and file formats! Next time we’re going to talk about the other side of the coin: unloading data in Snowflake. If you would like to continue the Snowflake discussion somewhere else, please feel free to connect with me on LinkedIn here!