
This blog post is Human-Centered Content: Written by humans for humans.
Sigma’s action framework has come a long way. Bulk update and bulk delete gave app builders serious power over input tables. But one gap remained: There’s no native way to insert multiple rows with a single action. Sure, you could chain 48 insert row actions together, or use some stored procedure wizardry, but those methods were not the elegant solution I was looking for. The gap in capabilities bothered me until I realized the building blocks for a workaround were already there.
Why Use Bulk Inserts?
Fair warning: this is an advanced technique with real tradeoffs. Sigma likely hasn’t shipped native bulk insert for good reason — it’s computationally expensive, and the snapshot method Sigma proposed handles many of the same use cases more efficiently. But snapshots don’t cover everything.
Think about a sales team building a custom product package for a customer. They need to assemble a variable number of line items then submit the whole thing for supervisor approval. Or, consider an audit log that needs to capture the exact state of a submission at the moment it was sent, not just the deltas. These are the workflows where bulk insert earns its complexity.
Why Not Just Use Versioning/Snapshots?
If you are not familiar, Snapshots capture versioned change logs that get replayed against the base table with a given shape (x rows, y columns). They then replay those changes against the base table to reconstruct version. They don’t capture the entire state of a table. The bulk insert method I propose serializes the full table state as a single row.
On the one hand, snapshots are great. You can add new versions and restore alterations, this is ideal for making comparisons between multiple potential states, but this is where the issues lie. However, unless you copy and paste the rows in and manually set them to a new version before editing, it is hard to make past versions which persist, and data governance falls out the window when past versions can be edited directly. Additionally, snapshots still work by altering a base table and only track changes one row at a time. If your users need to create large tables with dozens or hundreds of new rows especially if the number of rows can vary, then the batch inserting method may make more sense than snapshotting.
For snapshot setup, Sigma’s own guide is excellent. The rest of this post focuses on what snapshots can’t do.
How to Bulk Insert Rows in Sigma: Step by Step
1. Create a user input table
- Additionally, any information which is a single value such as customer or program ID can be set on a control rather than a column on the original table
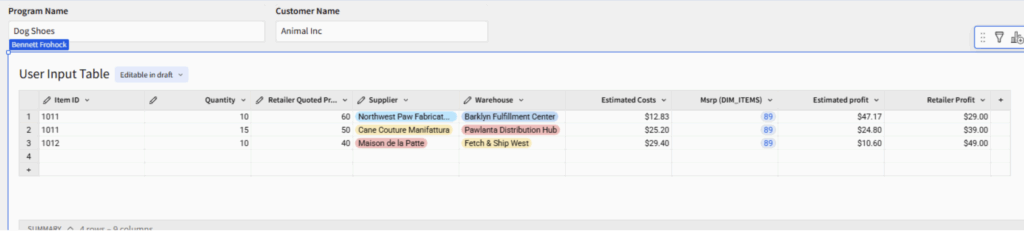
Above: In this example table, a sales team can enter item codes, supplier and warehouse information to discover information about profits to create a holistic sales package for a customer. The table relies on multiple lookup fields based on user input.
2. Create an intermediary Receiver table
- After you have identified which rows you would like to insert create a new blank input table. There are multiple ways to configure this, but the way I like to do it is to create one matching column in the input table for each input column in the source.
- You can choose to store calculations as well (especially if they are point in time dependent lookups) or recompute them once you pull the data back out. I’ll show you how to perform the latter method. But the best practice here will be to store only necessary information.
- Create a column for any control values you wish to store.
- Every Column in this table should be set to text.
- Avoid using spaces in column names for this table (These columns will be referenced directly in SQL later.)
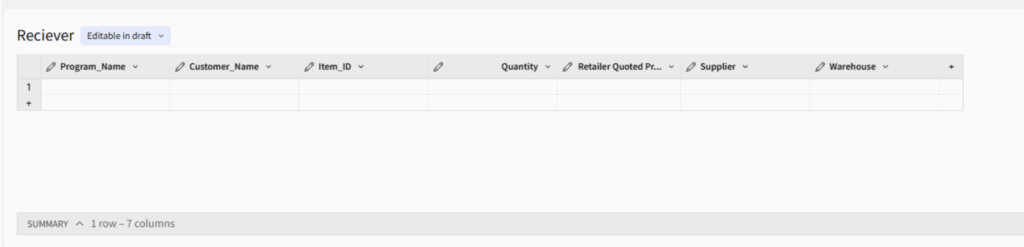
A blank receiver table without lookup fields, ready to record user input data.
3. ArrayAgg() all columns in the insert row statement.
- Figure out what is going to kick off your action. We will use a submit button here:

- The process of bulk insert is much more straightforward if you filter the source table first. This way you can use a simple ArrayAgg() or ListAgg() function without having to worry about trying to filter in the function.
- You’ll also want to ensure that all aggregated columns have the same number of rows. One method for dealing with nulls would be to use a coalesce function to replace them with blank spaces or N/A before aggregating. Coalesce([column], “N/A”)
- Optional Cleanup rows in the user input table (delete all if true)
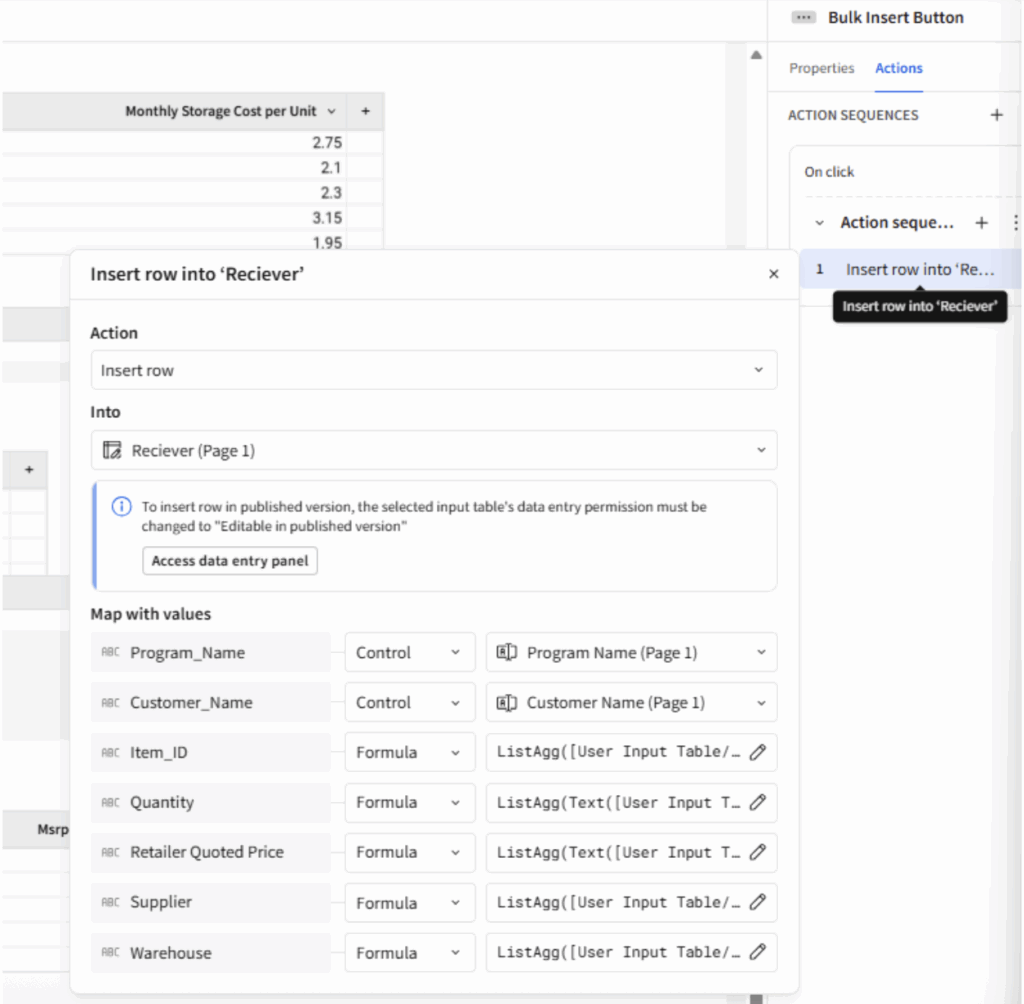 The insert row action uses ListAgg() to record the entire table as a single row. Note all the receiver table columns must be text and some of the user input table columns must be converted to text in the ListAgg() formula. If you use ArrayAgg() then the text conversion happens after – Text(ArrayAgg([Column]) and is necessary for all functions.
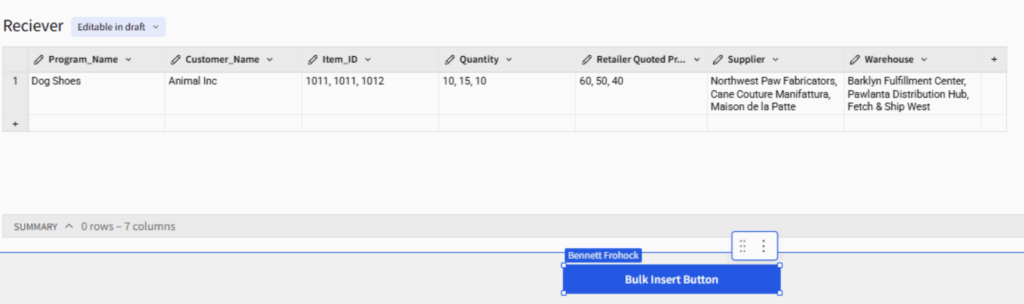
The receiver table with the aggregated information from a single submission in a single row.
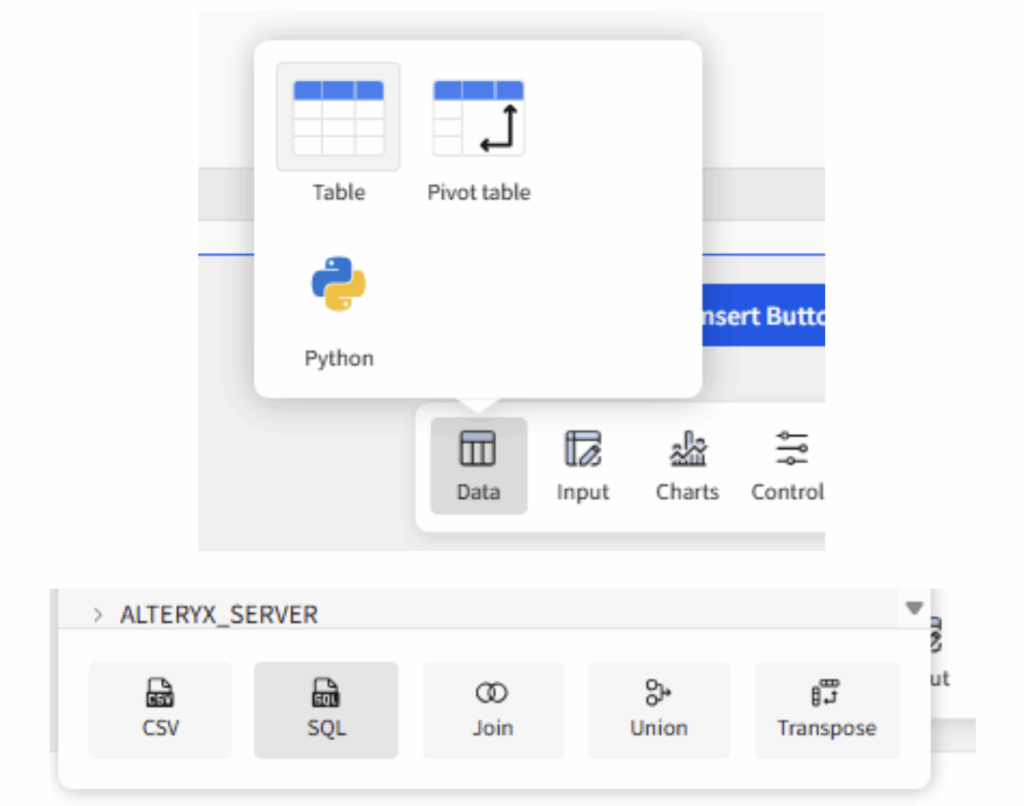
4. Great now you’re done! All the information from your source table is stored in a new row… Wait, you wanted rows plural. To explode our rows back out we will need to use a custom SQL table. We will create one in Sigma using the receiver table as its source:
5. Parse the lists through the select statement using SQL. The SQL splits each delimited string back into individual values and aligns them by position — effectively reversing the ArrayAgg() or ListAgg() serialization. In Snowflake, the WHERE clause ensures all columns stay in sync by matching on the array index.
- I have included SQL examples for Snowflake and Databricks at the end of the blog.
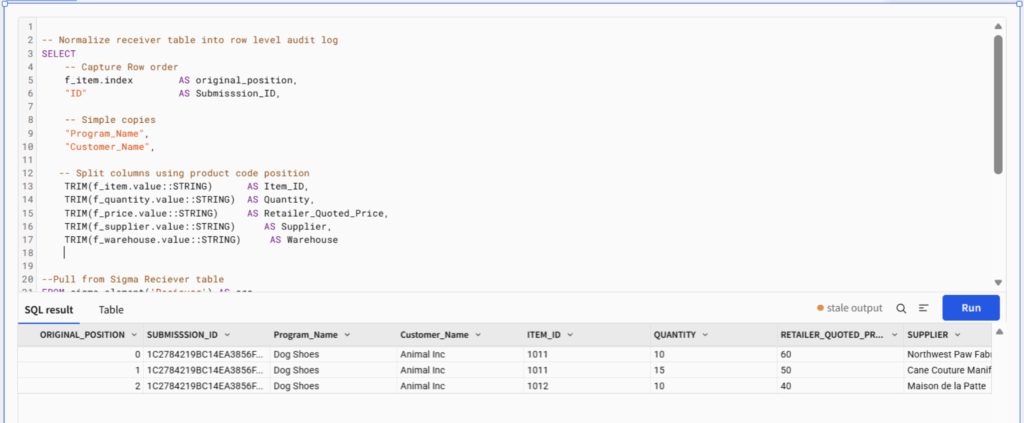
We explode the table back out in this example using Snowflake SQL.
And we are done for real this time!
Why Not As a Stored Procedure or Python Element?
The Bulk insert method keeps all the logic within Sigma, granting analysts full control and visibility of the processes. However, if you have analytics engineer on the team and prefer to optimize for cost over latency, a stored procedure might be a better fit. Check out my action guide to learn more about how to use stored procedures in Sigma. Python is also a solid option with similar tradeoffs to using a stored procedure. You can learn more about enabling and using Python in Sigma here.
Tradeoffs: Bulk Insert vs. Snapshot
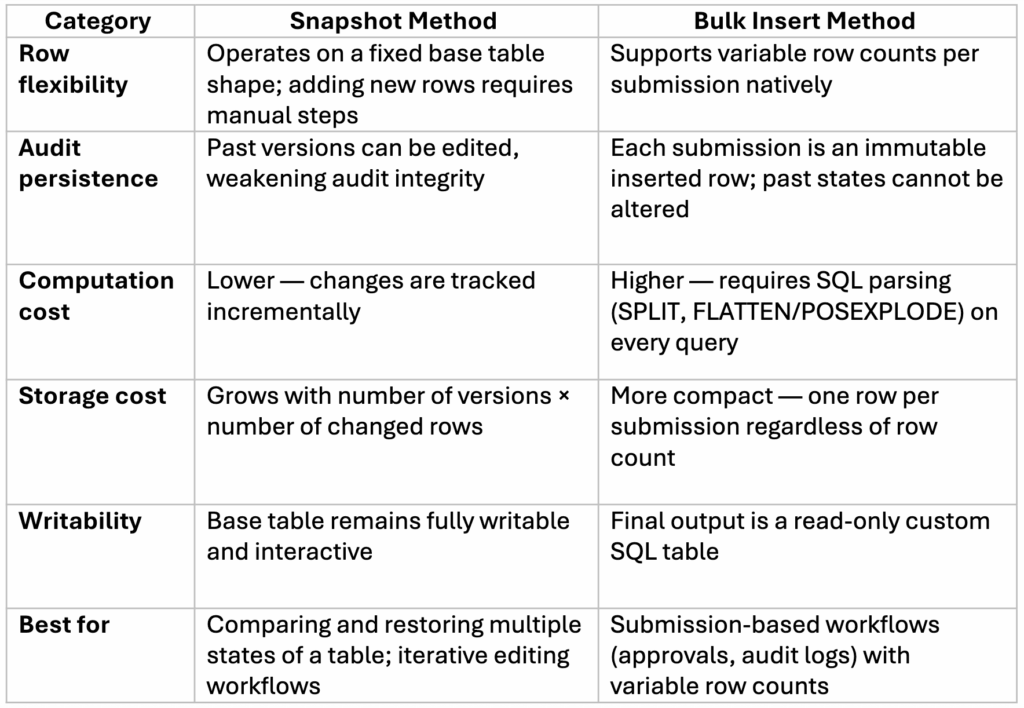
The Bulk Insert Row method I explain here is not without its limitations. For example, the final table is created via custom SQL, meaning it is unwritable and may not be materializable depending on the configuration. Bulk inserting is also more computationally expensive than a snapshot method. On the other hand, storage will be cheaper with the bulk insert method especially as row counts for snapshots increase. The computation costs will most likely outweigh the storage savings if money is your concern when choosing between these methods.
Here is a table which summarizes the pros and cons of each method:
 With those tradeoffs in mind, here’s how to get the most out of the bulk insert method if you decide to use it
Best Practices
Materialize and Expose the Right Layer
The receiver table is the backbone of this workflow, and it’s going to grow fast. Every submission adds a row, and every row gets parsed by your custom SQL on each query. Left unchecked, that gets expensive. Materialization helps, but which table you materialize depends on how your team consumes the data.
Materialize the receiver table when you have multiple downstream consumers with different needs. The receiver stores submissions in their compact, aggregated form. Materializing it locks in that raw data as physical storage, keeping it cheap to scan and available for pipelines outside of Sigma. An analytics engineer might query submission-level metadata (who submitted, when, how many items) without ever parsing the delimited columns. A data pipeline might pull the aggregated data into another system and transform it on its own terms. If your organization needs that kind of flexibility, the receiver is the right layer to materialize, and a warehouse view on top of it gives each team a common starting point.
Materialize the flattened SQL table when your primary consumers are analysts and business users who need clean, row-level data. This pre-computes the expensive SPLIT and FLATTEN operations at materialization time rather than running them on every dashboard load. You’ll use more storage as the rows are already exploded, but for teams where query performance matters most and the data is mainly consumed in its parsed form, that’s a worthwhile exchange. A warehouse view on the SQL table exposes the final output directly, ready for reporting, joins or downstream dashboards.
In high-volume environments, there’s no reason you can’t materialize both — the receiver for durability and pipeline access, the SQL table for query performance. Storage is typically cheap relative to repeated computation. The question is really about who your consumers are and whether they benefit from seeing the data before or after it’s been flattened.
ArrayAgg() or ListAgg()
Both functions are valid and perform similarly. ArrayAgg() has the added benefit of naturally representing different data types — although Sigma still stores the output as text — and produces a standardized JSON array format that’s straightforward to parse in SQL. ListAgg(), on the other hand, is simpler to set up and easier to read in the aggregated receiver table. If your goal is to quickly audit submission data within Sigma, ListAgg() may be the more readable option. If the goal is to write clean, structured data back to the warehouse, ArrayAgg() produces a more robust format.
Filter Before You Flatten
Wherever you land on views, one thing is universal: Filter early. Your custom SQL table should include a tight WHERE clause. Scope by user attributes, program, date range or whatever dimensions make sense for your workflow. The SPLIT and FLATTEN operations are some of the most expensive parts of this pipeline, and the fewer rows they process, the better your dashboard will perform.
Keep Your Data Clean
Here’s the thing about an insert-only workflow: It only grows. There’s no built-in mechanism to prune old records, and if your users are anything like mine, they’ll submit drafts, resubmit and submit again before they’re happy with the result. That’s a lot of orphaned data accumulating in the background.
Build a cleanup strategy from day one — don’t wait until your receiver table has 10,000 rows and your dashboard takes 45 seconds to load. I like to use Sigma’s scheduled actions to clean up older submissions — older than two weeks, for example. If you want more control, a warehouse-side cleanup job that archives or purges stale records on a recurring basis works just as well.
For teams with an approval workflow, consider adding a status column to the receiver table (e.g., “draft,” “submitted,” “approved”). This gives your cleanup logic something to key off of and doubles as a useful filter for end users who only want to see finalized submissions.
Wrapping Up
The bulk insert method isn’t the right tool for every job, but when you need immutable audit trails, variable row counts, or full-state captures of user input, it fills a gap that snapshots and stored procedures can’t quite reach. Like most advanced Sigma techniques, the complexity is front-loaded: Once the receiver table, aggregation formulas and SQL are wired up, your end users get a clean, one-click submission experience.
If you’re building apps in Sigma and running into the edges of what’s natively supported, you don’t have to figure it all out alone. InterWorks has a dedicated Sigma consulting and implementation practice — we help teams design, build and scale production-ready Sigma applications. Whether you’re wiring up your first input table workflow or architecting something more ambitious, reach out to InterWorks. We’d love to help.
Happy building.
CODE APPENDIX:
LISTAGG() parsing:
Snowflake LATERAL FLATTEN example:
-- Normalize receiver table into row level audit log
SELECT
    -- Capture Row order
    f_item.index        AS original_position,
    "ID"                AS Submission_ID,

    -- Simple copies
    "Program_Name",
    "Customer_Name",

   -- Split columns using product code position
    TRIM(f_item.value::STRING)      AS Item_ID,
    TRIM(f_quantity.value::STRING)  AS Quantity,
    TRIM(f_price.value::STRING)     AS Retailer_Quoted_Price,
    TRIM(f_supplier.value::STRING)     AS Supplier,
    TRIM(f_warehouse.value::STRING)     AS Warehouse


--Pull from Sigma Reciever table
FROM sigma_element('Reciever') AS src,

-- Explode each delimited column at the same grain
-- All FLATTEN calls must be on the same index to stay aligned
LATERAL FLATTEN(input => SPLIT("Item_ID",  ',')) f_item,
LATERAL FLATTEN(input => SPLIT("Quantity", ',')) f_quantity,
LATERAL FLATTEN(input => SPLIT("Retailer_Quoted_Price",    ',')) f_price,
LATERAL FLATTEN(input => SPLIT("Supplier",    ',')) f_supplier,
LATERAL FLATTEN(input => SPLIT("Warehouse",    ',')) f_warehouse

-- Keep rows aligned across all flattened columns by matching index position
WHERE f_item.index = f_quantity.index
  AND f_item.index = f_price.index
  AND f_item.index = f_supplier.index
  AND f_item.index = f_warehouse.index;
Databricks POSEXPLODE split string:
-- Normalize receiver table into row level audit log
SELECT
    -- Capture row order
    pos                                     AS original_position,
    ID                                      AS Submission_ID,
    -- Simple copies
    Program_Name,
    Customer_Name,

    -- Split columns using product code position
    TRIM(SPLIT(Item_ID,               ',')[pos]) AS Item_ID,
    TRIM(SPLIT(Quantity,              ',')[pos]) AS Quantity,
    TRIM(SPLIT(Retailer_Quoted_Price, ',')[pos]) AS Retailer_Quoted_Price,
    TRIM(SPLIT(Supplier,              ',')[pos]) AS Supplier,
    TRIM(SPLIT(Warehouse,             ',')[pos]) AS Warehouse

-- Pull from Sigma Receiver table
FROM sigma_element('Reciever')

-- Explode at product code grain using Item_ID as the driver
LATERAL VIEW POSEXPLODE(SPLIT(Item_ID, ',')) exploded AS pos, val;
ArrayAgg() parsing:
Snowflake:
-- Normalize receiver table into row level audit log SELECT -- Capture Row order f_item.index AS original_position, "ID" AS Submission_ID,

-- Simple copies
"Program_Name",
"Customer_Name",

-- Extract values from arrays by position
TRIM(f_item.value::STRING)          AS Item_ID,
TRIM(f_quantity.value::STRING)      AS Quantity,
TRIM(f_price.value::STRING)         AS Retailer_Quoted_Price,
TRIM(f_supplier.value::STRING)      AS Supplier,
TRIM(f_warehouse.value::STRING)     AS Warehouse


-- Pull from Sigma Receiver table FROM sigma_element('Receiver') AS src,
-- Parse each text column as a JSON array, then flatten
LATERAL FLATTEN(input => PARSE_JSON("Item_ID")) f_item,
LATERAL FLATTEN(input => PARSE_JSON("Quantity")) f_quantity,
LATERAL FLATTEN(input => PARSE_JSON("Retailer_Quoted_Price")) f_price,
LATERAL FLATTEN(input => PARSE_JSON("Supplier")) f_supplier,
LATERAL FLATTEN(input => PARSE_JSON("Warehouse")) f_warehouse
-- Keep rows aligned across all flattened columns by matching index position WHERE f_item.index = f_quantity.index AND
f_item.index = f_price.index AND
f_item.index = f_supplier.index AND
f_item.index = f_warehouse.index;
DataBricks:
-- Normalize receiver table into row level audit log SELECT -- Capture row order pos AS original_position, ID AS Submission_ID,

-- Simple copies
Program_Name,
Customer_Name,

-- Extract values from arrays by position
TRIM(FROM_JSON(Item_ID, 'ARRAY<STRING>')[pos])          AS Item_ID,
TRIM(FROM_JSON(Quantity, 'ARRAY<STRING>')[pos])          AS Quantity,
TRIM(FROM_JSON(Retailer_Quoted_Price, 'ARRAY<STRING>')[pos]) AS Retailer_Quoted_Price,
TRIM(FROM_JSON(Supplier, 'ARRAY<STRING>')[pos])          AS Supplier,
TRIM(FROM_JSON(Warehouse, 'ARRAY<STRING>')[pos])         AS Warehouse

-- Pull from Sigma Receiver table FROM sigma_element('Receiver')
-- Explode at product code grain using Item_ID as the driver LATERAL VIEW POSEXPLODE(FROM_JSON(Item_ID, 'ARRAY')) exploded AS pos, val;