
This blog post is Human-Centered Content: Written by humans for humans.
In an era where data-driven decisions are essential, organisations are increasingly looking to move beyond analysis and into intelligent automation. Snowflake has already simplified data querying through tools like Cortex Analyst and Cortex Search. But what if you could go further — building agents that not only answer questions but also take action?
In this blog, I’ll show you how to extend Snowflake’s standard agent capabilities to create integrated intelligence agents that orchestrate workflows across multiple systems. Using a graduate admissions use case, we’ll explore how teams can connect data, automate onboarding and streamline financial processing directly within Snowflake.
While this example centres on graduate admissions, the same pattern applies across industries — from finance and healthcare to logistics and retail — where data-driven orchestration can replace manual processes with intelligent automation.
Use Case: One Business Process. Multiple Systems.
A university graduate admissions officer is using Snowflake Cortex Analyst to visualise data about newly accepted students across programs. But in practice, the duties of the admissions office span multiple systems. When onboarding new students, the team must also handle:
- Onboarding Coordination: For each accepted student, admissions manually raises a ticket in a separate project management tool so IT can set them up, requiring repeated data entry and checks.
- Finance Processing: Admissions also coordinates with Finance, manually entering student details into a web-based system to generate a PDF invoice.
All of this forces teams to switch between systems and rely on manual input, which is inefficient, time-consuming, and error-prone.
But fear not: Snowflake Intelligence comes to the rescue.
What is Snowflake Intelligence?
Released late last year, Snowflake Intelligence (SI) agents provide an interface where users, using natural language, can request data and execute tasks by connecting to different systems. Don’t worry if this still sounds a bit abstract; you will see what this exactly means as we progress through this blog.
When setting up an agent, there are several layers we need to tackle which I’ve unpacked in the following diagram:
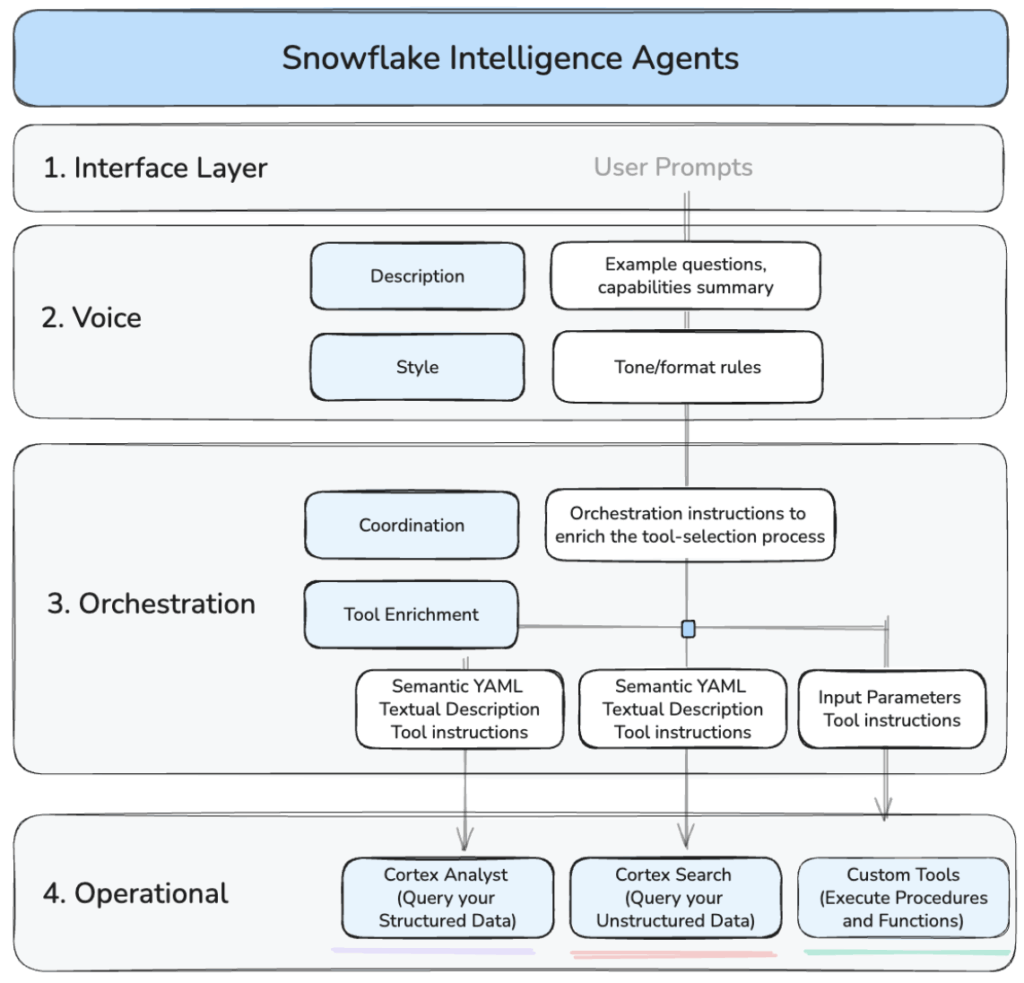
Above: Key conceptual areas for the deployment of a Snowflake Intelligence Agent.
In short, these are the areas that we need to configure:
- User Interface: A chat experience where users pose questions in natural language. There are two options: we either use the chat interface provided by Snowflake or access the agent via the API. In this blog, we’ll use the former.
- Voice: Give your users a description of your agent, a repertoire of questions and actions it can handle, and define instructions on how your agent should sound and respond to users.
- Orchestration Layer: Defines the instructions governing how the agent uses its available tools, including both general orchestration guidance and tool-specific inputs.
- Operational Layer: Contains the underlying business logic defined in Snowflake prior to configuring the agent. This includes capabilities such as Cortex Analyst, Search, as well as existing stored procedures and functions.
Let’s get started!
Setting Up: From Logic to Agent Deployment
There are a few things we need to have in place before we setup an agent (like relevant databases, schemas, etc). I will not go over the full implementation in this article. However, I have included all the code being referenced in this Github repository.
Step 1: Prepare the Operational Logic
Before building the agent, we need to build in Snowflake all the operational logic this agent can have access to. This logic can be as simple or as sophisticated as required, but the principle we will follow is consistent: isolate integrations in Snowflake and expose them for secure agent access as needed.
If you recall, in the use case definition earlier we spoke that the student admissions team had to perform several tasks manually, namely:
- Creating tickets in a separate project management tool called Plane
- Coordinating the generation of PDF invoices
To handle each of this we will create two stored procedures, one will handle the onboarding workflow and the other the invoicing.
They both interact with external APIs. The former with project management tool Plane, the latter with invoice-generation API. Snowflake can interact with APIs using External Access Integrations. You can read more about this here if you are interested.
I will not cover the logic of these stored procedures in the article, but you can find all the relevant code in this GitHub repository. I am including below a high-level diagram so you can understand what each one does.
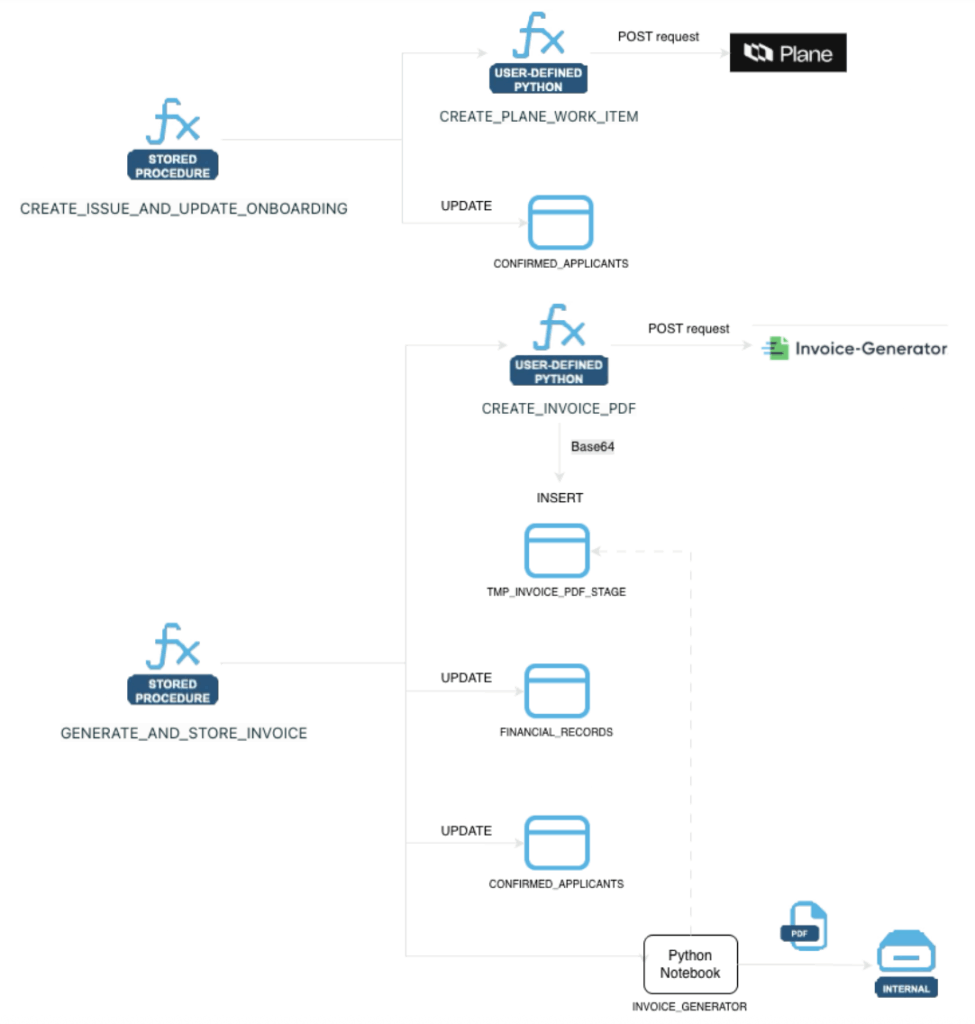
Above: Stored procedure logic designed to support onboarding and invoicing workflows.
Step 2: Creating and Configuring the Agent
With the core business logic in place, now it’s time create the agent itself. We can do it via the web UI, but in this blog we will do it programmatically using Snowflake’s API.
I will first get hold of a Snowflake programmatic access token (I recommend a different authentication mechanism for production environments) and export the necessary variables in my environment:
bash

export DATABASE_NAME="DB_NAME"
export SNOWFLAKE_ACCOUNT_BASE_URL="https://UPDATE-DETAILS.snowflakecomputing.com"
export SCHEMA_NAME="SCH_NAME"
export INTELLIGENCE_AGENT="xxxxxxx-this-is-your-PAT-xxxxxxx"
Then I will create the agent using this curl command:
Bash
curl -X POST "$SNOWFLAKE_ACCOUNT_BASE_URL/api/v2/databases/$DATABASE_NAME/schemas/$SCHEMA_NAME/agents" \
--header 'Content-Type: application/json' \
--header 'Accept: application/json' \
--header "Authorization: Bearer $INTELLIGENCE_AGENT" \
--data '{
"name": "ADMISSIONS_INTELLIGENCE_NEW_2026",
"comment": "This agent supports Admissions in analyzing admissions data using Cortex Analyst and coordinating several related operations.",
"models": {
"orchestration": "claude-4-sonnet"
}
}'
You should receive confirmation of creation in your command line output:
"status" : "Agent ADMISSIONS_INTELLIGENCE_NEW_2026 successfully created."
This agent is currently created but totally empty. Let’s put some content in it.
Below I have included a boiled-down version of the full script so you can see the key sections. It should be fairly self-explanatory. But remember that I have the full version of this file here.
curl -X PUT "$SNOWFLAKE_ACCOUNT_BASE_URL/api/v2/databases/$DATABASE_NAME/schemas/$SCHEMA_NAME/agents/ADMISSIONS_INTELLIGENCE_NEW_2026" \
--header 'Content-Type: application/json' \
--header 'Accept: application/json' \
--header "Authorization: Bearer $INTELLIGENCE_AGENT" \
--data '{
"profile": {
"display_name": "Biology Admissions Agent"
},
"instructions": {
"response": "You are a specialized academic operations agent...",
"sample_questions": [
]
},
"tools": [
{
"tool_spec": {
"type": "generic",
"name": "onboard_user_and_update",
"description": "Trigger this tool...",
"input_schema": {

}
}
},
{
"tool_spec": {
"type": "generic",
"name": "generate_and_store_invoice",
"description": "Trigger this tool...",
"input_schema": {

}
}
},
{
"tool_spec": {
"type": "cortex_analyst_text_to_sql",
"name": "CONFIRMED_APPLICANTS",
"description": "Definition:..."
}
}
],
"tool_resources": {
"onboard_user_and_update": {
"type": "procedure",
"identifier": "BIOLOGY_ADMISSIONS_DB.INTAKE_2025_26.CREATE_ISSUE_AND_UPDATE_ONBOARDING",
"execution_environment": {
}
},
"generate_and_store_invoice": {
"type": "procedure",
"identifier": "BIOLOGY_ADMISSIONS_DB.INTAKE_2025_26.GENERATE_AND_STORE_INVOICE",
"execution_environment": {
}
},
"CONFIRMED_APPLICANTS": {
"semantic_model_file": "@BIOLOGY_ADMISSIONS_DB.INTAKE_2025_26.BIOLOGY_DOCS_STAGE/biology_confirmed_applicants.yaml",
"execution_environment": {
}
}
}
}'
In the script above we are covering all the fronts we spoke of earlier regarding the agent setup: Defining its instructions and connecting it to the orchestration layer with the required tools. These tools are linked to business logic via stored procedures and semantic models to manage operational workflows.
In the script you will notice three tools:
- cortex_analyst_text_to_sql called “CONFIRMED_APPLICANTS”. This is a Cortex Analyst that lets the agent turn natural-language questions about those students into precise SQL queries over the right tables and joins automatically.
- Two custom tools (onboard_user_and_update and generate_and_store_invoice), representing the two stored procedures we created earlier.
Agents can be as simple or as complex as your use case demands it. Some will require Cortex, Search and Custom Tools, and some will only require one of these. Either way, the structure of your PUT call will closely mirror the example above.
To verify the setup, just call:
bash

curl -X GET "$SNOWFLAKE_ACCOUNT_BASE_URL/api/v2/databases/$DATABASE_NAME/schemas/$SCHEMA_NAME/agents/ADMISSIONS_INTELLIGENCE_NEW_2026" \
--header 'Content-Type: application/json' \
--header 'Accept: application/json' \
--header "Authorization: Bearer $INTELLIGENCE_AGENT" | jq .
And lift off! You should get something like the below, confirming the agent is ready to go:
{
"agent_spec": "{...}",
"name": "ADMISSIONS_INTELLIGENCE_NEW_2026",
"database_name": "SNOWFLAKE_INTELLIGENCE",
"schema_name": "AGENTS",
"owner": "ENGINEER",
"created_on": "2025-12-21T04:39:39.198+00:00"
}
Testing the Intelligence Agent
Now that the intelligence agent and its tool integrations are configured, let’s test the full workflow.
Remember that the University Admission team is already using Cortex Analyst, so we will focus on testing the additional logic we’ve just implemented.
First, let’s head into the user interface of our agent. In Snowflakle UI, go to AI & ML -> Agents. On the top right of that screen you will see a Preview button:

Clicking on it will take you to the Agent screen:
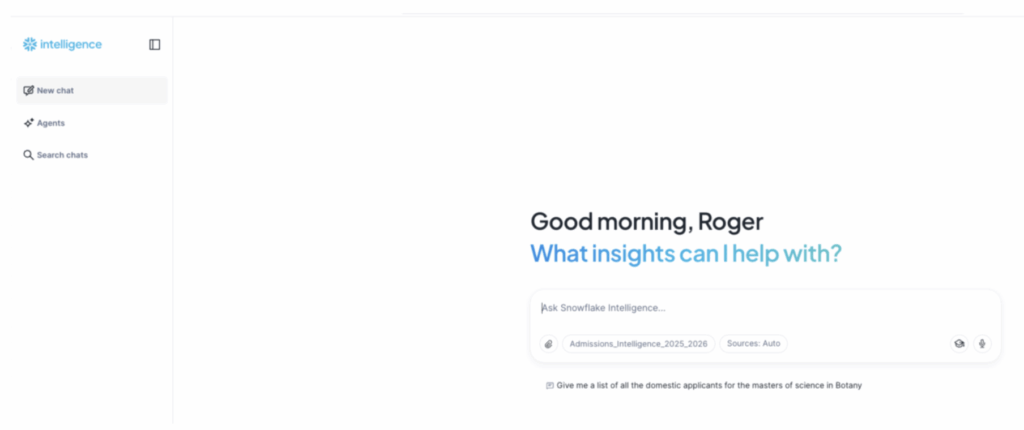
And behold: Our SI Agent ready! We will divide the testing into three areas:
1. Retrieving Accepted Applicants
Start with prompts, such as:
[user prompt]
How many students have been confirmed for each program in the Biology admissions cohort this year?
This answer is useful, but we can further refine it with:
[user prompt]
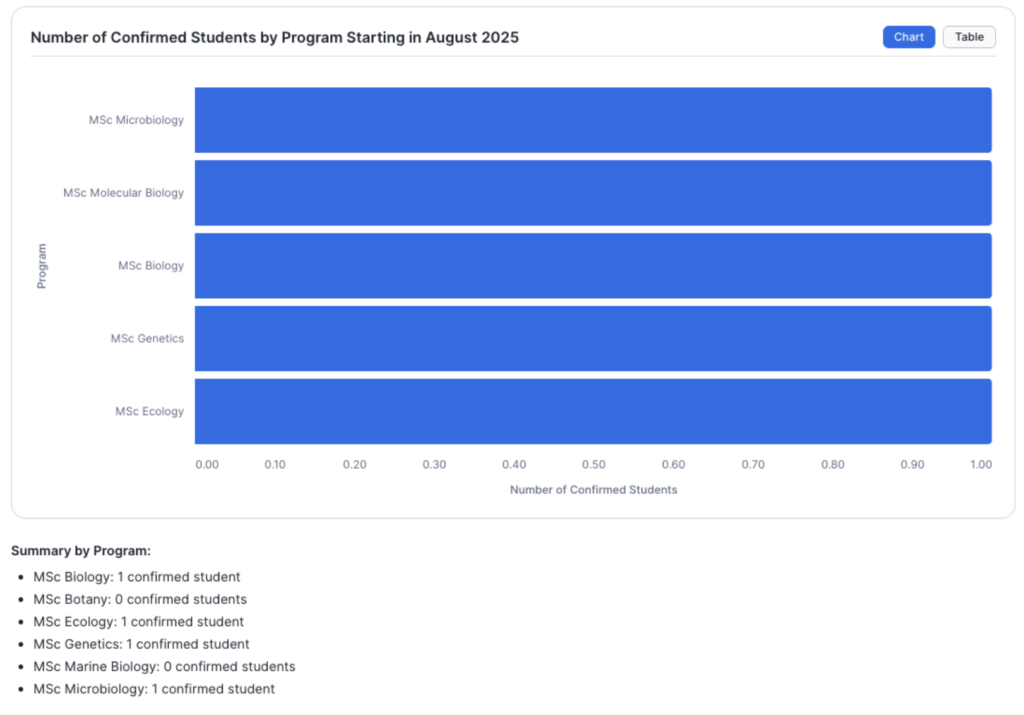
Give me the details for the confirmed applicants that are supposed to start this August
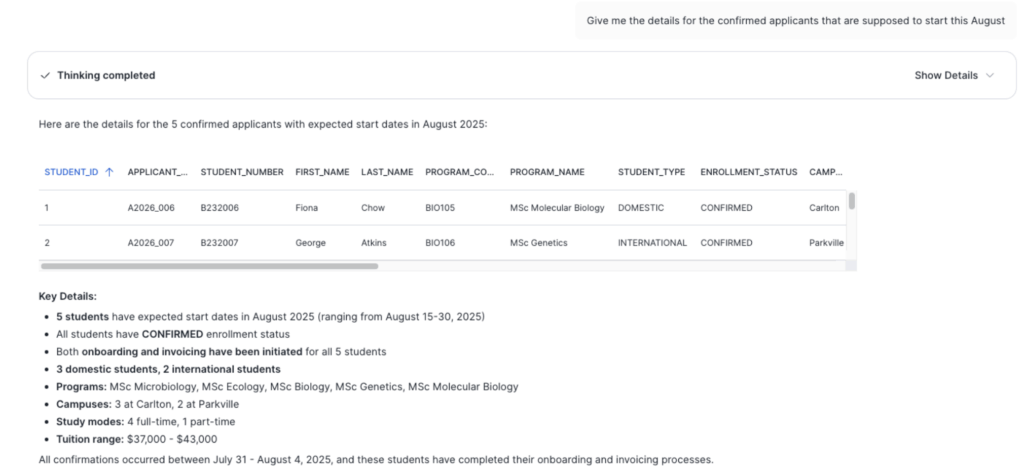
So far, we observe standard Cortex Analyst behaviour. Notice that the agent provided a scrollable list of five students. This is important because in a second this will become the “scope” of our next prompt.
2. Interacting with External Project Management Tools
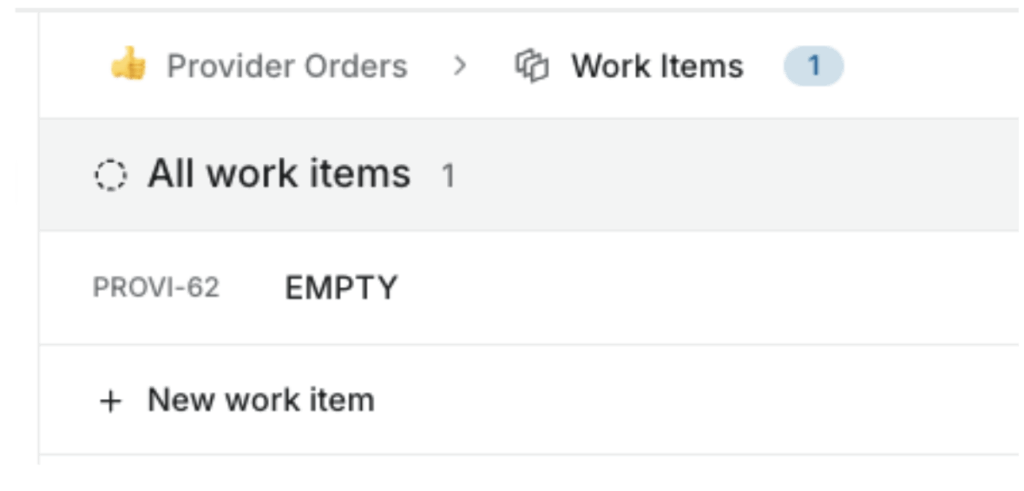
Now Admissions wants to coordinate with IT, as the latter need to issue campus access credentials. To do so Admissions need to create one ticket in Plane (external project management tool) for each student. Quite a tedious and repetitive task.
At the moment Plane is empty:
But now, the Admissions team can simply get the Snowflake agent to create these tickets by asking:
[user prompt]
Start onboarding for these students
The agent gets to work and, after a few seconds, it returns a message confirming that it has successfully created several tickets for the IT team to implement:

Let’s find out if that’s correct. If we now head over to Plane, the external project management tool, we can indeed see that several tickets have been created, one for each of the five students in scope:
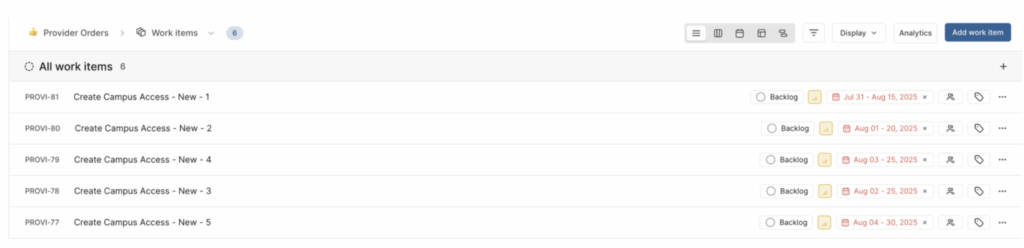
Under the hood, the agent is simply leveraging the tools it has access to, in this case, one of the stored procedures we created earlier.
Great! That takes care of the first task.
3. Automatically generating PDFs
Next, these same accepted students need to be sent invoices for 15% of their annual tuition to secure their place.
This time, the Admissions team will instruct the SI agent to generate and store PDF invoices, ready for emailing.
This step is a bit more involved: We need to combie data from both the confirmed applicants (e.g. name, student ID, program details) and financial records (e.g. tuition amount of the program they’ve been accepted into) to create complete invoices.
But thanks the logic we created earlier, the Agent should be able to handle it.
The admissions user can simply ask the agent:
[user prompt]
Now generate the invoice for these students
In a few seconds, the agent confirms the task is done.
For the purposes of this demo, the agent will store the PDFs in an internal stage. If I query this stage I can see five files.

Above: PDF invoices stored in internal Snowflake stage
And if I download one of these, I can see the full detail:
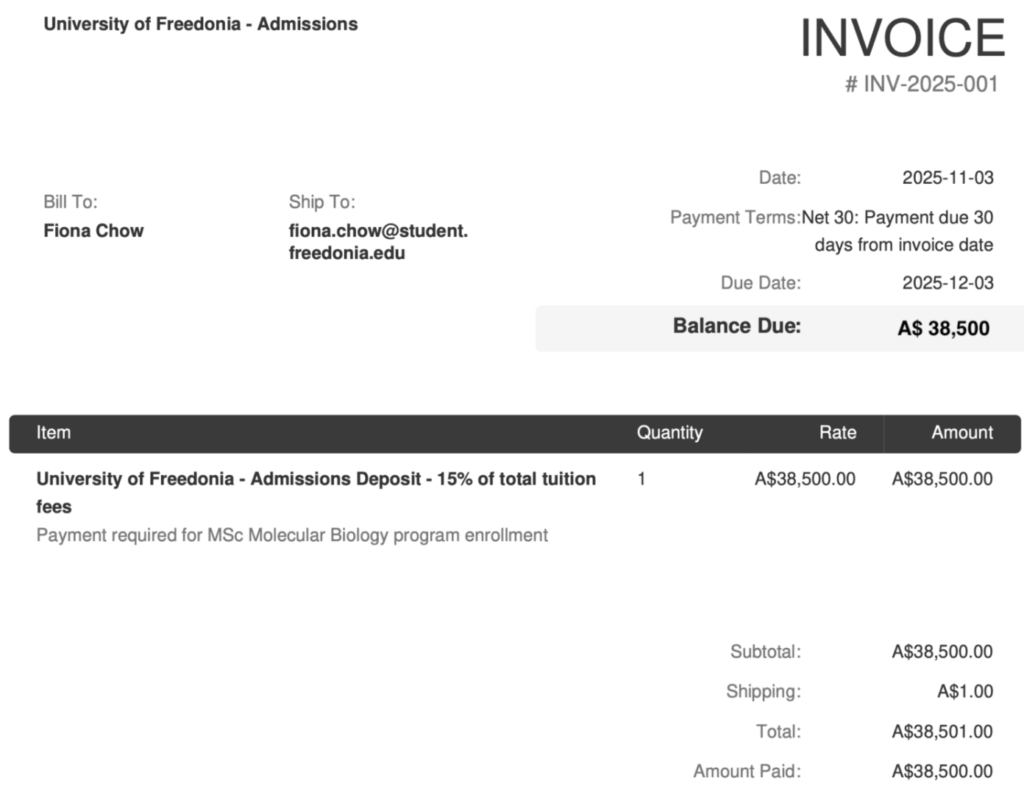
Great! All the details of the document have been populated based on information for these students existing in the financial tables we had in Snowflake.
Conclusion
The graduate admissions scenario highlights just how powerful Snowflake Intelligence Agents can become when enhanced with custom tool integrations. By connecting data insights to real operational workflows, teams can move seamlessly from understanding to action — all from a single conversational interface.
This approach demonstrates a broader shift: Moving from isolated data analytics to truly intelligent orchestration. Whether it’s admissions, finance approvals, inventory management or customer onboarding, the same structure — data logic in Snowflake, connected tools via agents — can transform repetitive processes into reliable, automated workflows.
As organisations continue to blend analytics with operational automation, Snowflake Intelligence moves beyond just being a data platform. It’s evolving into a coordination layer for the intelligent enterprise.