
So, you’ve been looking to copy or move one of your Tableau Server sites to another server. Or, perhaps you’ve got multiple Tableau Server environments that you’d like to consolidate into one shared server. Maybe you’re planning a migration to change the identity store your Tableau Server relies on. If any of these describe your situation, you are in the right place!
In this post, we’re going to be addressing exactly these questions by diving into site migrations in Tableau Server, specifically using Tableau Server’s site import/export method. We’ll go over the export and import process, things to watch out for, and when to perform this type of migration.
Before we begin, a quick review on Tableau Server sites: Sites in Tableau Server allow for multi-tenancy. In other words, Tableau Server sites let you create siloed off sections of the Tableau Server for different user bases where the sites are all accessible at the same Tableau Server URL. Each site has its own set of users, and users can be members of multiple sites on the same Tableau Server. We’ll be discussing the migration of sites in this article.
When Should I Use the Site Export/Import Process?
With site imports and exports, you can move or restore a single site’s content as opposed to restoring the entire server’s content using a Tableau Server backup. This comes in handy for different scenarios, such as:
- Migrating to a new Tableau Server that has a different identity store type from the source server: One example would be migrating from a server relying on a local identity store to one using Active Directory. For these types of migrations where the type of identity store differs between source and target server, restoring a Tableau backup (via tsm maintenance restore) is not supported, so site migrations are often the most suitable method of moving to a new instance.
- Copying a site’s content to another site, either on the same server or to a different one: Site exports and imports can be used to duplicate sites or to push site-level content to a development server in an isolated fashion.
- Combining or splitting out Tableau Server environments: One can also leverage site migrations to consolidate multiple Tableau Server environments into one single server by exporting different servers’ sites and importing into one shared In the same way, sites from one single server can be exported and then imported into multiple new environments (for example, for creating departmental environments vs. one shared server).
What Do I Need To Watch Out For?
There are a few considerations and caveats to keep in mind when performing site migrations:
- Tableau versions: The target server must be on a Tableau Server version that is equal or newer to the version installed on the source server.
- Locking of site during export: For the duration of the export, the site being exported becomes locked and users are unable to sign in. All other sites on the Server will remain accessible and are not affected by the export. The time required to export depends on the size of the site, so it’s best to check on this before running the export in order to communicate the expected downtime effectively.
- Disk space: This is another point that relates to the site size. Before kicking off a site export, it’s important to verify there is sufficient free disk space on the Tableau data disk. Much like with the export duration, the required disk space is dependent on the site’s size, so as a general rule of thumb, we’d recommend having at least 40% of the data disk available before kicking off an export.
- Connections with embedded OAuth access tokens: OAuth tokens do not get carried over and all OAuth tokens need to be re-added manually after importing a site.
- Site content: Most of the site content will be migrated with the site export and import, including all workbooks, data sources, schedules and groups. The hierarchy of projects and the correct permissions to content are also preserved. An exception to this are prep flows which don’t get captured in a site. Moreover, custom view URLs change during migration, which can affect users’ bookmarks to custom views.
Pre-Migration Steps:
In addition to the considerations listed above, we’d also recommend taking some pre-migration steps to ensure a smooth export and import:
- Add users to the target site: For site migrations, each user account from the source site needs to be mapped to a user on the target site. During the export, Tableau Server writes out a .zip file containing the site’s data, which also includes all of the site users. Each user on the source site must have exactly one corresponding user on the target site; many-to-one or one-to-many mappings between the source and target sites are not supported for usernames. Later on, during this import step, Tableau creates .csv files that list all the of the site users with corresponding matches that are detected. How the .csv files work in detail is outlined in the “Importing a Site” section below, but for now it’s important to know that Tableau requires us to have one target site user for each one that is exported from the source.
To prepare for a site export, we’ll remove inactive users from our source site. This is especially important in scenarios where the target site’s server relies on Active Directory or LDAP as the identity store. The reason for this is that we might not be able to add users to the target who are included in the export file, but who are not found in Active Directory/LDAP on the target. Next, we’ll add all of the source site’s users to the target site. Adding users to the target before exporting helps reveal inactive users (ones that throw an error when trying to add) while also preparing the target with the 1:1 mapping of users. - Schedules: It’s a similar story for schedules: Like with the users, there must be exactly one schedule on the target server for each source Before exporting a site, we’ll add all of the source’s schedules to the target server. Overall we’ve got more flexibility with schedules compared to with the user mappings because we can add new schedules at any time if needed (even right before the final import step, but more on that later!)
- Workbooks and Data Sources: There isn’t any manual mapping of workbooks and data sources when performing a site import/export, so no actions are required. As an optional step though, we’d recommend removing stale/inactive workbooks and data sources on the source site prior to running the export — this will help reduce the export duration and the downtime on the site.
One note on the TSM commands and screenshots in these next few sections: In our example, we’re running the site export and import on a Linux machine, but the TSM commands and command line output will look the same on Windows server!
Exporting a Site
Now that we’ve prepared our sites, let’s get started! As we touched on briefly, the first step is to export the source site. To start a site export, we’ll run the command:
tsm sites export --site-id MigrationSourceSite --file test_export.zip

Once the site export has finished, we will see a .zip file in the siteexports directory. By default this is located at C:\ProgramData\Tableau\Tableau Server\data\tabsvc\files\siteexports (Windows) or /var/opt/tableau/tableau_server/data/tabsvc/files/siteexports (Linux).
This export file needs to be copied to the target server, specifically to the directory where the Tableau import searches for export files. Default locations for this are C:\ProgramData\Tableau\Tableau Server\data\tabsvc\files\siteimports (Windows) or /var/opt/tableau/tableau_server/data/tabsvc/files/siteimports (Linux).
Importing a Site
Now that we’ve got the export copied over to the target server in the siteimports directory, we are ready to import! The site import process occurs in two step, i.e. with two TSM commands:
1. The tsm import step:
For the first part of the import we’ll run the command
tsm sites import --site-id MigrationTargetSite --file test_export.zip


In our example above, we are importing the export file source_export.zip into the site MigrationTargetSite (this is the site-id we’re passing into the command). Once this job completes, we can find a directory named “mappings” within the import’s working directory, which is where the .csv mapping files are located:

Before we proceed with the second import step, we’ll need to verify and populate these mapping files. Specifically, we’re making sure the files mappingsSystemUserNameMapper.csv and mappingsScheduleMapper.csv are populated correctly. Here is an example of a user mappingsSystemUserNameMapper file in a Linux environment where we can see the site’s five users that we’re importing:
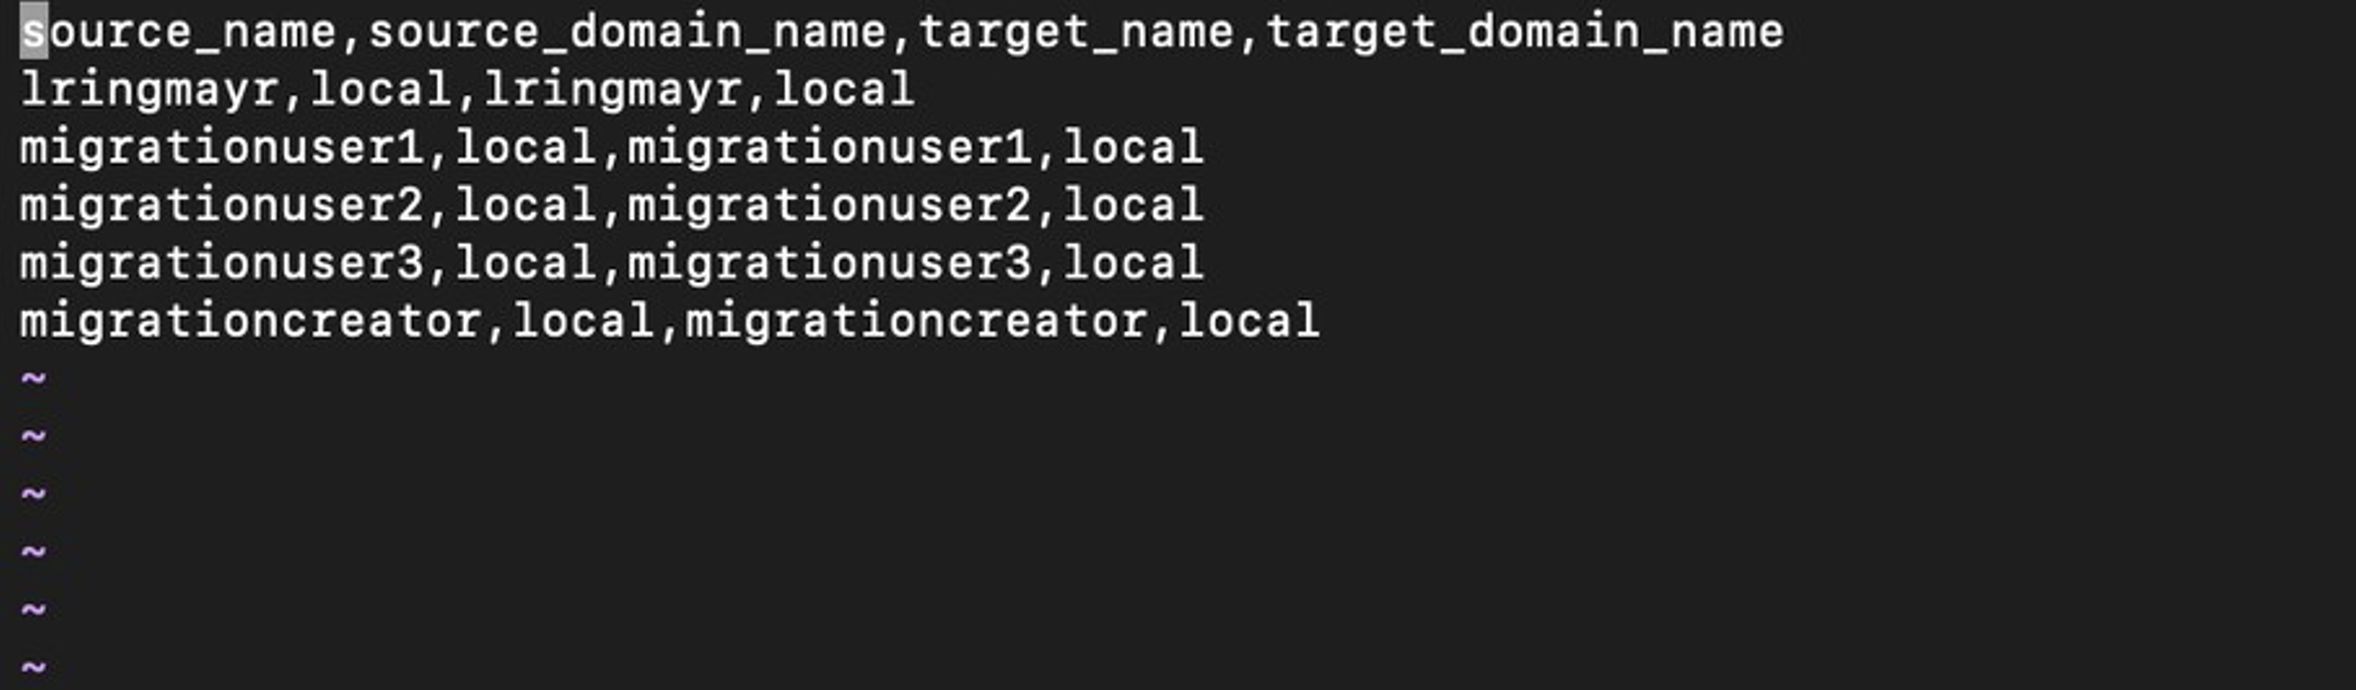
Each source_name has one corresponding target_name, and in this case, we’re migrating from local identity store to local identity store, hence the source_domain_name and target_domain_name are both “local,” as opposed to an actual domain for Active Directory/LDAP identity stores.
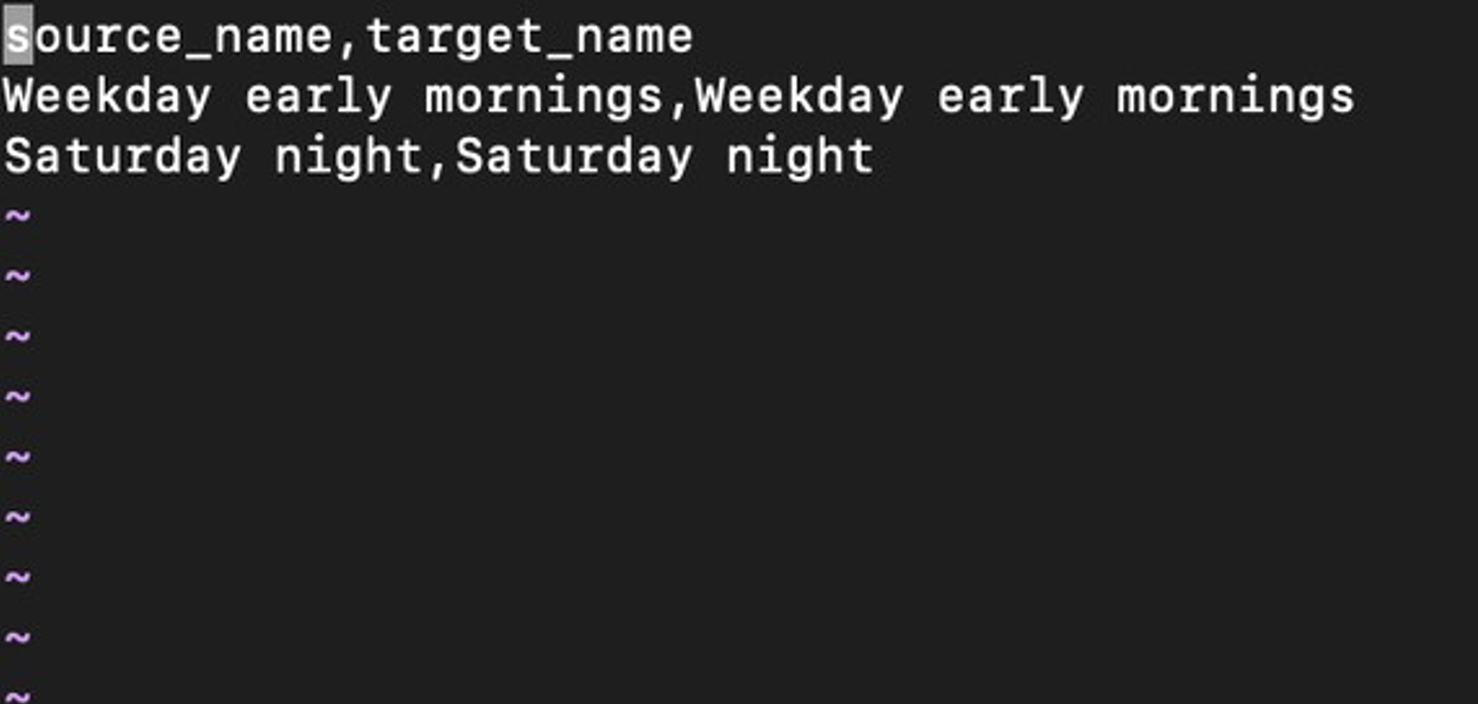
Since we added our users to the target site before exporting already, Tableau was able to populate the usernames in the target_name column for us. If Tableau cannot find a matching target_name for a source_user, a placeholder value of “???” will show up in the mapping file for that user. Any “???” entries will need to be replaced with an actual target_name that the source_name can map to before we finalize the import with the tsm import-verified command. This also applies to the mappingsScheduleMapper.csv- if there are any “???” in the mapping file, we can add missing schedules to the target server and then fill out the field in the mapping file. In our case, we have two schedules that are present in both the imported .zip file from the source (source_name) and on the target server (target_name):
Having completed our mappings, we are ready to proceed.
2. The tsm import-verified step:
After the .csv mapping files are fully populated, we run the import-verified step via the command:
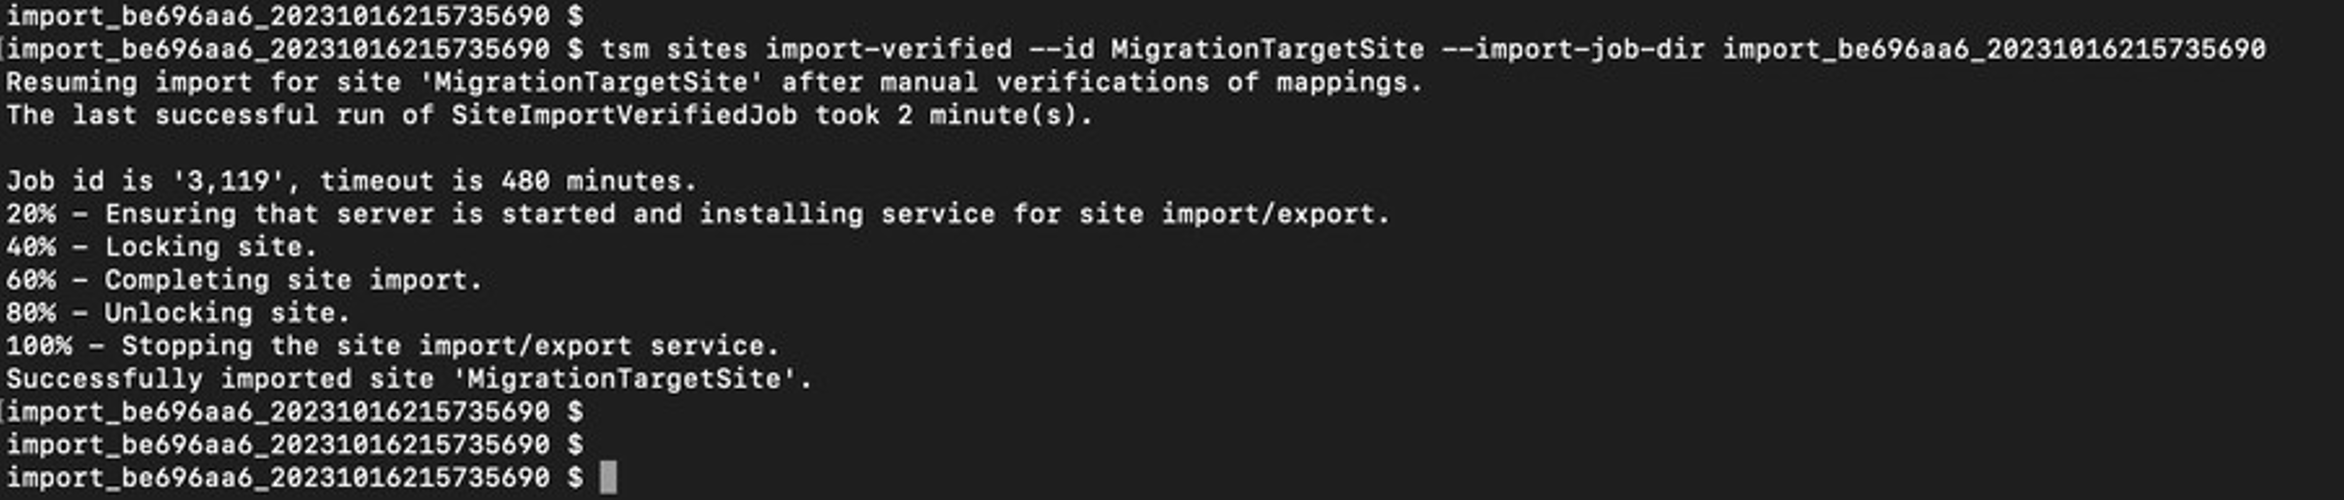
tsm import-verified --id MigrationTargetSite --import-job-dir import_be696aa6_20231016215735690
In the above command, the “–import-job-dir” argument is this import’s working directory. We can also see this directory in the output of the first tsm import command. The tsm-verified job verifies the mappings and will throw an error if any of the mapping files are misconfigured. Common issues include duplicate mappings or occurrences of “???” in any of the files. Oftentimes, mapping errors get captured in the site import error logs, which are also within the mappings directory. TSM will indicate whether the import was successful when the import-verified job finishes:
That’s it, we’ve successfully migrated a Tableau Server site! If you’re looking for assistance on your next Tableau Server migration or if you’ve got questions in general, we’d be happy to connect with you!