
The new Windows terminal was released back in June of 2019 and has brought several exciting and modern features such as support for tabs, availability for in-depth styling, as well as a configurable JSON file to the Windows Command Line environment. These components together offer the terminal user an endless array of configurations, making this a valuable tool for development work and system administration. It also lends itself to creativity and finding the best fit for the type of work you find yourself doing at the command line.
If you do not already have the new Windows Terminal installed, this article from Microsoft will get you up and running.
Expanded Profile Support
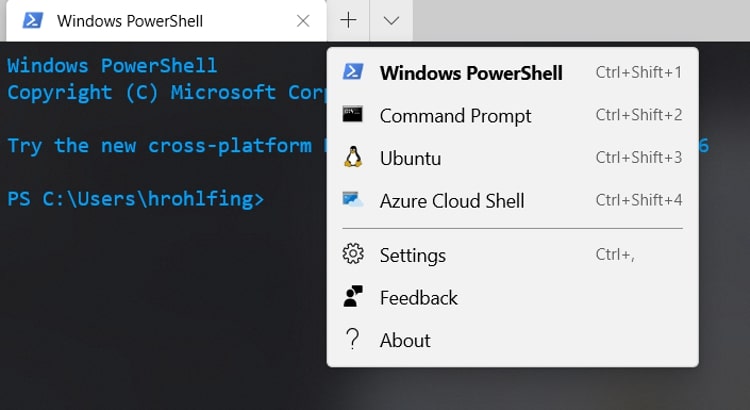
One of the most exciting features to me is the Windows Terminal’s support for profiles. These profiles make up the different command line environments on your machine and, by default, include Windows Powershell, Command Prompt and the Azure Cloud Shell. If you also have a Windows Subsystem for Linux Distribution installed, that shell will automatically be loaded into one of your Windows Terminal profiles. The nice thing about support for different profiles is that we can create and edit them as we wish. In this tutorial, I’ll be diving into configuring a profile for connecting to SSH servers from the new Windows Terminal. Then I’ll continue on to show you to how to tie this together with SSH Keypairs.
Prerequisites
- Valid SSH User Account and Credentials for the SSH server
- Windows Terminal installed
- OpenSSH enabled on Windows 10
- SSH Server with Public Key Authentication allowed (optional)
To begin, we will start by opening our settings.json file within your favorite text editor and creating a new profile within the profiles list for our SSH connection.
Getting Started
The settings.json file is accessible within Windows Terminal by pressing CTRL + , or by navigating to the drop-down arrow and selecting Settings. Once open, you will see that the profiles array is made up of several different properties. You can find the full list here:
Out of simplicity, I will create my new entry at the bottom of the list and add a comma to the closing brace of the above profile. Use the below code to add a new profile for our SSH connection:
{
              "guid":  "{5063f744-37f9-4c7c-aba5-51fa0789ee1a}", //Random GUID
              "hidden":  false, //Show the profile in the dropdown
              "name":  "server1", //Name of profile
              "commandline": "ssh bob@server1" //Program, replace user/host
 }
Notes on Properties
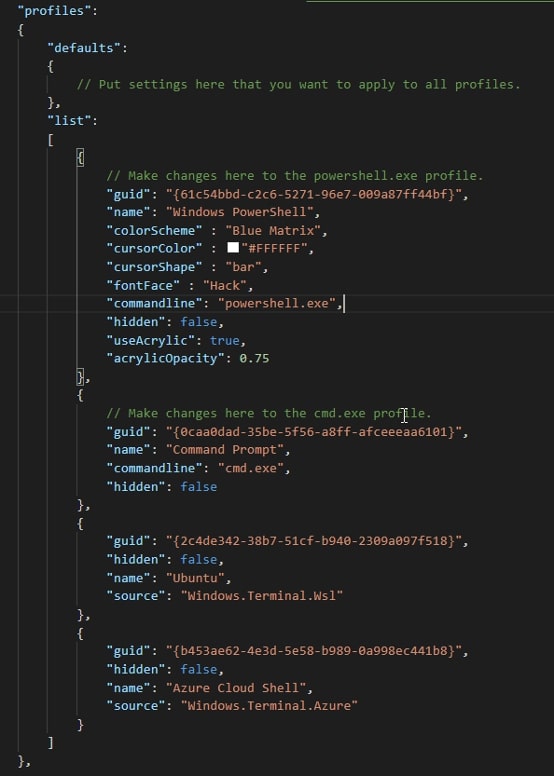
Each profile you add will need a unique random guid property. You can choose the name that you would like to show within the drop-down menu with the name property. The commandline property allows the user to supply the name of the executable used when the profile is launched.
Looking at the default options, we can see that the commandline property calls executables like powershell.exe and cmd.exe. Applying this same idea, we can begin to create the profile using the SSH executable then apply some basic SSH concepts to fully automate our login process. Make sure to substitute your username and hostname or IP Address within the profile.
Now what?
At this point, we have a functioning profile that launches the SSH executable and connects to the server with the username provided, but it still requires a password. This works perfectly fine, but wouldn’t it be nice to open this profile with a keyboard shortcut then have the SSH executable utilize an SSH Keypair to provide passwordless authentication to the server?
Setting up the SSH Client for Public Key Authentication
We will begin this process by creating a new SSH keypair to use with this server. You can skip this step if you already have a keypair you utilize for the server you are connecting to.
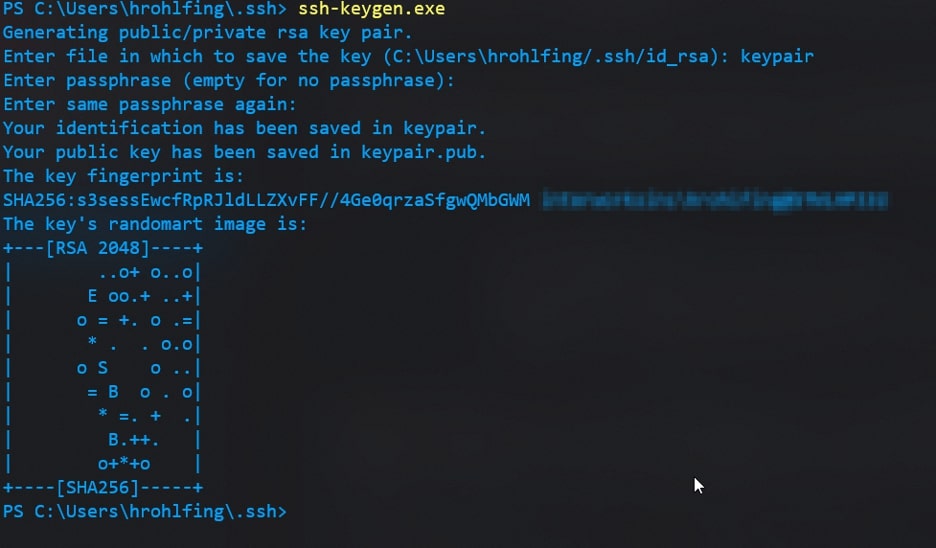
I will utilize OpenSSH’s built-in functionality for generating private keypairs, ssh-keygen. To do this, I will run ssh-keygen then specify a name for the keypair after being prompted and, finally, provide the key a secure passphrase for added security. You should always set passphrases for your keypairs in case they end up in the wrong hands somehow. For more in-depth information on ssh-keygen’s functionality and security, check out the manual page.
The input will be the following:
ssh-keygen
# Generate your new SSH keypair
# Give it a name and a passphrase
Here’s an example output:
Moving Your Public Key to the SSH Server
Once we have our keypair created, it will by default appear within your C:\Users\$ENV:USERNAME\.ssh\ folder with the public key appended with .pub and the private key appearing as the name you associated with the keypair. Now, we must move our public key over to the authorized_keys file within your respective /home/.ssh/ directory on the server. There is a multitude of ways to do this, but out of simplicity and the lack of a tool like ssh-copy-id on Windows, we will utilize another piece of OpenSSH’s suite—SCP—to move our file itself to the server. Only move your public key; the private key should never be copied to other machines.
I will move my public key over to my home folder (~) on the SSH server using the following SCP command. You will be prompted to log in with your SSH credentials:
scp C:\Users\$ENV:USERNAME\.ssh\yourpublickey.pub user@ipadddress:~

#Replace user@ipaddress with your user and IP
Now that we have our public key on the server, we can copy and paste it into our authorized_keys file to allow password-less login using this keypair. SSH into the server using your username and password. Next, copy the contents of the public key, and authorize it by adding it to the authorized_keys file within your /home/.ssh/ directory:
#Read out your public key and copy the output
    cat yourpublickey.pub
#Open your authorized_keys file in vim
    sudo vim ~/.ssh/authorized_keys
#Paste the copied output within the authorized_keys file, right click within vim to paste the contents.
Once you are within vim (or your preferred UNIX text editor), follow these steps:
- Enter insert mode by pressing (i)
- Navigate to a new line if you have additional SSH Keys
- Right-click to paste the contents of the public key
- Press Esc + :wq! to save and exit the file
Note: Feel free to remove your public key from your home directory with the rm command. We will not be using that Public Key any longer since we have configured it as an authorized key already.
Tying It All Together
That is it! We can confirm that password-less login is working by opening our profile we made earlier from the Windows Terminal drop-down menu. Let’s give that a go:

Great! It works! We were prompted for our SSH key passphrase and granted password-less login via our profile we created in the Windows Terminal application. If you manage multiple servers with multiple keypairs, I would recommend looking into creating an SSH configuration file. This configuration file would automatically apply your preconfigured settings to each host you connect to. Learn more about SSH configuration files.
To recap, in this tutorial we covered creating an SSH profile within the new Windows Terminal then configuring this profile for password-less authentication using a private keypair. This setup gives some serious management capability for anyone who works at the terminal on multiple systems concurrently. I hope you found this tutorial helpful in configuring your terminal, and don’t forget to dig into the other cool things the new Windows Terminal has to offer like keyboard shortcuts, color schemes and pane splitting. Check out their full documentation, and feel free to reach out to us at InterWorks if we can help you in your exploration.