
This blog post is Human-Centered Content: Written by humans for humans.
First off: Congratulations! This is most likely a big step you’ve taken, and it probably looks pretty daunting from where you’re sitting. Let’s try and alleviate some of the pain that comes with getting an entirely new software spun up for the first time.
Registering a Creator License
Note: This step specifically applies to Users who have been granted a Creator License and who have Tableau Desktop or Tableau Prep installed locally on their workstations.
Users who have been granted a Creator License in Tableau Cloud will be able to register that license in Tableau’s Desktop application by logging in and authenticating to Tableau Cloud.
Let’s go through step by step:
- Open Tableau Desktop
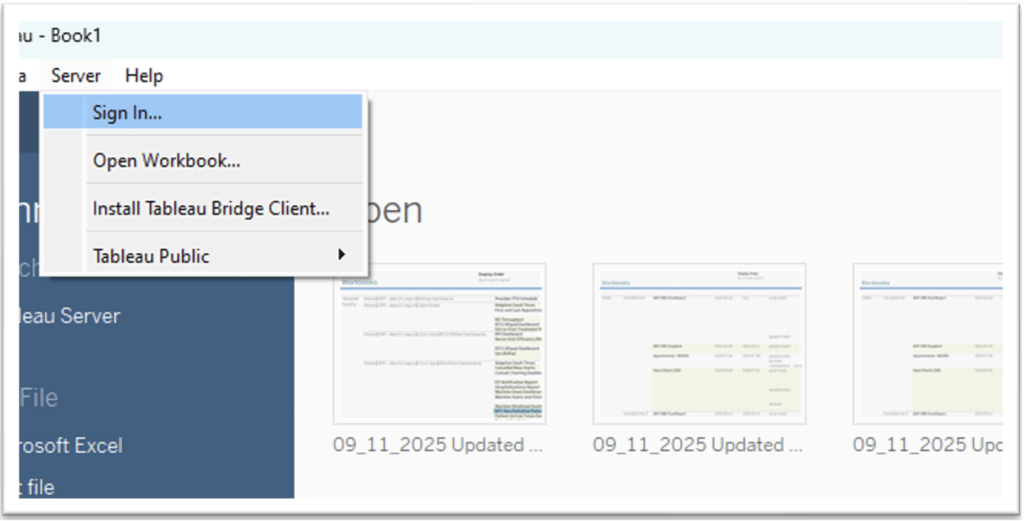
- Click “Server,” then “Sign In” in the Menu Bar:
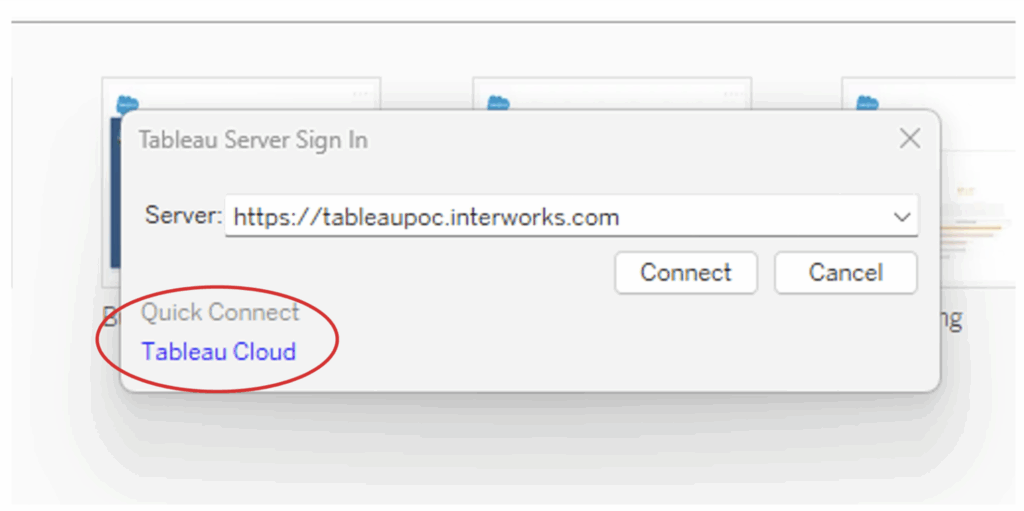
- Click “Tableau Cloud:”
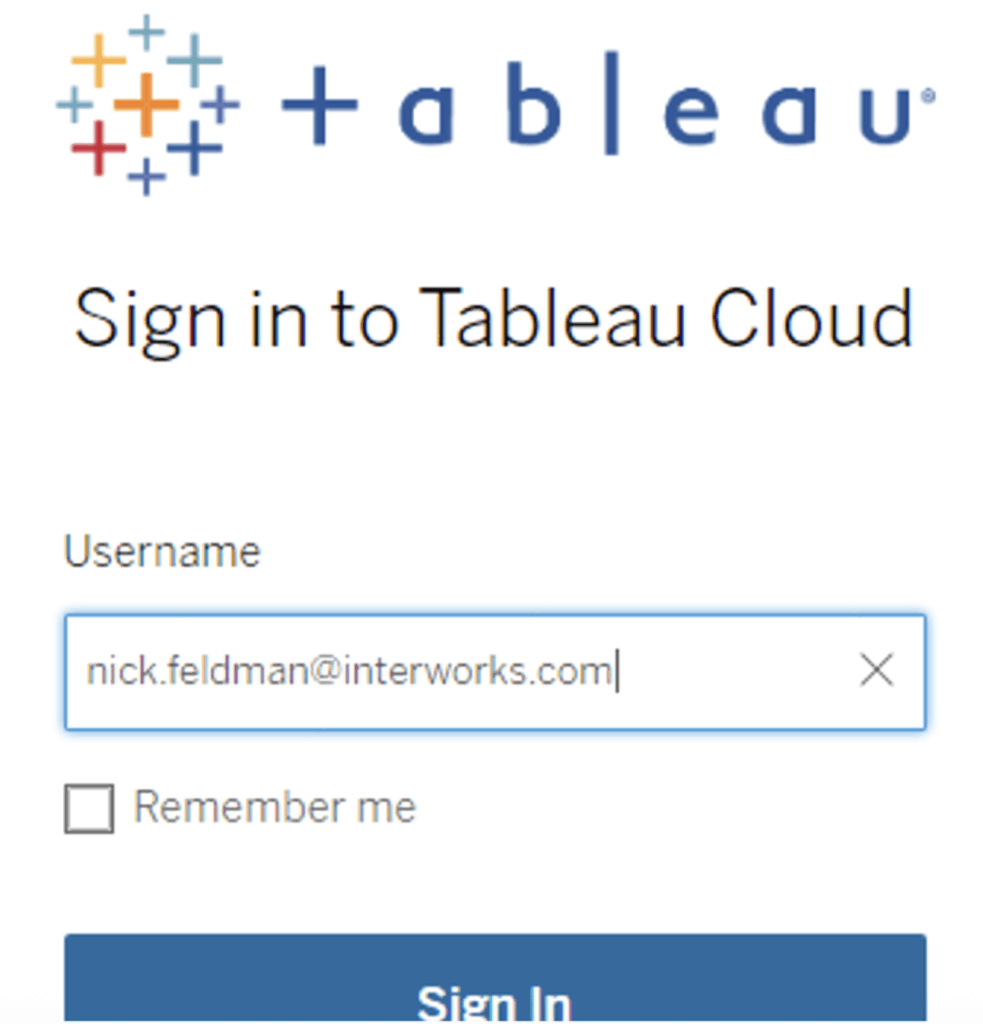
- Enter the email you use to login to Tableau Cloud:
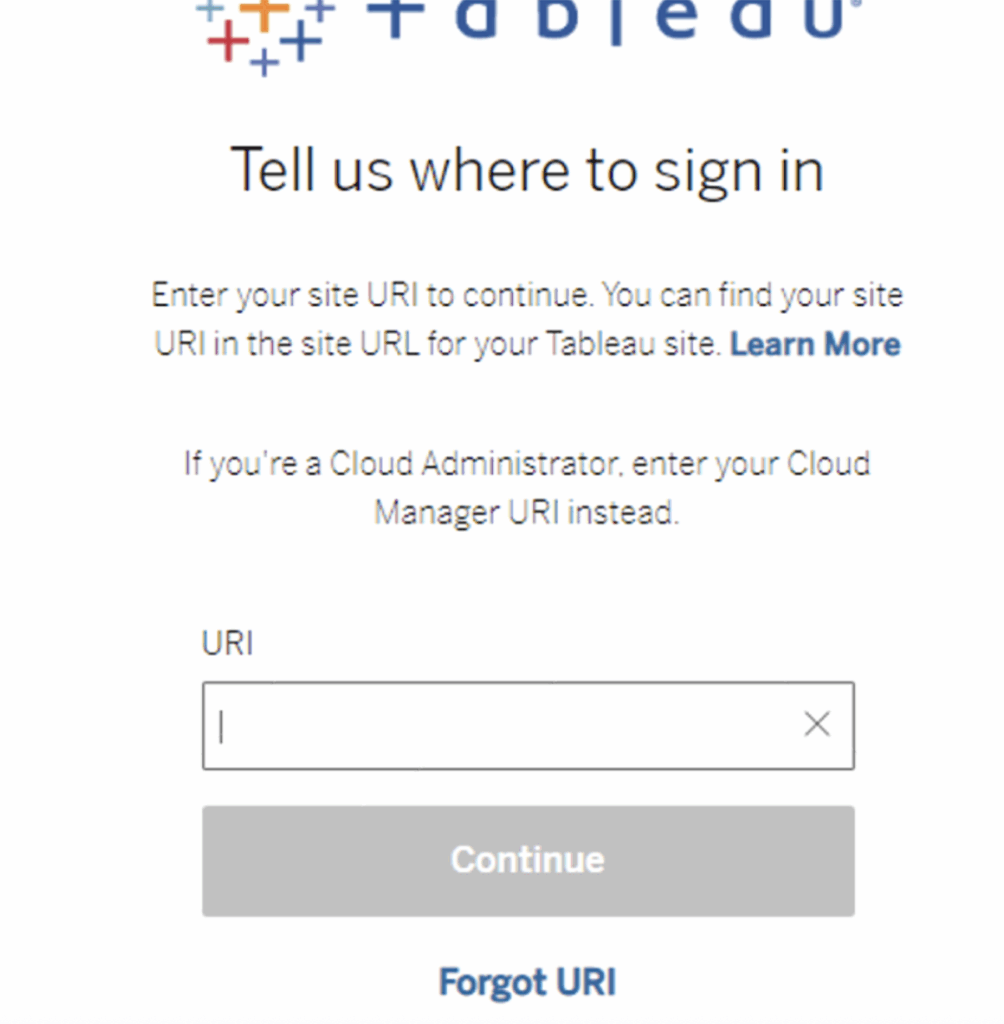
- If this is the first time you’ve logged in to Tableau Cloud, you may be prompted for the URI. The URI is the Tableau Cloud Site to which you’ve been granted access:
- Follow the Entra ID Authentication prompts per your organizational setup. Once authenticated, Tableau will confirm you can close the pop-up windows.
- Confirm you are signed in to the correct site by clicking the Server Menu dropdown:
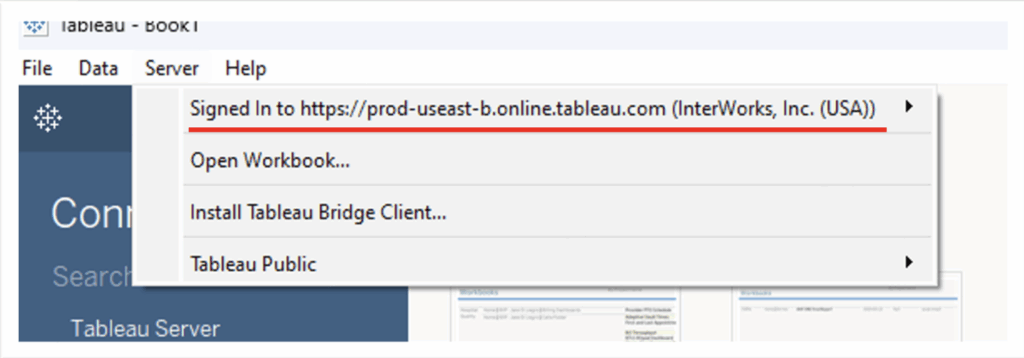
And there you go! You may now use Tableau Desktop and publish to Tableau Cloud as a Creator.
Server vs. Cloud: Creators and Admins
Note: The details here generally apply to Users who have been granted Cloud Manager, Users who have been granted a Site Admin Creator License in Tableau Cloud, and Users who have been granted a Creator License in Tableau Cloud.
Navigation, Editing and Publishing Experience
From a Creator’s perspective, both platforms support rich analytics and web authoring, but differ primarily in their administration, data connectivity and speed of feature updates. Tableau Server and Tableau Cloud provide similar core dashboard-building, data connectivity and sharing capabilities, but differ notably in deployment, management and how updates or new features are delivered.
Here, we’ll go over some high-level topics and comparisons between Server and Cloud related to the navigation, editing and publishing experiences that you may find relevant:
Deployment and Updates
Tableau Server runs on-premises, requiring IT resources for installation, configuration, updates and ongoing maintenance, allowing Creators and administrators full control over upgrade schedules.
Tableau Cloud is a SaaS solution managed by Tableau, delivering automatic updates and access to the latest features without any user intervention, sometimes resulting in Creators receiving new innovations more quickly.
Data Connectivity and Integration
Tableau Server enables Creators to connect directly to internal, local or cloud data sources, providing custom performance tuning and access to on-premises resources without extra tooling.
Tableau Cloud relies on Tableau Bridge for on-premises or hybrid data connections, which adds a layer of complexity to direct database connectivity and live data refreshes.
Features & Authoring Experience
Creators on both platforms can connect to new data sources, create and publish workbooks, and manage embedded data sources either in the browser or with Tableau Desktop/Prep Builder, which are included with every Creator license.
However, some new Tableau features and enhancements (such as Dashboard Starters or Tableau Pulse) tend to launch first on Tableau Cloud before reaching on-prem Server installations.
Licensing and Administration
Tableau Cloud provides specialized management tools such as Tableau Cloud Manager, offering more granular control over license allocation per site. Server site management operates at the organization’s local level.
Security and Compliance
Tableau Server enables Creators to leverage local authentication systems, granular permission controls and custom reporting, which is crucial for organizations with complex on-prem security needs.
Tableau Cloud enforces Tableau’s managed enterprise-grade security and compliance for all users, often simplifying admin for businesses that do not require custom integration.
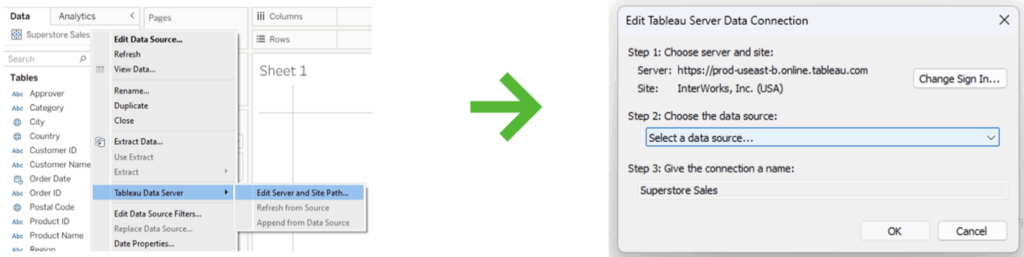
Replacing a Data Source
With a hosted a data source, the user can update the connection and not break formatting
Another method of replacing a Data Source via “Tableau Data Server” in Tableau Desktop:
- Right Click the Data Source. Select “Tableau Data Server” and then “Edit Server and Site Path.”
- Here you can update the Data Source you are wanting to use:
Key Differences for Explorers
Note: These details apply to Users who have been granted an Explorer License in Tableau Cloud.
Overall navigation in both platforms is almost identical from an Explorer’s perspective. Users can web edit, connect to data sources for which they have permissions and build new workbooks within the web interface in the same way as in Tableau Server. Users can also browse, search for dashboards, interact with filters, and use menu options like subscriptions and alerts. The organization of dashboards and folders/sheets follows the same logic, and Tableau’s UI strives for consistency across both solutions.
Tableau Cloud benefits from instant access to the newest features and UI improvements, as updates are deployed automatically and universally by Tableau. This means Cloud Viewers may occasionally see UI/UX enhancements (button placements, faster feature rollouts, new filter options, and features like the Recycle Bin and Project Tree) ahead of Server installations, which depend on their administrators to manually update. After the initial migration, however, Viewers will not observe these as platform differences.
Key Differences for Viewers
Just like with Explorers, overall navigation in both platforms is almost identical from a Viewer’s perspective. Users can browse, search for dashboards, interact with filters, and use menu options like subscriptions and alerts. The organization of dashboards and folders/sheets follows the same logic, and Tableau’s UI strives for consistency across both solutions.
Tableau Pulse
If this is your first time interacting with Tableau Pulse, it’s a metrics-first platform and exploration tool that lives in Tableau Cloud. It harnesses AI to deliver immediate, actionable insights by replacing the need for basic, manual dashboarding and leverages natural language summaries of the metrics enable anyone to quickly grasp what’s happening in the data.
Basically, without the marketing terms, it’s an AI plugin that helps you search for information using natural language processing and it displays it automatically.
If you want to turn it on, head to “Settings,” then “General,” then scroll down to “Tableau Pulse” and enable.
As far as the data it can access, Tableau Pulse can only connect to Published Data Sources (not Embedded). Permissions for Pulse Metrics are done at the Data Source Level.
If a user is needing to view a Pulse Metric, they must have View and Connect permissions to the Published Data Source from which that Metric was created from. It’s recommended to create a User Group for everyone that is going to be utilizing Pulse. This should simplify the permissions in the long run.
Metric Alerts
Tableau Pulse can be configured to give you “Metric Alerts,” which are exactly what they sound like: Alerts on whatever metrics you’re asking Pulse to track. They’re released on a defined schedule for each individual user in what is called the Tableau Pulse Digest.
- The Schedule can be Daily, Weekly or Monthly.
- The user has the option to receive the Tableau Pulse Digest in Slack, Email or Both.
- There is also an option to create custom thresholds or goals for each Pulse Metric.
- If the goal or threshold is met, Pulse will send out a Digest on that day even if it’s not part of the user’s normal frequency.
- Pulse Digest is sent out the same time every day. This time is determined in the Site Settings and will be the same for every user.
Tableau Bridge
This might also be your first time interacting with Tableau Bridge. Tableau Bridge acts as an intermediary to connect Tableau Cloud to your on-prem Data like SQL Server. Make sure you have an allow list that’s set up with all on-prem databases.
Note that Tableau Bridge is necessary to run extracts that are not in the Cloud and that it utilizes server pools to automatically load balance those connections.
If you’d like to turn Bridge on, navigate to “Settings” and, on the top row of options, select “Bridge.” You can then review all your options there to determine if it’s right for you.
Common Errors You Might See with Tableau Bridge
“An error occurred while communicating with Tableau Server: Tableau Bridge does not have a client configured for your site to handle live connections.” or “Cannot connect to database.”
- Make sure the Bridge Server is in the pool.
- Make sure the Bridge Server is Green. If not, restart to try to reconnect it.
“This data source requires a correct file path” or “Unable to refresh data source because of an unsupported operation.”
- Ensure the correct file path is in the data source.
- Also, ensure the account used to connect Tableau Bridge to Tableau Cloud has access to the data source.
You can find more Tableau Bridge troubleshooting tips here.
Wrapping Up
We tried to go over some of what we thought were the most important things you may need to know when starting Tableau Cloud for the first time. If you need help with anything outside this blog, or if you need a hand with your Tableau Cloud instance, drop our Assist team a line and see what we can do for you.