As of version 2019.3, Tableau Prep introduced a new and exciting feature: integration with R and Python. This is an incredible way to expand and customize the capabilities of your workflow. As someone coming from an R background, I was excited to brush up on my R skills within the Tableau environment. But first, I had to figure out one thing: how?
This blog will walk through how to set up your Tableau Prep environment to utilize R. For this article, we’ll start simple. I’m just going to add a simple UniqueID field using the index() function.
Setting up R
Unfortunately, Tableau Prep doesn’t come with R built into it. But luckily, R has the astoundingly low price of $0.00 (€0.00). First, you must download R and R Studio. R Studio is an integrated development environment, which is basically something to make R look less like a scary coding language. The free version will suffice for most use cases. The download page for R might look scary, but just choose the location nearest you and the operating system you are using.
Once you’ve downloaded R and R Studio, make sure to install them both. Then we need to briefly enter the realm of R. We need to start up Rserve, which allows Tableau Prep to connect to R. This will require three simple lines of code:
install.packages("Rserve")

library(Rserve)

Rserve()
Copy and paste these into R Studio and hit run. If it doesn’t start up and gives you an error, you may need to add the —no-save argument to the last line. To do this, replace Rserve() with:
Rserve(“args=--no-save”)
Next, we have the R code you want to implement. I have attached an R file called Functions.R, which contains a function called index. This function receives a field called UniqueField and returns that field, as well as a Unique ID field, which you can then join back to your data. In the second part of this blog, I will include more practical examples, but I wanted to start simple.
Tableau Prep Integration
Once you have Rserve started and your R code ready to go, you can now go into Tableau Prep. Before we add the script, we will need two clean steps for this example. The reason we need the clean steps is because Tableau Prep + R require that we match a defined dataframe. I started with a function that adds a unique ID based on a given unique field. If you don’t have one unique field, create a calculated field that combines the elements that make one row of data unique. If necessary, convert that new field to a string type. Then, rename your field UniqueField. This has to match the name defined in R, so make sure there are no spaces. In a separate step (separating this makes it easier to self-join later in the workflow), remove all other fields.
Pro tip: UniqueField should populate first. If you select the second field, hold shift, and select the last field, Prep will select all remaining fields. You can then right-click and select remove.
Adding the Script
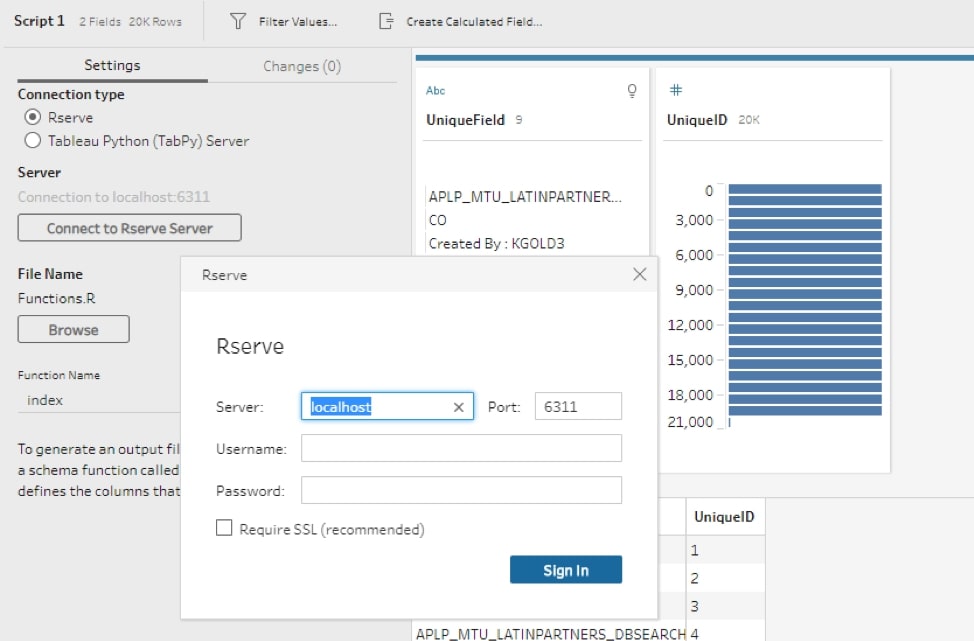
Now, finally, we are ready to use the magical add script feature. Once you have added the script step, enter the following settings:
- Connection Type: Rserve
- Connect to Server:
Server: localhost
Port: 6311
(This is to point to Rserve on your local machine)

- File Name: Functions.R (or whatever R script you are trying to run)
- Function Name: Index

Once you run this workflow, it should give you an output of two fields: UniqueField and UniqueID. You can then join this back to your original data source, and you now have a unique ID field! Your final workflow will look something like this:

Time to Conquer the World … of Data Cleansing
Now, you’ve unlocked the key to the world of Tableau + R. Hooray! I’ve attached the R file, as well as the packaged workflow, to help walk through this. And if you’re ready to go deeper with these topics, jump over to part 2 of this blog! Good luck and happy preppin’!

