Right out of the box, Drupal 7, allows for a powerful and complete system for creating content types, forms, and content management interfaces. With a few quick steps, you can create highly detailed forms for a content-rich website. However, the more information we want to collect for a content type, the more overwhelming the actual client-side form can become.
It is important—along with smart content organization—that we also deliver to the client-user a manageable UI for better workflow.
Field Group (http://drupal.org/project/field_group) allows you to take control over how a client-side form is built, displayed, and rendered. It provides, through the UI, element wrappers to help consolidate form elements. Content wrappers in the module include collapsible fieldsets, divs, vertical or horizontal tab groups, multiple-page containers, and jquery accordions.
The Field Group module also lets us add additional CSS selectors to the form wrappers, giving a themer greater flexibility in styling the form. This is a big key to keeping your site easy to maintain for either yourself or a future developer.
Administering the Field UI with Field Group is as easy as dragging and dropping groups and fields into the content-type form. Field Group form wrappers can be nested within each other for even greater flexibility in your form-making.
Field Group also allows for some additional markup power over the default display of a saved node, but node display will be discussed in a future article.
For this demonstration, the Field Group module and a tiny bit of CSS will be implemented. To follow along, download and enable the module: (http://drupal.org/project/field_group). Access to your CSS files is handy for playing around with the display of your forms.
Basic Form Configuration
This very familiar form display includes a title field, body, tags, and an image field (plus other ‘hidden’ configuration fields depending on your installation: URL aliases, flags, etc.)
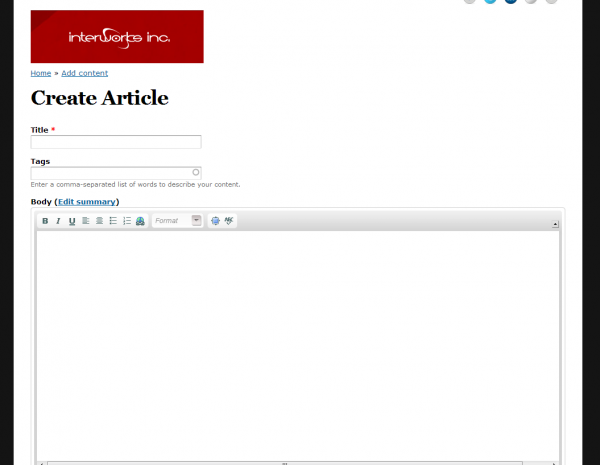
Each form element, inside its own
Example: In this form, to float the Title field element, we would have to select .page-node-add-article input#edit-title and then apply the float attribute. Though this seems simple and straightforward, the more form elements you add increases the length and specificity of CSS selectors, opening the door to code errors and trial-and-error development tactics.
With Field Group you can wrap form elements in custom classes that not only make more sense to you as a developer, but to anyone who is maintaining the site later.
Getting Started with Field Group
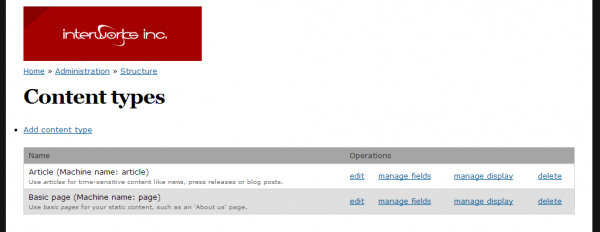
Let’s configure some field-group wrappers on the Drupal default Article content type. Navigate to /admin/structure/types. In the ‘Article’ row, click ‘manage fields’.
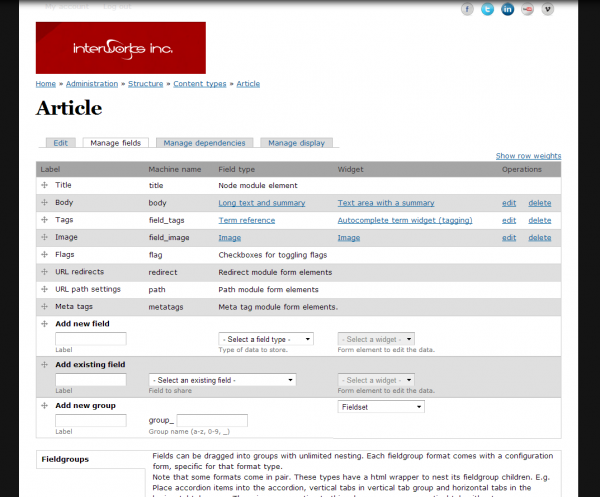
There is a new widget at the bottom of the table that allows us to create a Field Group. Enter a label, machine name, and select which type of display wrapper you will use with this group.
Fieldsets
Field Group allows you to wrap form elements in collapsible fieldsets.
In the Field Group widget (Add New Group), enter the label, machine name, and select ‘Fieldset’ from the drop-down. Click ‘Save’ at the bottom of the form.

Your new field group will show up in the table with your label and machine name. Drag and drop the field group to the top and nest some form elements in it. Click ‘Save’.
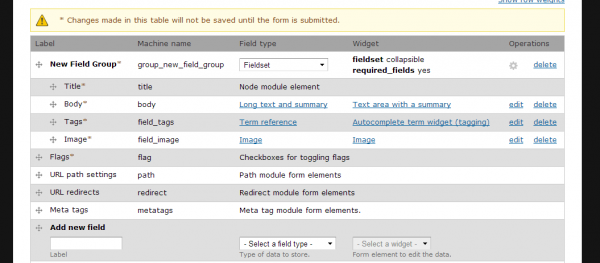
After saving, click the gear icon under ‘Operations’ in the table header. This will give us some extra options to display or theme this fieldset.
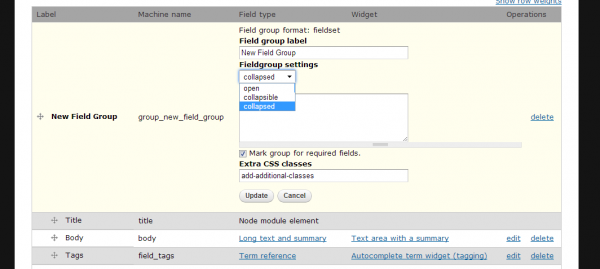
Here, you can select the default behavior of the fieldset, add a text description that will display on the node form, and add additional CSS classes to the form element wrapper, allowing for further visual customization.
After making changes to this display, click ‘Update’ then ‘Save’ at the bottom of the admin form.
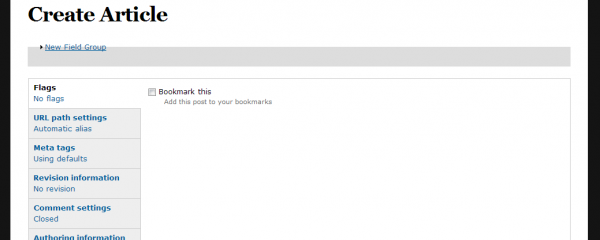
Navigate to /node/add/article and notice the changes. The form elements are wrapped up inside a collapsed fieldset that will expand and contract by clicking the legend, or fieldset header.
I have added some simple CSS to highlight the fieldset. The image below shows the default, collapsed state.
The opened fieldset reveals the hidden form elements.
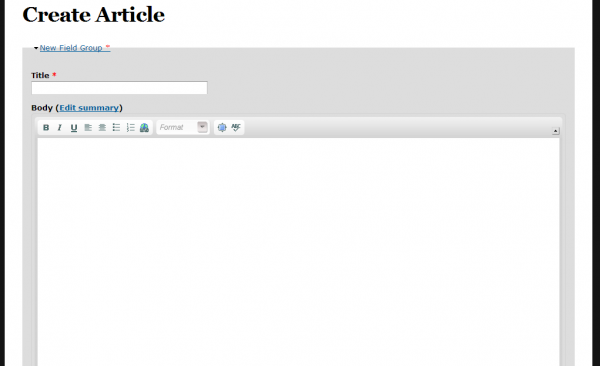
You can add additional fieldsets and organize the form elements easily while providing a client-side form that is easy to navigate. You can also nest fieldsets (or other field groups) inside each other to organize even further. Nesting is especially handy when creating detailed forms with Field Collections (http://drupal.org/project/field_collection).
Field Group
wrappers
Go back to your form admin page. In the drop-down list for your fieldset, change the selection to ‘Div’.

View the options for this container by clicking the gear icon in the Operations column.
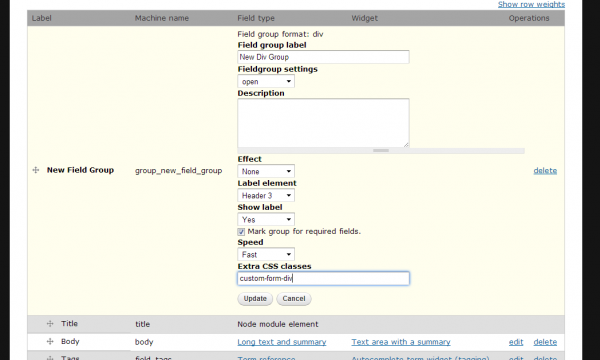
The
wrapper allows you to control the display of a container that includes many form elements depending on your forms organization. The
wrapper makes it easier to style the form.
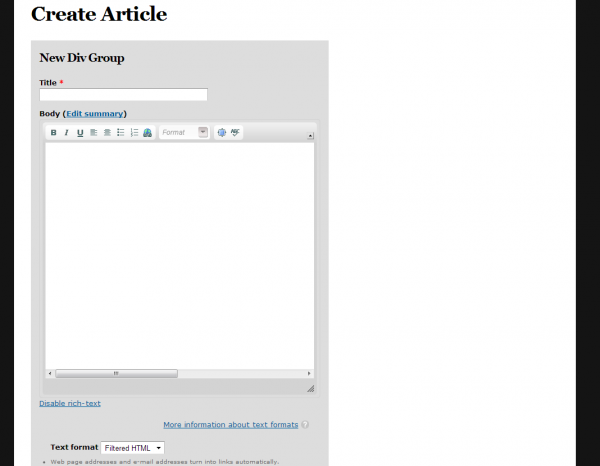
With the
wrapped form elements and some simple CSS, the new form shows the form elements inside a grey container with a narrow width.
Vertical Tab Groups
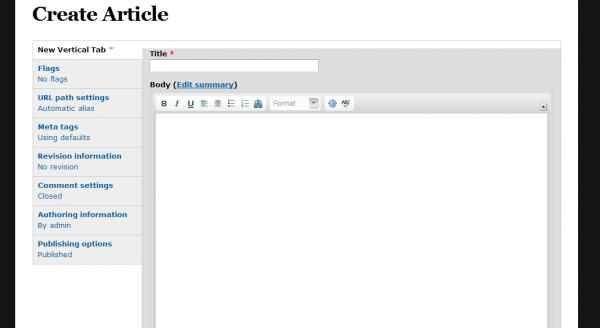
Vertical tabs are by far the easiest way to organize a form. Vertical Tabs help to integrate your form elements into the ones provided by Drupal (or other modules) toward the bottom of node forms.
Go back to your form admin page. Change the Field Group drop-down to Vertical Tab. (Vertical Tab Group will be discusses after this.)
View the options in the container editor in the Operations row.

Remember, after changing any options in the Field Group options, you need to click ‘Update’ and then ‘Save’ the form.
Refresh your Article form and see that your form elements are now handing out with the other guys in a vertical tabs group.
Vertical Tab Groups
Vertical tab groups allow us to further increase a form’s organization and add additional hierarchies. A tab group requires nested field groups. At minimum, a Tab Group and one Tab.
In your form admin page, add a new field group—enter a label, machine name, and select ‘Vertical Tab Group’. Review the display options. Click ‘Update’. Drag this new Field Group to the top of the admin form and nest your previous Vertical Tab inside it. For this and further examples, I have created a third field group to nest in the Tab Group.
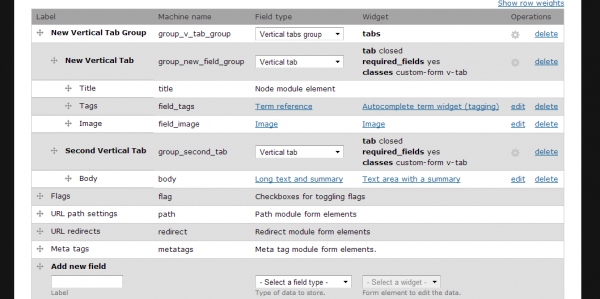
Review this setup and then view the resulting display.
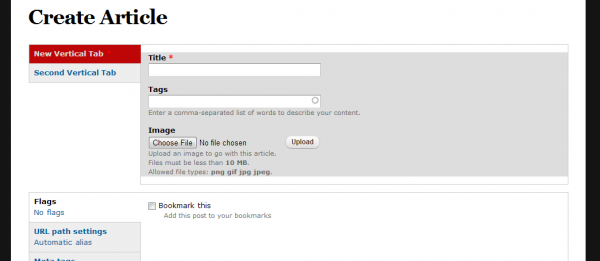
The new vertical tab group is separate from the ‘lower’ tabs. You can create as many tab groups and tabs as needed by your form and organization of form elements.
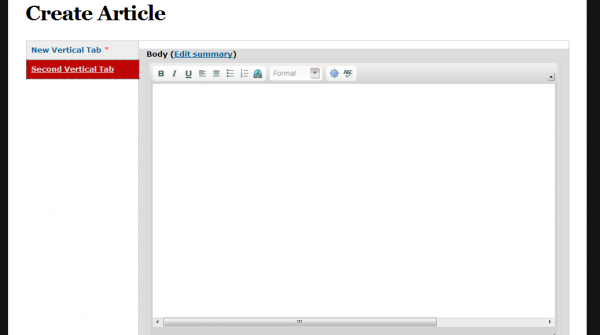
Here is a view with the second tab active.
Horizontal Tabs and Tab Groups
Horizontal tab groups behave in the same manner as vertical tabs.
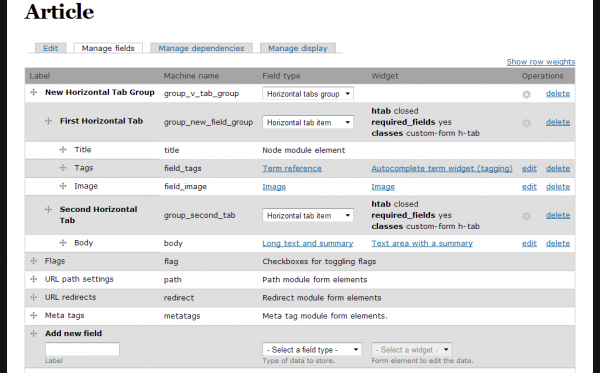
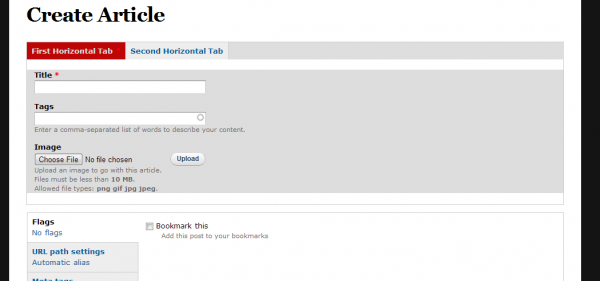
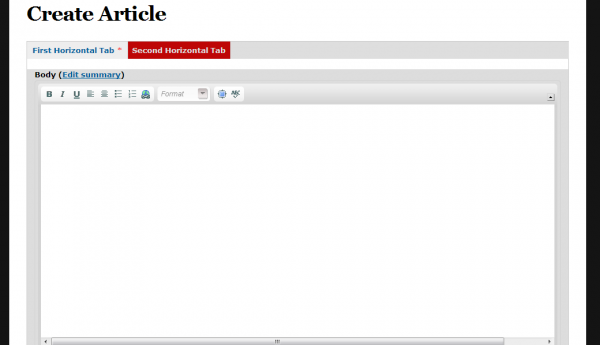
The adjustments above result in the following display.
Accordion Groups
Accordion Groups add animated, collapsing jquery accordion form containers to your node form.
Nesting is required for accordion groups and items to function correctly. They are set up similarly to Vertical or Horizontal tabs/groups.
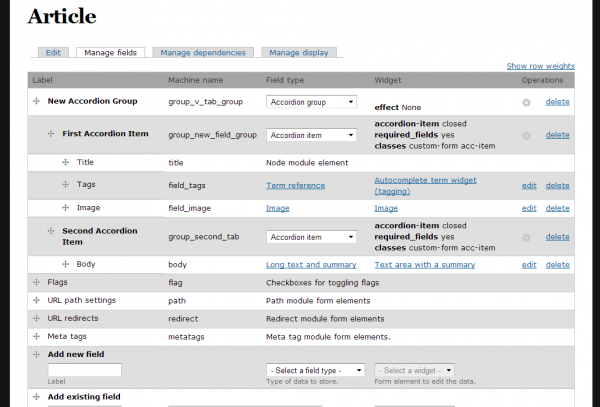
The above setup will result in the following display:

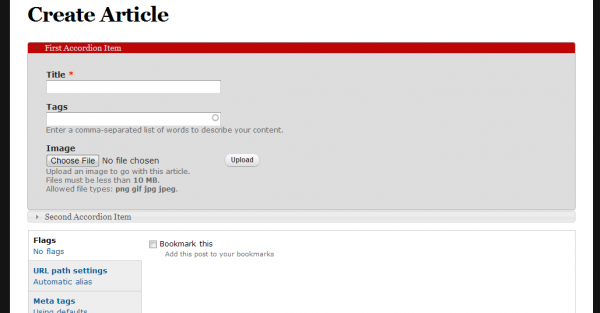
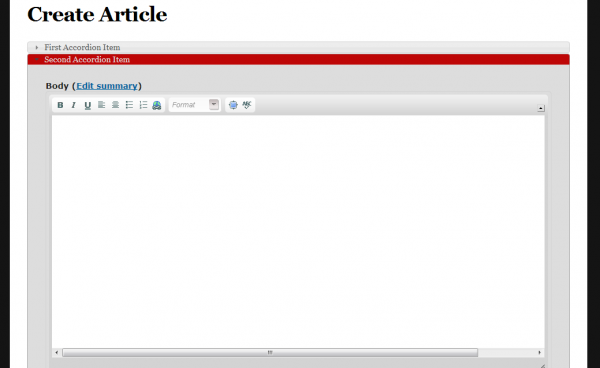
Multiple Page Groups
Multiple page groups allow you to sort your form elements with page breaks. They are configured in the same manner as other field-group groups. There isn’t really a need to repeat the configuration example here. Also, multiple page groups on a node form add extra buttons and links that may confuse a content creator. They come in handy for displaying content with a simple pager, but aren’t as powerful or as flexible as views.
Conclusions for Field Group
Field Group helps to better organize and display Drupal entity forms. It allows the developer to create a more fluid, friendly, and stylish client-side administration UI. With very simple widget configurations in form administration and with some basic CSS knowledge, you can take an anonymous-looking node form and make it work better for your client.
Go back to your form admin page. In the drop-down list for your fieldset, change the selection to ‘Div’.

View the options for this container by clicking the gear icon in the Operations column.

The
With the

Vertical Tab Groups
Vertical tabs are by far the easiest way to organize a form. Vertical Tabs help to integrate your form elements into the ones provided by Drupal (or other modules) toward the bottom of node forms.
Go back to your form admin page. Change the Field Group drop-down to Vertical Tab. (Vertical Tab Group will be discusses after this.)
View the options in the container editor in the Operations row.

Remember, after changing any options in the Field Group options, you need to click ‘Update’ and then ‘Save’ the form.
Refresh your Article form and see that your form elements are now handing out with the other guys in a vertical tabs group.

Vertical Tab Groups
Vertical tab groups allow us to further increase a form’s organization and add additional hierarchies. A tab group requires nested field groups. At minimum, a Tab Group and one Tab.
In your form admin page, add a new field group—enter a label, machine name, and select ‘Vertical Tab Group’. Review the display options. Click ‘Update’. Drag this new Field Group to the top of the admin form and nest your previous Vertical Tab inside it. For this and further examples, I have created a third field group to nest in the Tab Group.

Review this setup and then view the resulting display.

The new vertical tab group is separate from the ‘lower’ tabs. You can create as many tab groups and tabs as needed by your form and organization of form elements.
Here is a view with the second tab active.

Horizontal Tabs and Tab Groups
Horizontal tab groups behave in the same manner as vertical tabs.

The adjustments above result in the following display.


Accordion Groups
Accordion Groups add animated, collapsing jquery accordion form containers to your node form.
Nesting is required for accordion groups and items to function correctly. They are set up similarly to Vertical or Horizontal tabs/groups.

The above setup will result in the following display:


Multiple Page Groups
Multiple page groups allow you to sort your form elements with page breaks. They are configured in the same manner as other field-group groups. There isn’t really a need to repeat the configuration example here. Also, multiple page groups on a node form add extra buttons and links that may confuse a content creator. They come in handy for displaying content with a simple pager, but aren’t as powerful or as flexible as views.
Conclusions for Field Group
Field Group helps to better organize and display Drupal entity forms. It allows the developer to create a more fluid, friendly, and stylish client-side administration UI. With very simple widget configurations in form administration and with some basic CSS knowledge, you can take an anonymous-looking node form and make it work better for your client.

