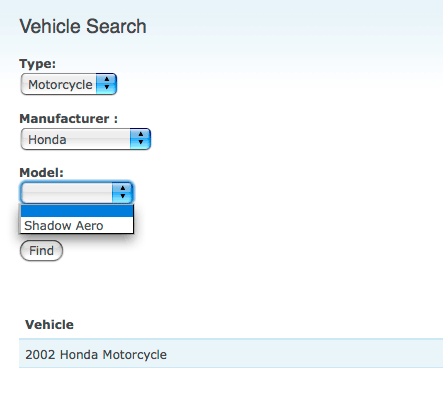
The Finder module is a search module that can be used to complement or replace Drupal’s core search functionality. The great thing about Finder is it can use a View to specify what content is to be searched for a particular Finder instance. Using a View with Finder opens up a lot of possibilities such as limiting the options available in a finder element, providing functionality similar to Faceted Search’s Guided Search function.
For example, if you had a site that sold cars and motorcycles, you could have a Finder that allowed visitors to search by manufacturer, automobile type (sedan, coupe, motorcycle), and model. If a user searched for coupes and wanted to refine that search, it’d make sense that the manufacturer field would be limited to manufacturers that make coupes. By default, Finder doesn’t do this without some extra work.
In the following tutorial, I’m going to show you how to accomplish three things – create a view to drive your Finder search, setting up a Views Finder, and filtering elements as users refine their search. Unfortunately, I haven’t been able to get this to work using AHAH or on the autocomplete element type.
I’m starting with a clean Drupal 6 install that includes CCK, Finder, and Views.
Creating the View
Are you familiar with Views? If so, this part is easy.
- Create a new ‘Node’ type view. You will not need to add any additional display; Finder can use the “Defaults” view without issue.
- Leave the Row Style as ‘fields’. I recommend using ‘Table’ as the Style but you can use whatever as long as the row style is set to ‘fields’.
- Add your “Fields” that you want displayed on the results page. This will only impact how people see the results of your page.
- Set your filter. For my view, I filtered by ‘Content Type’ but you can limit the search pool however you need to; providing, of course, that Views supports that kind of filtering.
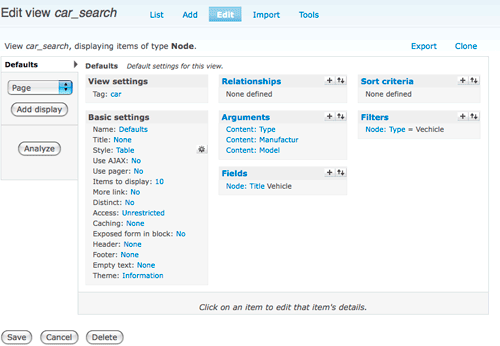
- Setup your arguments. These arguments need to be in the order that you plan to put the elements on your Finder. For my Finder, I’ll be allowing users to search by automotive type, manufacturer, and model in that order. The order here should match the order of elements displayed on your Finder search page. Why does this matter? It doesn’t for regular Finders. However, if you’re wanting to filter the search results, you’ll need to match the order to keep everything working smoothly.When creating arguments, I left all settings default. You’ll want to be sure that, when an argument isn’t provided, the option selected is “Display all values”.
When you’ve finished with your view, it should look similar to this.
Now that you’ve created your View, save it and we’ll create the Finder.
Setting up the Finder
This part is pretty easy, too. The Finder module makes it easy to create a new Finder and alter its settings after creation. Make sure that you have enabled the following Finder modules: Finder, Finder Node, Finder Option Widgets, and Finder Views.
- Navigate to admin/build/finder. Add a new “Views finder”.
- Be sure to check “Form on Page” option and select the appropriate View. Other than that, the default options are fine.
- Scroll down to the bottom and select “Select list” from the “Add Element” option and click “Save Finder” to configure the finder element. Fill out the basic information and select the appropriate field in the “Find items by this field” drop down.
 The field you select here should match the field used for as an argument in your view. Expand “Finder form element” and select “Prepend an empty choice to the top of the list”. Save the finder element.
 - Repeat this step for the other fields you have. In my case, I’ll have 3 elements when I finish – automotive type, manufacturer, and model. These should be in the same order as the arguments in my view. Here’s a comparison of my finder elements and my views arguments.
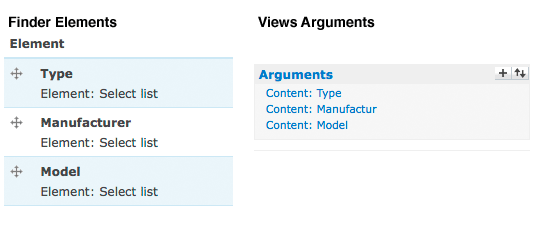
- Save the Finder and test it to make sure it’s functional and returning the results you’re expecting. If it is, now it’s time to continue to the final part!
Filtering Elements
First, you’ll need the following code snippet pasted into your template.php file. I’ve included comments to help make this a bit clearer.
/** Limit element search options in Finder module * * @param $total_items * The number of fields in use on the form * @param $current * The current item. Optional. This will allow users to select other options instead of * being limited to the current search term only. * @param $start * Specify where the arguments begin in a URL. Default is 1. This would work for something like * "/search/arg1/arg2/arg3". If you had a URL like "default/finder/search/arg1/arg2/arg3", then * you would set this to 4. * @param $wildcard * The wildcard used in your view. Should be 'all' but just in case you want to change it. */
function phptemplate_finder_element_filter($total_items, $current = -1, $start = 1, $wildcard = 'all'){
   $i = 1;
    while($i $total_items){
      if(arg($start) != '' && arg($start) != ' ' && $i != $current){
     $args .= arg($start);
       } else {
           $args .= $wildcard;
        }
       $args .= '/';
        $start++;
      $i++;
   }
    print
$args;
}
?>
Now go back to the edit the Finder you created. Select “edit” for your first element field.
In the “Possible choices” box, expand the “Views argument” section. In this box, paste in the following piece of PHP. You will need to change the arguments to match your specific Finder setup.
(3, 1, 2) ?>We will modify this code snippet for the other two finder elements. As you can see, we’re feeding this function 3 arguments. The first, 3, is the number of arguments that the View takes.
The second argument, 1, is the current finder element. On the second finder element, this argument would be 2, on the third, 3, and so on. This prevents a user from being locked in on a choice. For example, if they searched for Honda, and then didn’t like the results, they could click the Manufacturer field and switch to another manufacturer.
Finally, the third argument, 2, is the start of the arguments in the URL. The comments for the function are pretty clear on this but, in short, a default finder has a url like “Finder/1” and would require a start value of “2”. If your URL was “finder-search”, then your start would be 1.
This is how the snippet looks pasted into our first element, “Type”.
Paste the snippet above into the other fields changing the arguments as necessary.
When you’ve finished pasting everything in and saved it, go to your finder and test it. Select one of fields, hit “Find”, and check out the results – you should see the other select boxes are now limited to other potential options that make sense. This should prevent people from searching for a “Harley Davidson Coupe” or a “Honda Taurus”. That is, as long as they’ve used the search form to continually refine their search. Without AHAH or AJAX, we can’t dynamically limit the fields as people select options.
Here’s a screen shot of my default finder with no options selected. I’ve included a list of the values for each field.
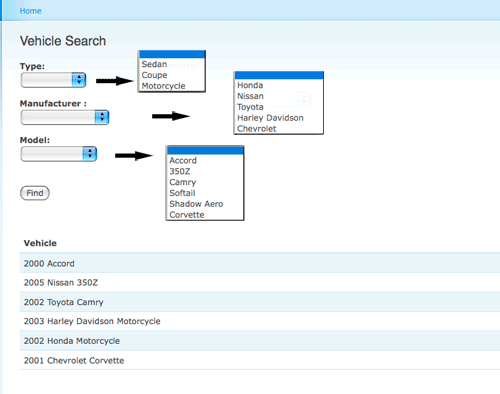
Here’s a screen shot after selecting “motorcycles” as the type.
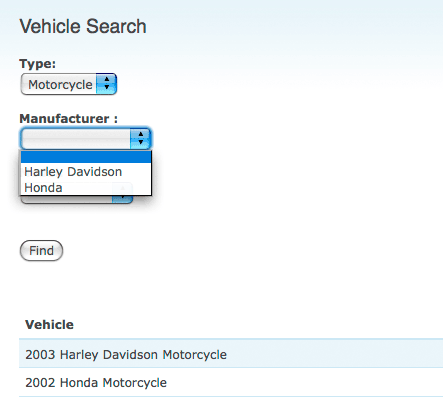
And finally, after selecting “Honda” as the manufacturer.
