
Matillion ETL is a GUI-based orchestration and transformation tool for data movement that has many functionalities, including querying external data via API. There are three primary ways to query this data from Matillion ETL:
- Create a custom Python script to send requests to the API directly, storing the response in variables in Matillion ETL:
- This option is code-heavy and then requires further steps to convert the response into structured data. However, there are plenty of scenarios where this is preferable.
- Leverage functionality in the underlying data platform, such as external access integrations in Snowflake:
- This option is also code-heavy and requires deeper knowledge of the functionality of the underlying data platform. However, there are also plenty of scenarios where this is preferable. At a minimum, this option allows all compute to be pushed down to the underlying data platform.
- Utilize Matillion ETL’s own API Query Profiles functionality to fetch data in the structure you desire:
- This option is the focus of this article.
Note that this article covers the functionality in Matillion ETL, which is the Matillion technology deployed within customer environments. The process is different if using Matillion Data Productivity Cloud (DPC), which is the Matillion’s newer SaaS technology.
Understanding Our Example API — Stock Prices
For the purpose of this blog, we will use a stock price API as an example. Our intention is to retrieve the recent performance of a given symbol over time, by leveraging the time series endpoint. This is documented here.
Specifically, the endpoint has the following URL:
https://api.twelvedata.com/time_series
To query any endpoint in this API, an API key is required to authenticate requests. If you wish to stick with simple dummy data, the value “demo” can be leveraged. If you wish to explore further, you may wish to configure your own free API key by signing up to the free plan, here. This API key can either be provided as a query parameter, which we will do quickly in a moment, or it can be included in the header of the request, which we will do in our main query profile.
Also, the following two parameters are required for the specific endpoint that we wish to query:
- symbol: This is the symbol of the instrument, otherwise known as the code for the stock.
- interval: This is the length of the interval between values in the returned time series.
Finally, among others, there is an optional parameter that I would recommend:
- outputsize: This is the number of data points to receive, ranging from 1 to 5000.
The following URL can be clicked to quickly query the API and see a sample of the output:
https://api.twelvedata.com/time_series?symbol=AAPL&interval=1day&outputsize=5&apikey=demo
Along with some metadata, the endpoint returns the following information for the symbol (stock) for each interval:
- datetime: Datetime when the interval began.
- open: Price at the opening of the interval.
- close: Price at the end of the interval.
- high: Highest price that occurred during the interval.
- low: Lowest price that ocurred during the interval.
- volume: Volume of trades that occurred during the interval.
Configuring the Query Profile
The first step is creating a query profile. This profile is how Matillion packages up any information it has about the API and allows the API to be leveraged as part of an orchestration job.
To create the query profile, follow these steps:
- Under the “Project” menu, select “Manage API Profiles” > “Manage Query Profiles:”
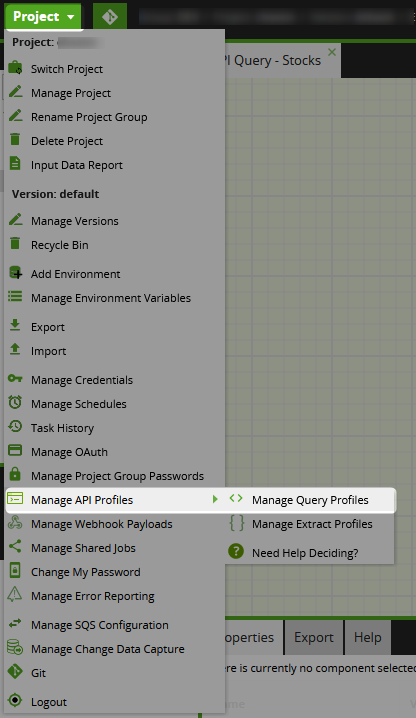
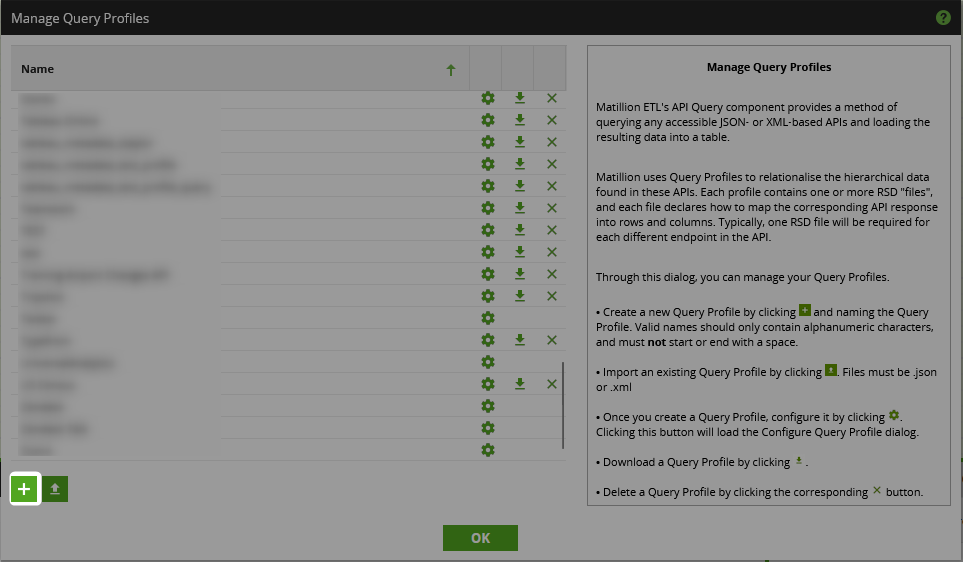
- This menu will list all query profiles that currently exist within your Matillion ETL environment. To create a new one, select the
+icon:
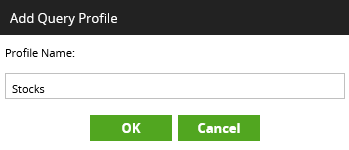
- Give the query profile a name, such as “Stocks,” then click “OK:”
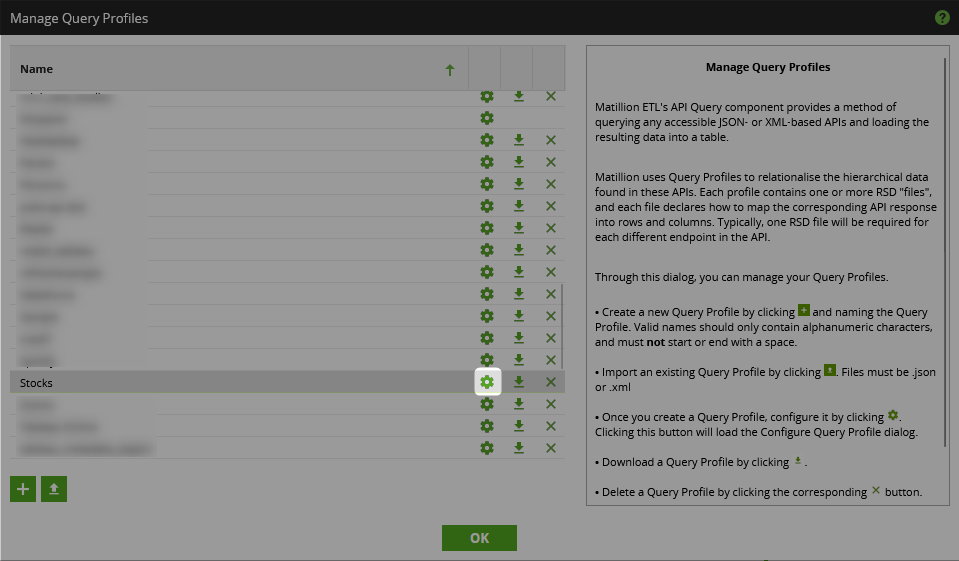
- Find your new query profile in the list, then select the gear icon to configure it:
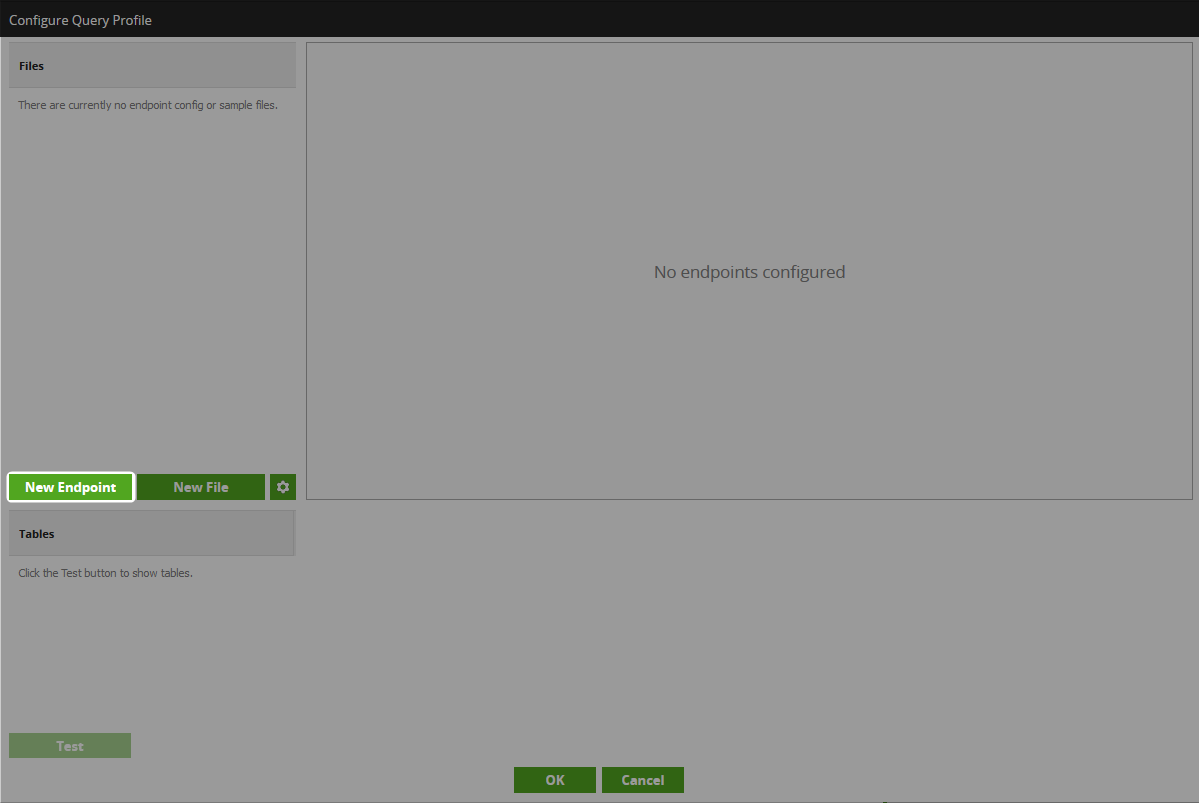
- At first, this will be empty as no endpoints are configured. For this article we will only create a single endpoint, however more complex scenarios can leverage multiple endpoints in the same query profile. Select “New Endpoint:”
- Under “Source Details,” give the new endpoint a name and description. Personally, I like to provide the link to the documentation of the endpoint in the description where possible, though you may wish to provide further information.

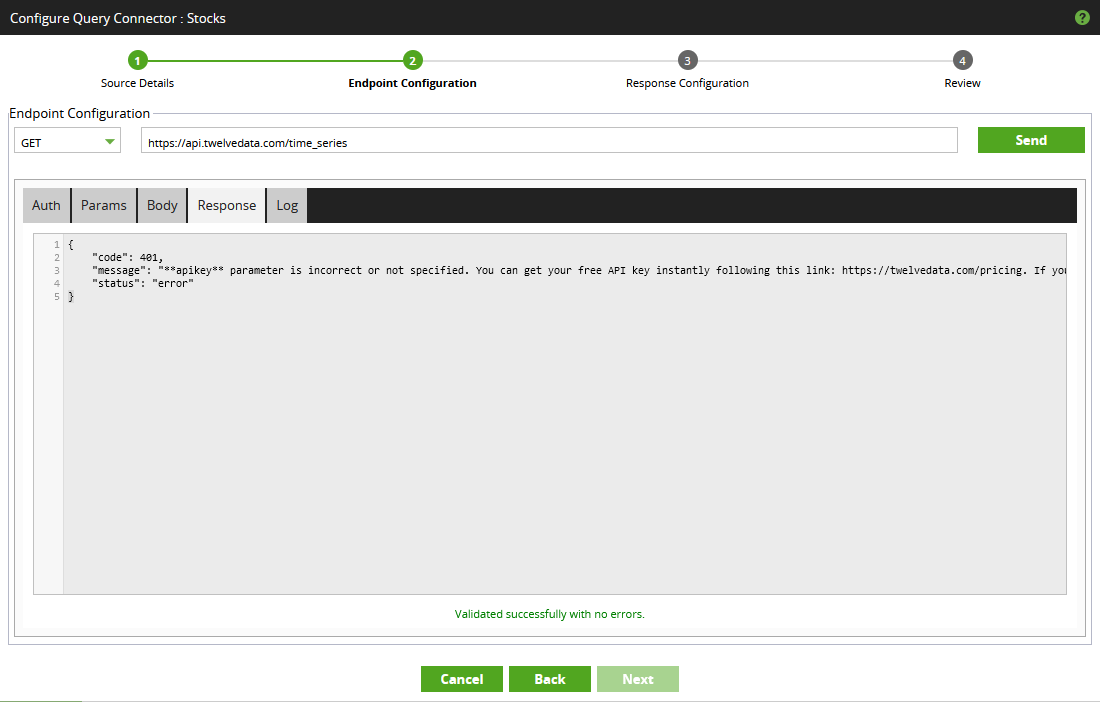
- Not surprisingly, the “Endpoint Configuration” area is where the majority of work takes place when configuring an endpoint. We start by populating the main endpoint URL. Recall from earlier that the value is as follows: https://api.twelvedata.com/time_series. Enter this and click “Send” to confirm that the URL is correct. Since nothing else is configured yet, the response will include an error stating a missing API key:
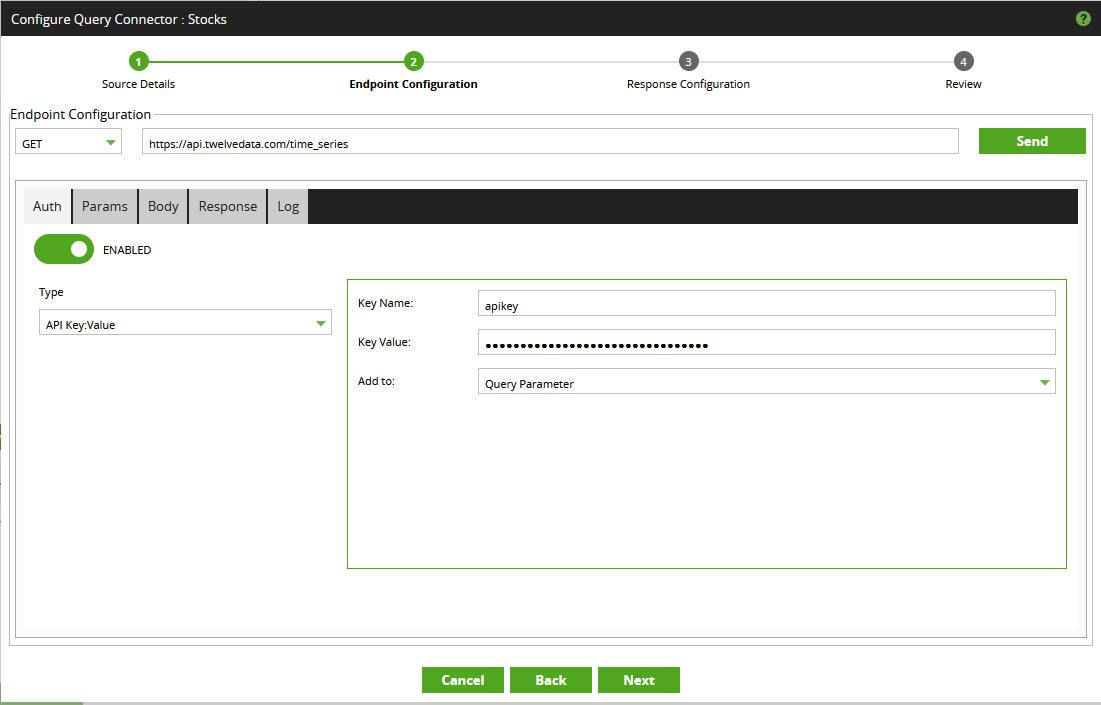
In addition to the main endpoint URL at the top, there are a few different tabs to look at here. These changes should resolve the missing API key issue, along with allowing some flexibility when querying the API.- First, switch to the “Auth” tab. This tab is where optional security/authentication information can be provided. In our case, an API key is required. As mentioned above, you can either use the value “demo” or configure your own free API key by signing up to the free plan, here. The value should be added as a query parameter:
Once the API key is configured, hit “Send” again to see a different error message. This confirms that the API key is now valid, and we can move on to providing the required parameters.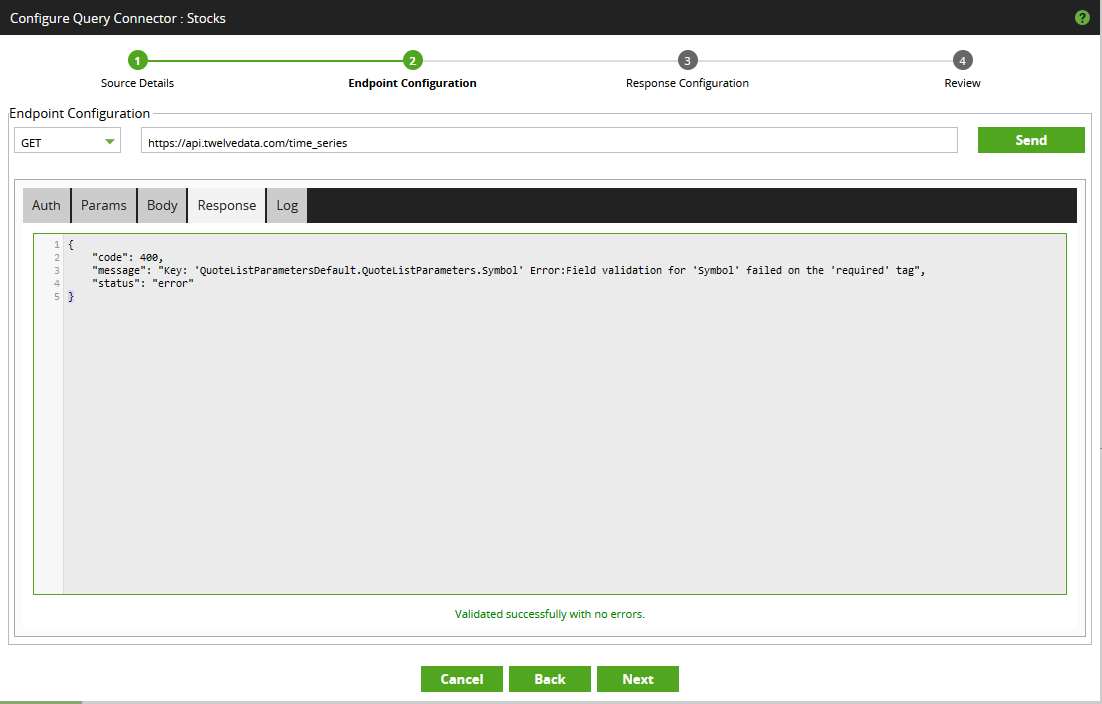
- Switch to the “Params” tab. This is where we can enter any other query parameters. Recall from earlier that we intend to send the following parameters to the endpoint:
- symbol: This is the symbol of the instrument, otherwise known as the code for the stock.
- interval: This is the length of the interval between values in the returned time series.
- outputsize: This is the number of data points to receive, randing from 1 to 5000
Each of these can be entered into the “Params” tab.
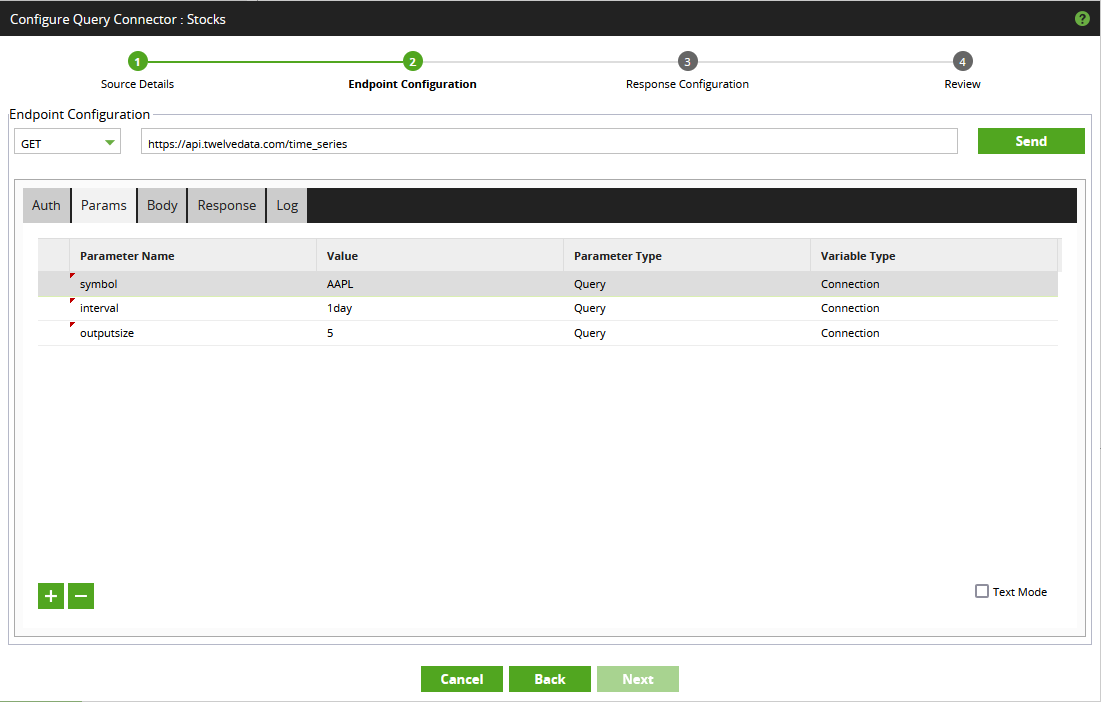
Other than the parameter name, there are three fields here:
- Value: This is the value of the parameter when you are testing the functionality by clicking “Send” in the “Endpoint Configuration” screen. This is sometimes persisted after you close the screen, depending on the variable type.
- Parameter Type: This determines what type of parameter is being used
- Query: Parameters that are added to the end of the URI after a
?character, separated by&characters. This is what we need for our example, as our parameters look like this:
?symbol=AAPL&interval=1day&outputsize=5 - URI: Parameters that are actually inserted into the URI, replacing placeholder values of the form
{param-name} - Header: Parameters should be included in the header of the request sent to the API
- Query: Parameters that are added to the end of the URI after a
- Variable Type: This determines how the variable can be populated when the query profile and endpoint are leveraged as part of a Matillion orchestration job
- Connection: This is the default variable type, where the variable is leveraged when sending the request to the API. This is what we need for our example.
- Constant: For this variable type, the value is persisted at all times and cannot be changed. It therefore cannot be overridden or populated when the endpoint is queried as part of a Matillion orchestration job.
- Input: This allows the values which are returned by the API query to be filtered from inside the API Query component in a Matillion orchestration job.
Again, click “Send” to see that we now have a working API query!
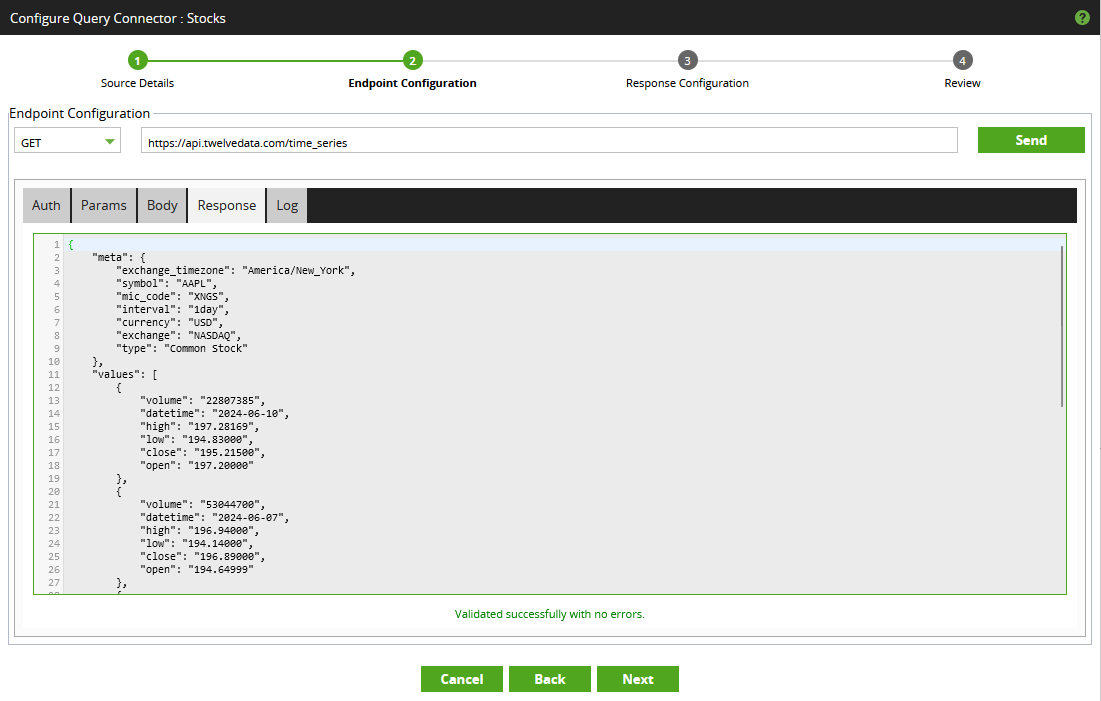
- Our example is a simple GET endpoint that does not require any more configuration. However, if you are attempting a more complex example then note that the “Body” tab can be used to add a body to your request.
- First, switch to the “Auth” tab. This tab is where optional security/authentication information can be provided. In our case, an API key is required. As mentioned above, you can either use the value “demo” or configure your own free API key by signing up to the free plan, here. The value should be added as a query parameter:
- We can now proceed to the “Response Configuration” area, where the final standardised output can be configured. The response we receive from our endpoint is rather simple, consisting of a dictionary containing multiple keys, of which one is a list of row-level data. The “Repeating Element” entry is the key that is used to determine where row-level data is retrieved. Matillion can understand this without further intervention and will automatically identify the “values” key as the list of row-level information, populating the “Repeating Element” in this area to match.
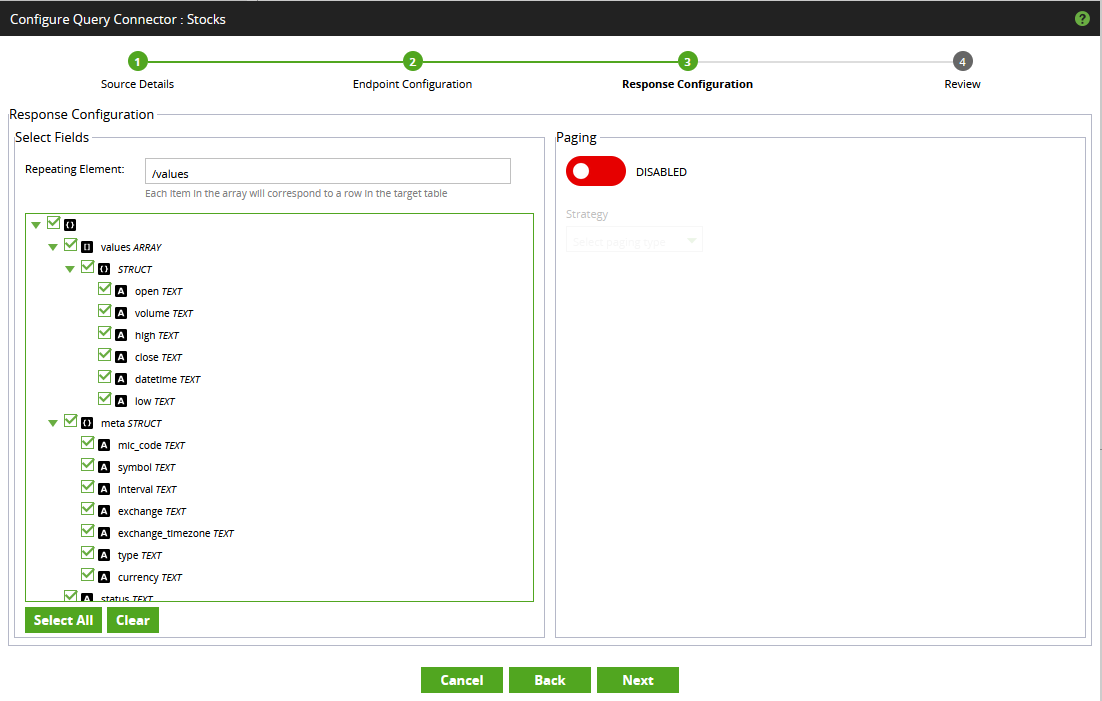
For more complex scenarios, the “Repeating Element” may need to be defined specifically. This is achieved by right clicking on a field and selecting “Set Repeating Element.” This area is also capable of handling paginated responses, however this is outside the scope of this article. - Finally, the “Review” area can be used to quickly confirm that the output appears as expected. Select “Finish” when ready.
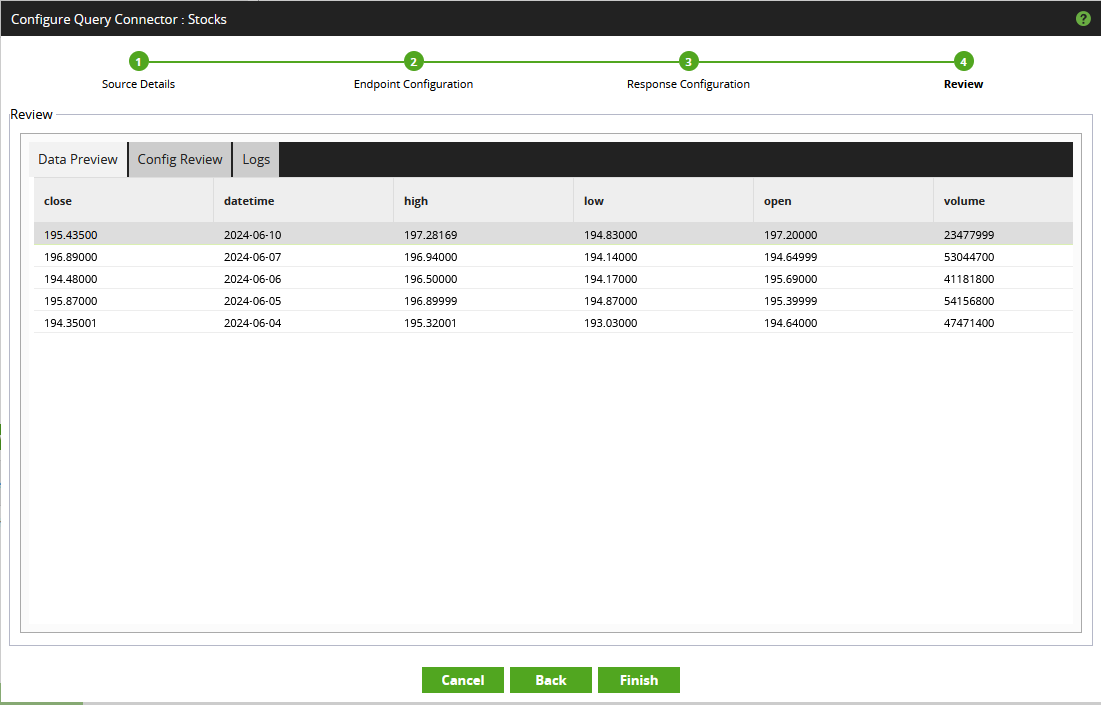
- Once finished, the query can again be tested by selecting the corresponding “Table” (this is what the Matillion UI labels the endpoint) and populating any parameter values.
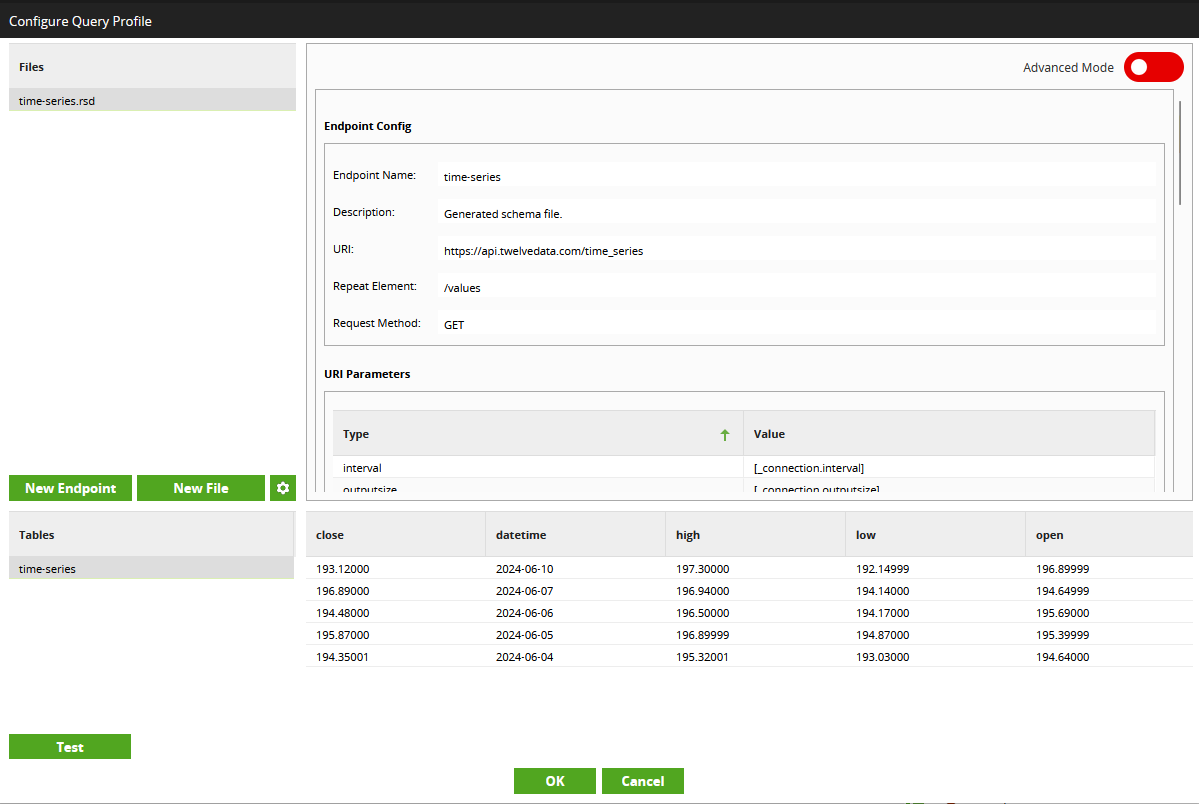
- Now for the less fun part of Matillion API Query Profiles. You may have noticed that this output does not include all of the expected fields! There were a set of meta fields outside of our repeating element which have not been included. Unfortunately, this is a known limitation in the UI, but there is a workaround! This has also been resolved in Matillion’s new Data Productivity Cloud, which is their SaaS offering. To work around this, toggle on “Advanced Mode” in the upper right corner. This will show you the Report template Schema Definition file, otherwise known as the RSD. This is the code that forms the endpoint’s configuration. This is documented in full detail here and here. Our goal is nothing too complex. We simple add the missing columns to the top. Testing again will then return the correct fields.
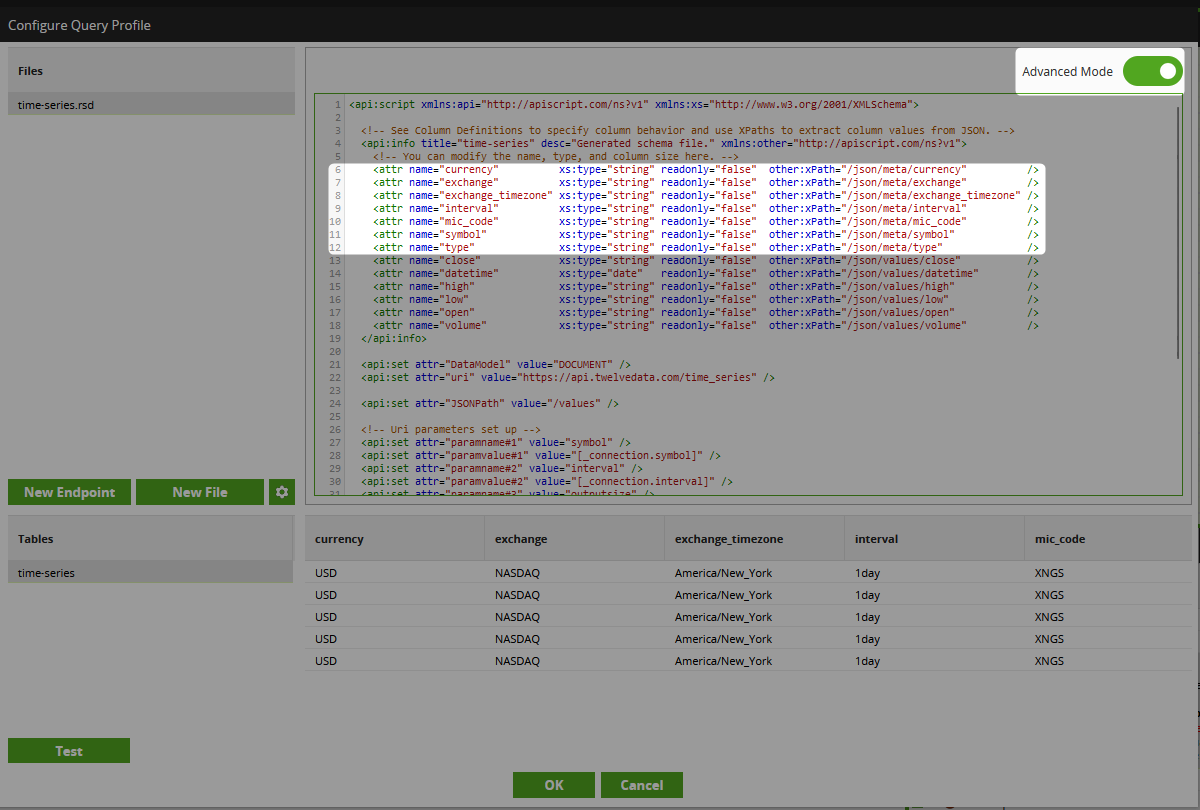
The full RSD for the endpoint is as follows:
<api:script xmlns:api="http://apiscript.com/ns?v1" xmlns:xs="http://www.w3.org/2001/XMLSchema">

  <!-- See Column Definitions to specify column behavior and use XPaths to extract column values from JSON. -->
  <api:info title="time-series" desc="Generated schema file." xmlns:other="http://apiscript.com/ns?v1">
    <!-- You can modify the name, type, and column size here. -->
    <attr name="currency"          xs:type="string" readonly="false"  other:xPath="/json/meta/currency"          />
    <attr name="exchange"          xs:type="string" readonly="false"  other:xPath="/json/meta/exchange"          />
    <attr name="exchange_timezone" xs:type="string" readonly="false"  other:xPath="/json/meta/exchange_timezone" />
    <attr name="interval"          xs:type="string" readonly="false"  other:xPath="/json/meta/interval"          />
    <attr name="mic_code"          xs:type="string" readonly="false"  other:xPath="/json/meta/mic_code"          />
    <attr name="symbol"            xs:type="string" readonly="false"  other:xPath="/json/meta/symbol"            />
    <attr name="type"              xs:type="string" readonly="false"  other:xPath="/json/meta/type"              />
    <attr name="close"             xs:type="string" readonly="false"  other:xPath="/json/values/close"           />
    <attr name="datetime"          xs:type="date"   readonly="false"  other:xPath="/json/values/datetime"        />
    <attr name="high"              xs:type="string" readonly="false"  other:xPath="/json/values/high"            />
    <attr name="low"               xs:type="string" readonly="false"  other:xPath="/json/values/low"             />
    <attr name="open"              xs:type="string" readonly="false"  other:xPath="/json/values/open"            />
    <attr name="volume"            xs:type="string" readonly="false"  other:xPath="/json/values/volume"          />
  </api:info>

  <api:set attr="DataModel" value="DOCUMENT" />
  <api:set attr="uri" value="https://api.twelvedata.com/time_series" />

  <api:set attr="JSONPath" value="/values" />

  <!-- Uri parameters set up -->
  <api:set attr="paramname#1" value="symbol" />
  <api:set attr="paramvalue#1" value="[_connection.symbol]" />
  <api:set attr="paramname#2" value="interval" />
  <api:set attr="paramvalue#2" value="[_connection.interval]" />
  <api:set attr="paramname#3" value="outputsize" />
  <api:set attr="paramvalue#3" value="[_connection.outputsize]" />

  <!-- The GET method corresponds to SELECT. Here you can override the default processing of the SELECT statement. The results of processing are pushed to the schema's output. See SELECT Execution for more information. -->
  <api:script method="GET">
    <api:set attr="method" value="GET"/> <!-- HTTP request type -->
    <api:set attr="method" value="GET"/>
    <api:call op="jsonproviderGet">
      <api:push/>
    </api:call>
  </api:script>

</api:script>
Leveraging the Query Profile Inside an Orchestration Job
To leverage the query profile inside an orchestration job, follow these steps:
- If needed, create a new orchestration job. This is the job which will be used to execute the API queries.
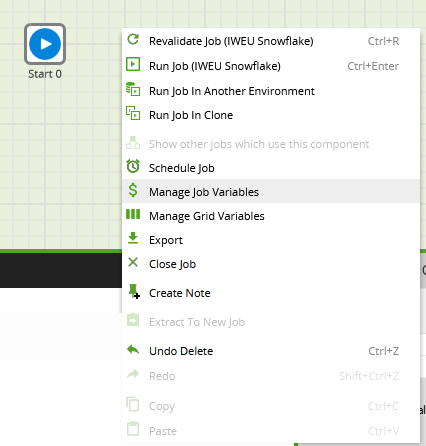
- We start by creating some variables, matching the variables we created for the query profile. Inside the orchestration job, right click the canvas and select “Manage Job Variables.”
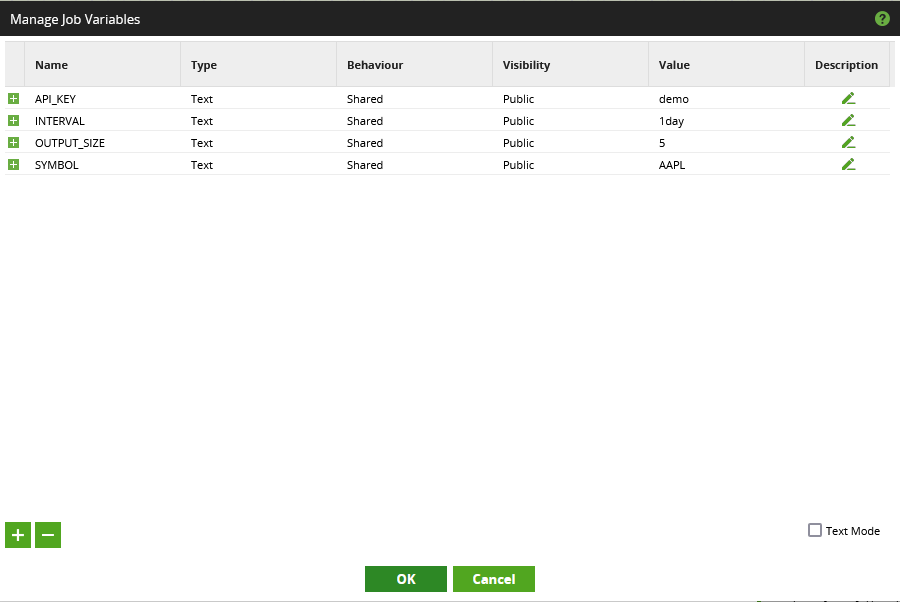
- Create the following variables, with either the defaults listed or whichever other values you wish:
- API_KEY: demo
- INTERVAL: 1day
- OUTPUT_SIZE: 5
- SYMBOL: AAPL
- Now find the “API Query” component and drag it onto the canvas:

- There are several things to configure within this component, most of which are out of scope for this article as they are standard Matillion functionality. The important things that we configure are:
- Profile: The name of the API query profile. For our example, we called this “Stocks.”
- Data Source: The name of the endpoint/table within the API query profile. For our example, we called this “time-series.”
- Data Selection: The fields that we wish to retrieve. For this example, simply select them all.
- Target Table: The name of the table in Snowflake where data will be loaded to. For this example, we have called this “API_STOCKS.”
- There is one more thing to configure here. It remains to configure the input variables so that our API query targets the correct data. To achieve this, we need to configure the connection options. There are two connection options we need to configure:
- Other: This is the connection option required for any of our parameters within the endpoint with the “Connection” variable type. Specifically, we use this to provide our three main parameters, using a semicolon-delimited list and leveraging the
${variable-name}notation to leverage the variables from our orchestration job. - CustomUrlParams: This is where any additional URL parameters can be provided. This uses an
&-delimited list, just like when adding parameters at the end of a regular URL.
We could have made the API key another parameter in our endpoint within the query profile, and then populated it along with everything else in the “Other” connection option. Personally, I prefer to keep any authentication values separate in some way so that they are more easily found and secured.
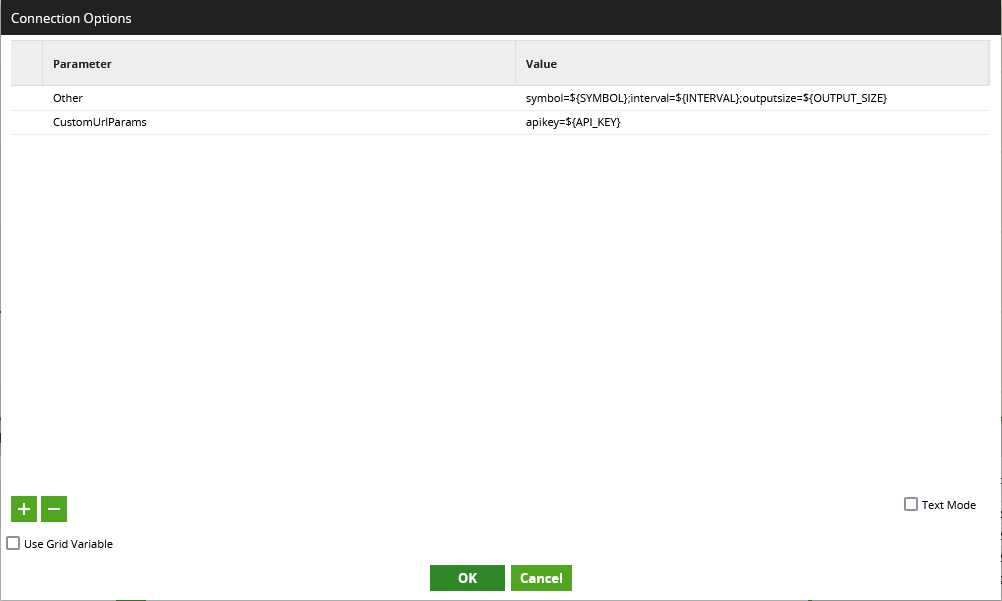
- Other: This is the connection option required for any of our parameters within the endpoint with the “Connection” variable type. Specifically, we use this to provide our three main parameters, using a semicolon-delimited list and leveraging the
- It should now be possible to see some results by sampling the component:
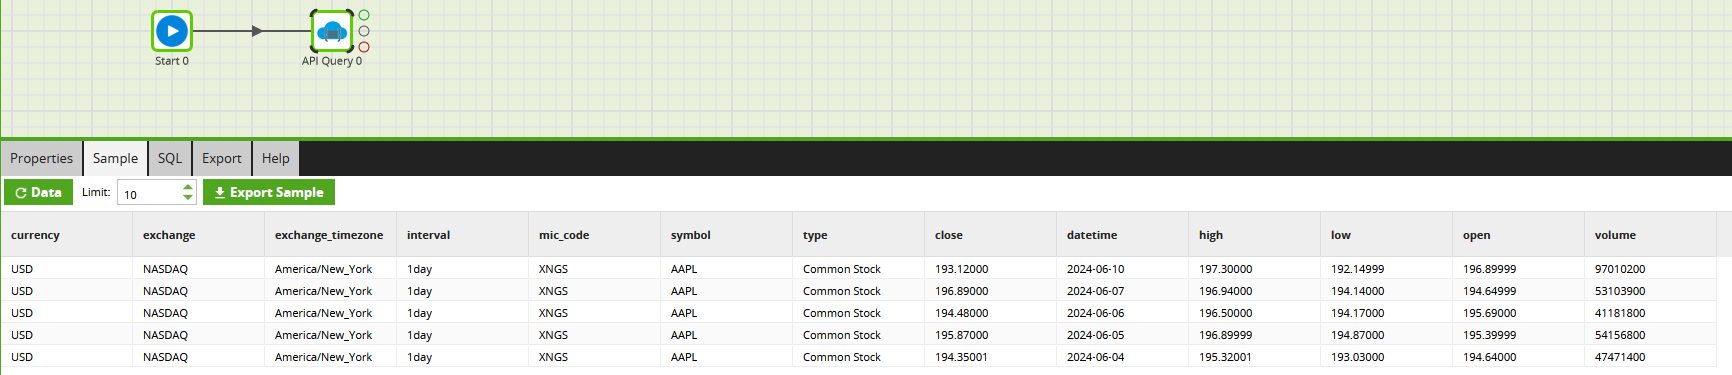
And so concludes our adventure into query profiles in Matillion ETL. We have created an API query profile and leveraged it inside an orchestration job. By aligning the inputs with job variables, we have improved the flexibility of the job and could leverage it as part of a larger job to iterate over multiple symbols, for example.