
This post is written with Tableau Server on Linux in mind. For instructions geared towards Tableau Server on Windows, check out my next post, which will be on the blog soon. In order to install the Okta Active Directory (AD) agent, you’ll need access to the AD domain controllers which will be running on Windows.
Syncing user groups from Active Directory to your Tableau Server isn’t a new feature, but when you’re not using Active Directory as your identity store, things start to become a bit trickier. There is a possibility for scripts to be written that will query the Active Directory groups you present and then will add and remove users as needed from those groups. However, this introduces another piece of infrastructure that needs to be monitored. By using Universal Directory (UD) from Okta, you’ll be able to add users from AD, add users from AD groups into Okta groups and add those groups to Tableau Server. You’ll even be able to enable SAML to allow for a more seamless login experience for both external and internal users.
Beneficial Use Cases
Here are some scenarios in which this connection would be a huge advantage. Tableau will only allow you to bind the Server to one domain (multiple if there is a two-way trust), but if the two-way trust can’t be created, Okta UD is a great way to allow for both of those domains to be logically “joined” together. This means that you can allow for users from both domains to use their domain passwords and grant the ability to sync AD groups to the Tableau Server as well.
You’re also able to add users external to your Active Directory. This means that if you have clients that use Tableau to receive analytics, they can use an Okta account to log in. If they have domain-specific emails, you can even automate adding them to the correct groups so that they’ll automatically be set up with the access they need via group permissions.
Setting up the Okta Environment
This post will go over binding or attaching Tableau to the Okta Universal Directory; creating the user that will allow Tableau to bind to Okta; creating groups that will be available for Tableau to query; and setting up SAML to connect Okta to AD. I’m making the assumption that this is a net new Linux Tableau Server, so I won’t be covering migrating content over from an existing server. Let’s start with the Okta setup piece!
Most times, the Okta environment will already be set up, but we’ll start with a from-scratch environment.
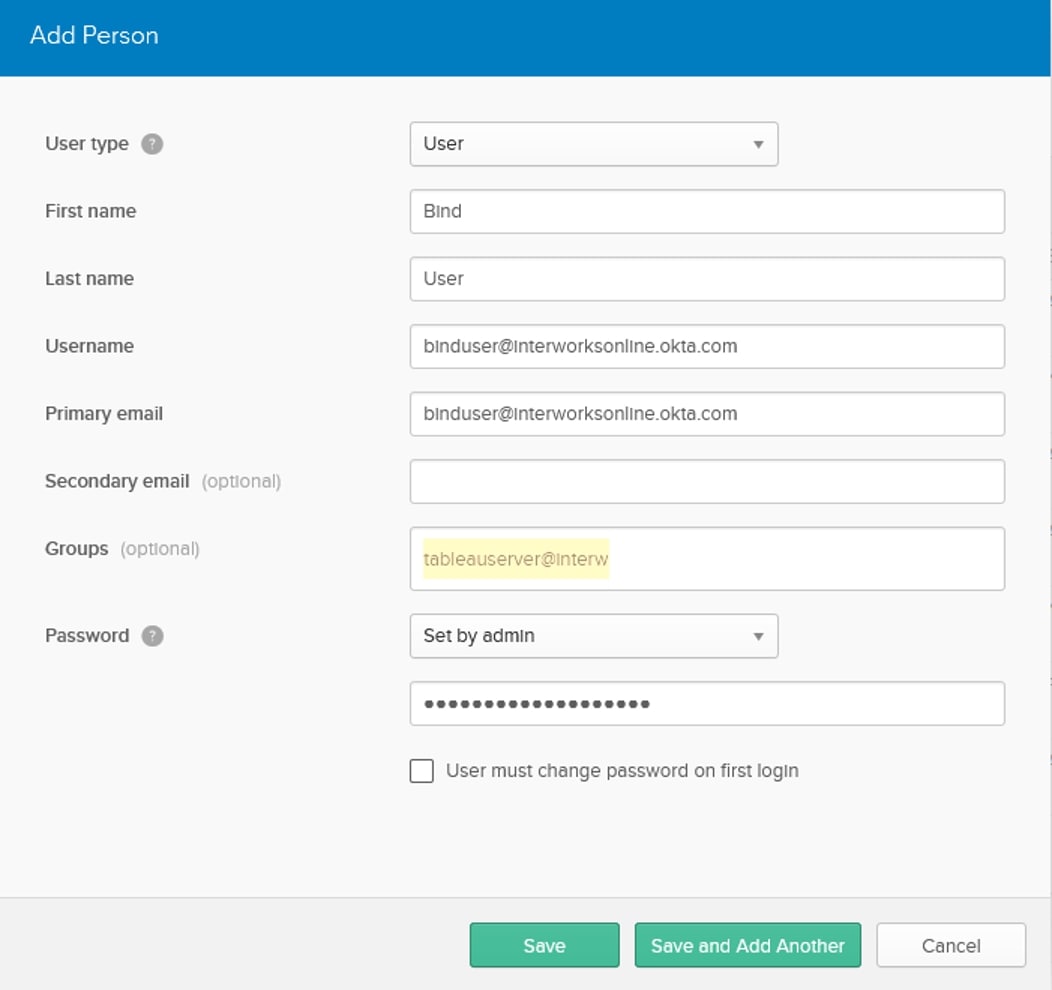
After getting through registration, you’ll head into the admin dashboard and under Directory, choose People. We will add a user that will act as the bind user so that we can bind to the LDAP interface. Click on Add Person and fill in the necessary information for that user. For the password, it should be Set by admin, and uncheck the box for User must change password on first login:
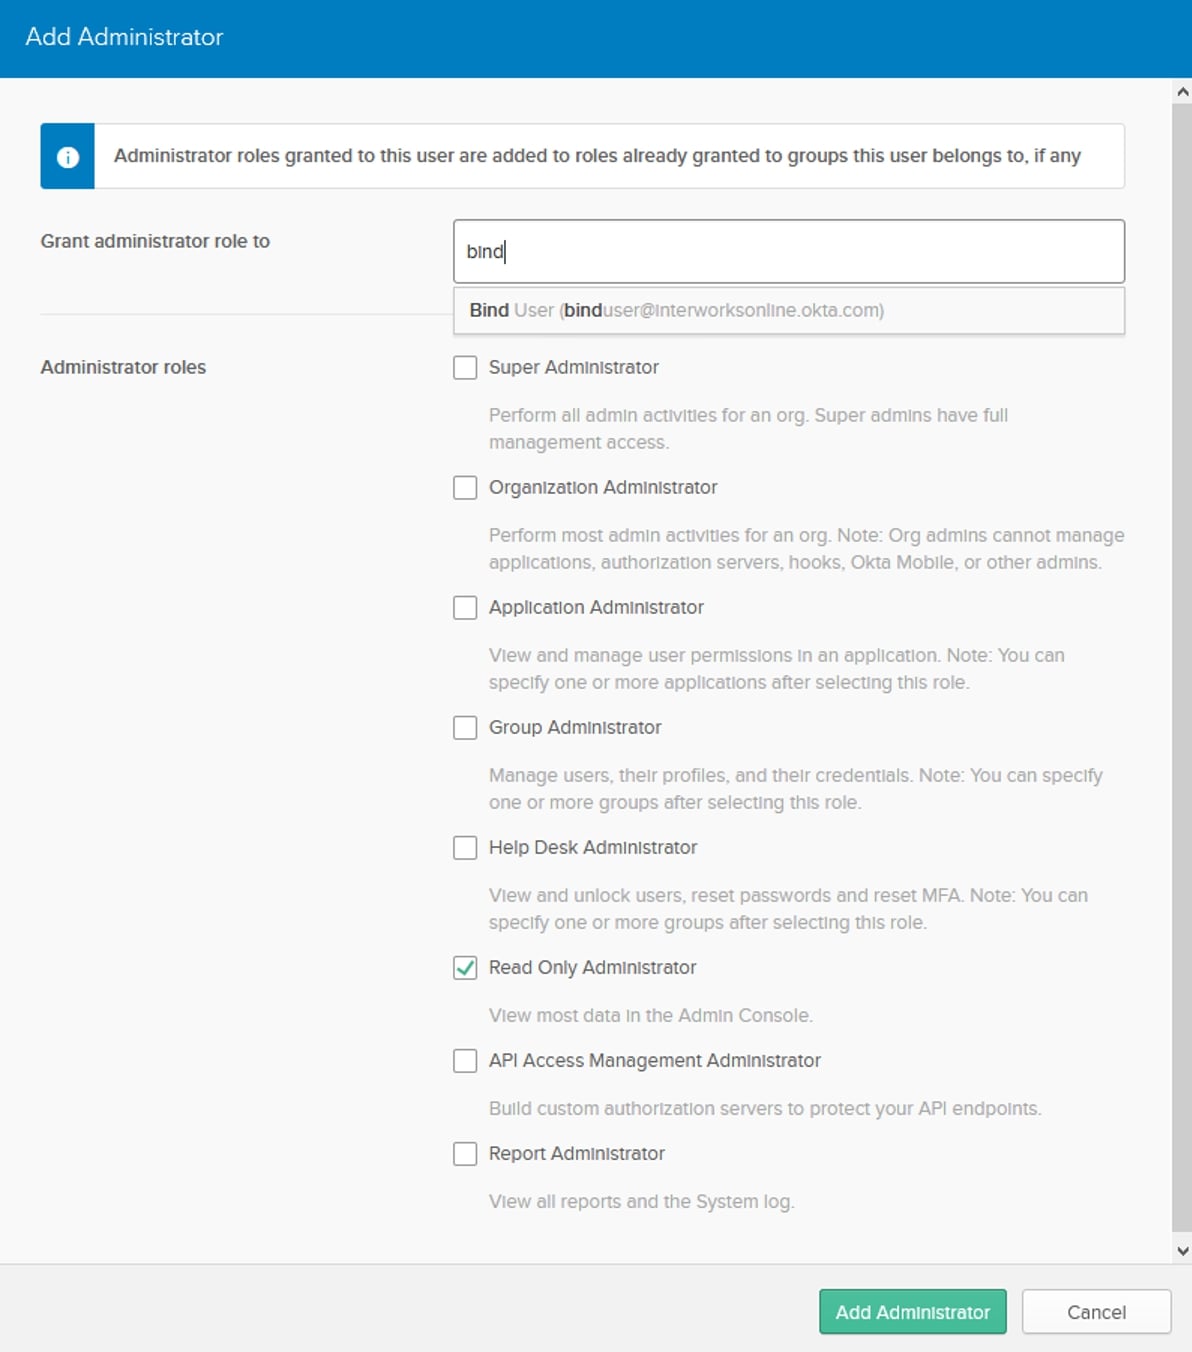
Click Save and the window will close. Then you can verify that the user has a status of Active. We now need to add the user as a read-only admin, so it will be allowed to bind to the LDAP interface.
Under Security, choose Administrators. Click the Add Administrator button and type the username for the bind user you just created. Select that user and check the box next to Read Only Administrator. Click the Add Administrator button, and the user will be granted that role:
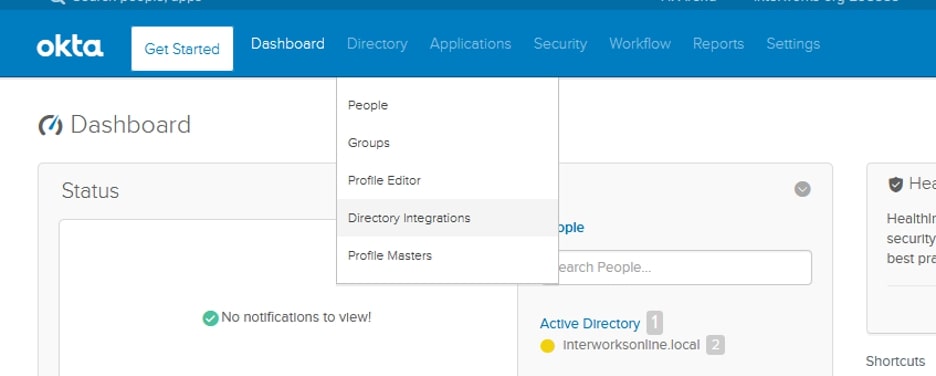
Now that the user has been given the appropriate permissions, we can go to setting up the LDAP Interface. Under Directory, choose Directory Integrations:
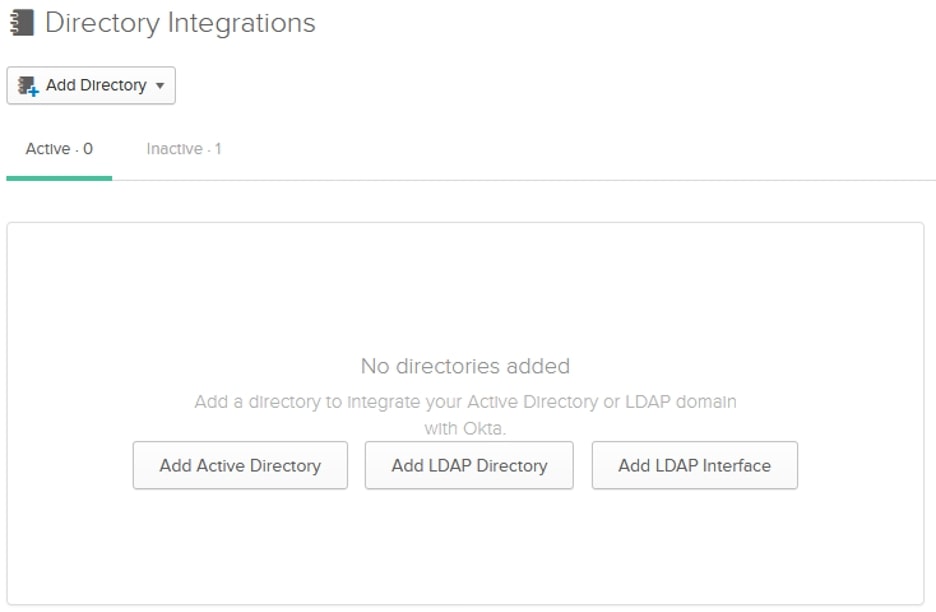
Click on Add LDAP Interface, and you’ll be brought to a screen giving parameters that we will need later:
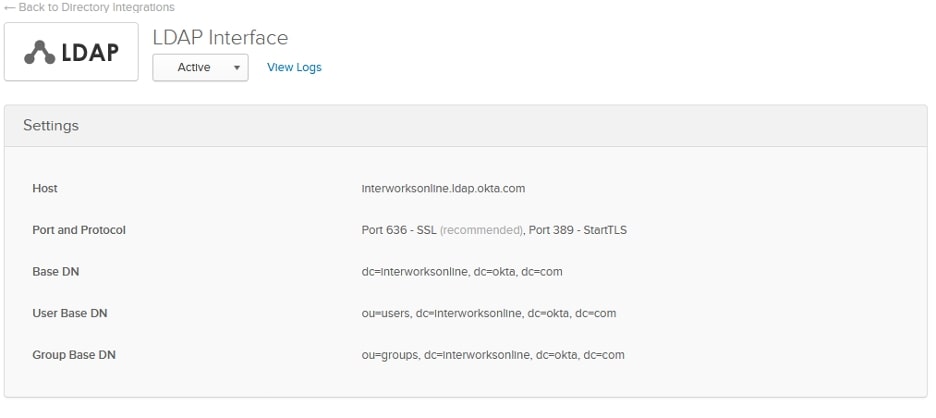
Copy those values into the following template:
{
"configEntities":{
 "identityStore": {
  "_type": "identityStoreType",
  "type": "activedirectory",
  "domain": "<First dc from Base DN>.okta.com",
  "root": "",
  "nickname": "",
  "hostname": "<Host>",
  "sslPort": "636",
  "directoryServiceType": "openldap",
  "bind": "simple",
  "username": "uid=<Read Only Admin Username>,<Base DN>",
  "password": "<Read Only Password Here>",
  "identityStoreSchemaType": {
      "distinguishedNameAttribute": "",
      "userBaseDn": "<User Base DN>",
      "userBaseFilter": "(objectClass=inetOrgPerson)",
      "userUsername": "uid",
      "userDisplayName": "uid",
      "userEmail": "mail",
      "userCertificate": "",
      "userThumbnail": "",
      "userJpegPhoto": "",
      "groupBaseDn": "<Group Base DN>",
      "groupBaseFilter": "(objectClass=groupofUniqueNames)",
      "groupName": "cn",
      "groupEmail": "",
      "groupDescription": "description",
      "member": "uniqueMember",
      "serverSideSorting": "false",
      "rangeRetrieval": "false",
      "groupClassNames": "groupofUniqueNames"
      }
   }
 }
}
Using the values that I have filled out, my template looks like the following:
{
"configEntities":{
 "identityStore": {
  "_type": "identityStoreType",
  "type": "activedirectory",
  "domain": "interworksonline.okta.com",
  "root": "",
  "nickname": "",
  "hostname": "interworksonline.ldap.okta.com",
  "sslPort": "636",
  "directoryServiceType": "openldap",
  "bind": "simple",
  "username": "uid=tableauserver@interworks.com,dc=interworksonline,dc=okta,dc=com",
  "password": "NotAPassword123123123",
  "identityStoreSchemaType": {
      "distinguishedNameAttribute": "",
      "userBaseDn": "ou=users,dc=interworksonline,dc=okta,dc=com",
      "userBaseFilter": "(objectClass=inetOrgPerson)",
      "userUsername": "uid",
      "userDisplayName": "uid",
      "userEmail": "mail",
      "userCertificate": "",
      "userThumbnail": "",
      "userJpegPhoto": "",
      "groupBaseDn": "ou=groups,dc=interworksonline,dc=okta,dc=com",
      "groupBaseFilter": "(objectClass=groupofUniqueNames)",
      "groupName": "cn",
      "groupEmail": "",
      "groupDescription": "description",
      "member": "uniqueMember",
      "serverSideSorting": "false",
      "rangeRetrieval": "false",
      "groupClassNames": "groupofUniqueNames"
      }
   }
 }
}
Note: Multi-factor authentication (MFA) will need to be disabled for the bind user for the bind to succeed.
Save this as a file on the server; I called mine idstore.json. The rest of the work will be performed on the server itself.
Setting up Your Tableau Server
Download the desired version of Tableau Server and install it. Typically, the installer will now tell you that you can connect to the TSM page on a local browser, but since we need to make some customizations, this will not be an option for us. Fear not! There are only a few steps required to get the server up and running.
After you SSH into the server, you can get a template out by typing tsm register –template and copy the output to a file. Open it up in a text editor and fill out the fields accordingly. Once the file is filled out, you can enter tsm register –file and enter the file path to the registration json file. Hit enter and the server will register itself with Tableau Servers.
We will need to activate the server next. If you don’t already have your key, you can activate the server as a trial and add the key later. Activate your license using tsm licenses activate -k <Product Key Here> or activate the trial by using tsm licenses activate –trial.
Once the server has an active license, we can import our custom Identity store settings by entering tsm settings import -f and entering the path to the idstore.json file we created and copied earlier. Once those settings are successfully imported, we can test a user mapping by entering tsm user-identity-store verify-user-mappings -v <your okta username>; tsm will return the info it was able to find on your user. If it returns an error, verify your settings are correct (edit the idstore.json file), reimport it and test the verify user again. You’re also able to verify group mappings using tsm user-identity-store verify-group-mappings -v <group-name>.
Once things are looking good, we can go ahead and initialize the server by entering tsm initialize and then waiting for the server to finish initializing. Once it’s completed, we can start the server and use tabcmd initialuser command to create the initial server administrator user. You’ll need to use your Okta username and password in order for this to succeed. In the case that your Okta username is the same as your AD username, the password will be updated to the AD value when we attach Okta to AD later.
Take a breath and a quick stretch! We’re most of the way there.
Setting up Your Active Directory
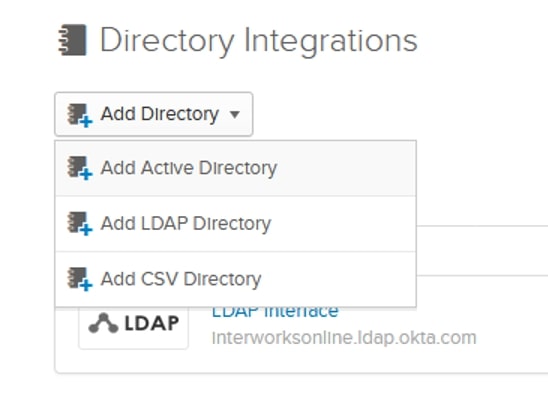
Adding your Active Directory is the next big step in getting your AD users to be able to log in to the Tableau Server. Head back the Okta Admin dashboard and under Directory, choose Directory Integrations. Click on Add Directory and choose Add Active Directory:
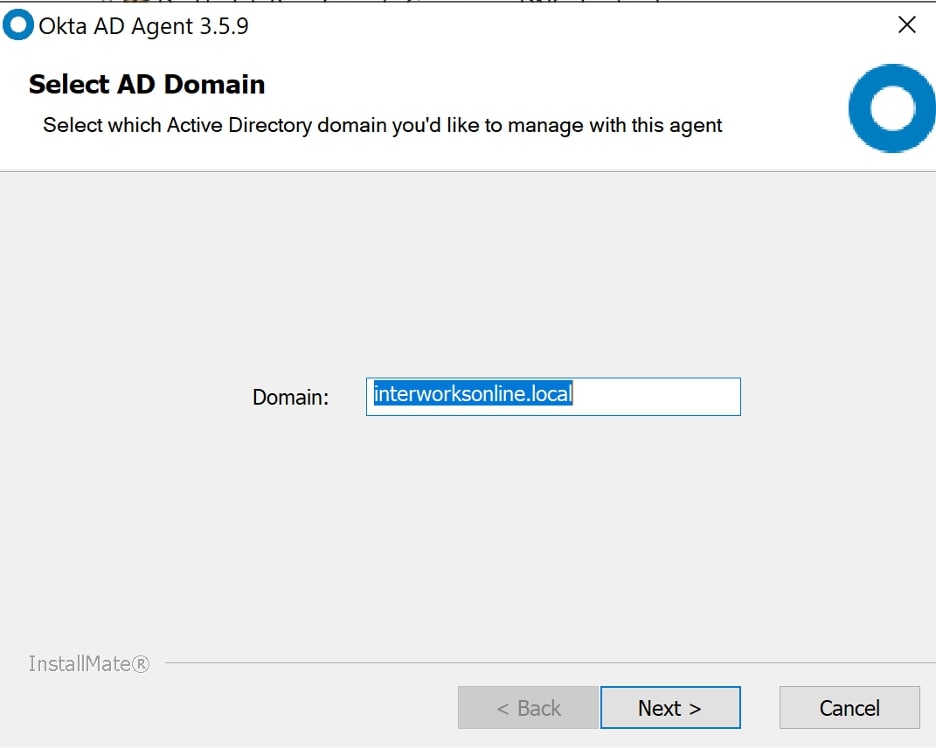
Click on Set Up Active Directory, and it will allow you to download the Okta AD Agent. Install the agent on all of the domain controllers within your company’s environment. Choose the domain that you want to configure to work with Okta:
Either create a service account for Okta to use or designate an account that Okta can use to sync:

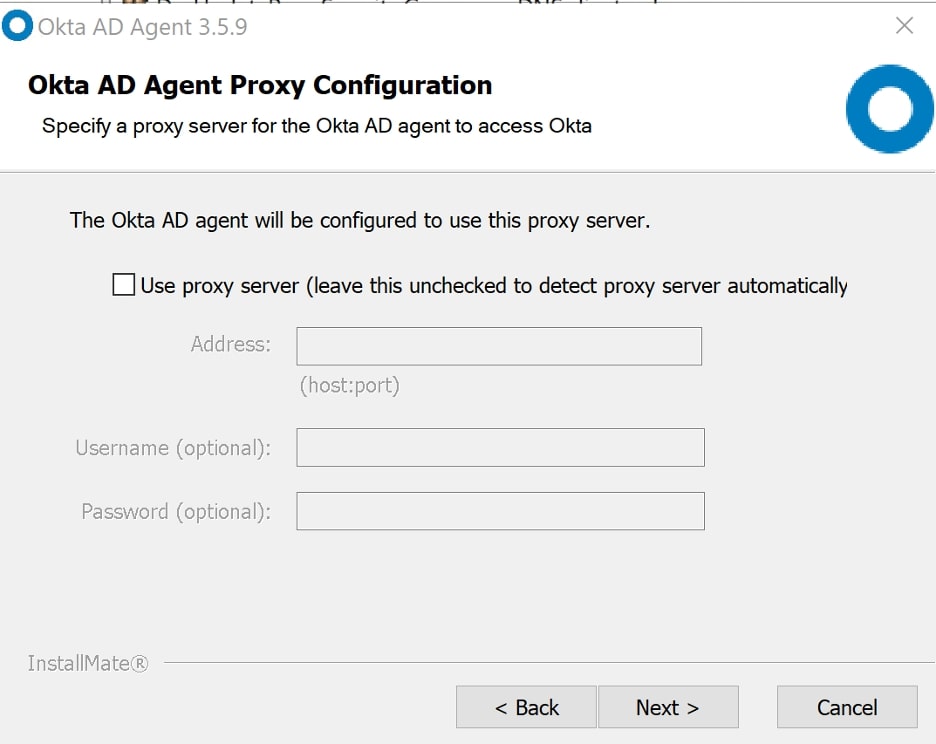
If your domain controller requires a proxy to connect to the internet, enter the details for it on this page:
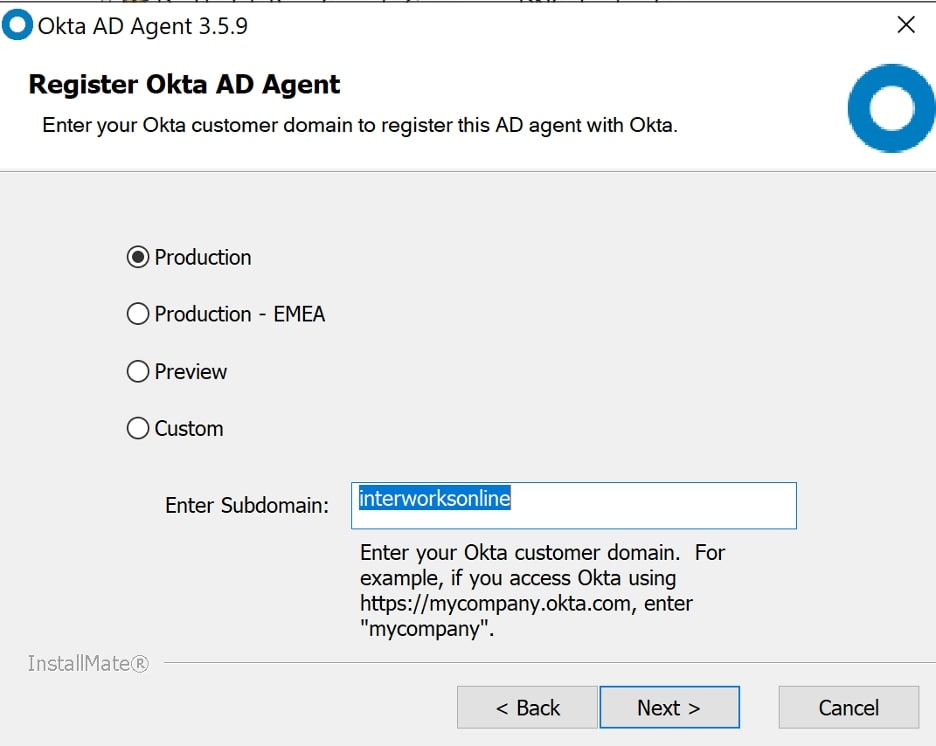
Choose the environment that your Okta tenant lives in. If you just set one up, it’s most likely Production. Also, enter the subdomain that you use to access the Okta dashboard. Since I access Okta at interworksonline.okta.com, I should enter interworksonline as my subdomain:
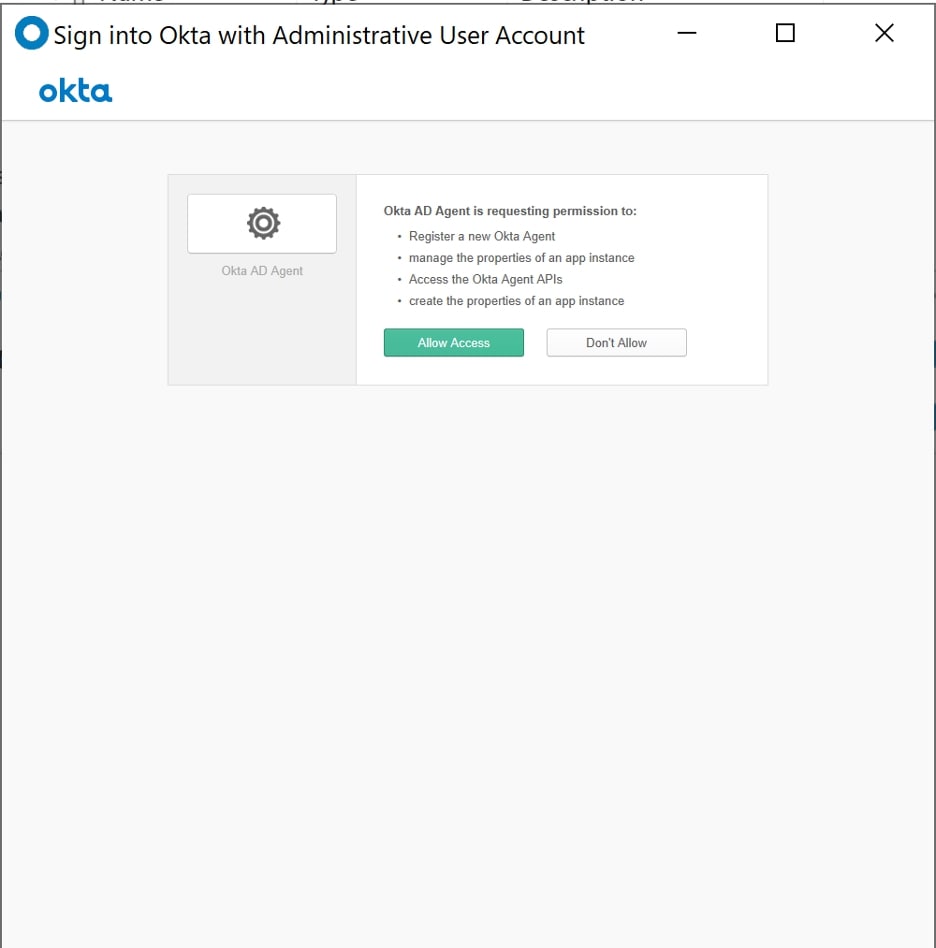
You should be prompted to log in using your Okta credentials. If you get an error message about cookies not being enabled, close this window and add https://*.okta.com as a trusted site inside of Internet Options and try to log in again. Okta will prompt you to either allow access or not allow access to your Okta environment. Click on Allow Access so that it can add users to the Okta tenant:
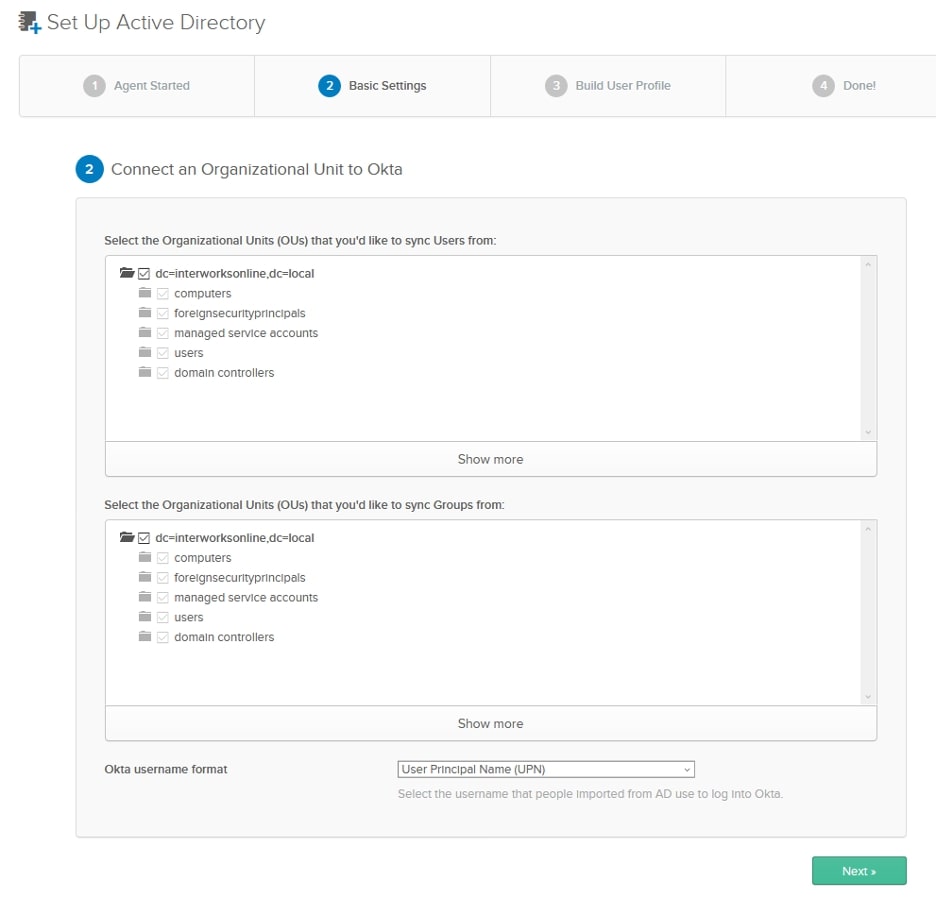
After allowing access, we can turn back to the webpage where we downloaded the Okta agent, and it will have changed to asking which Organizational Units (OUs) to sync.
We can choose what OUs we would like to sync users and groups from in our AD to Okta. You are able to choose everything or narrow it down to just the OUs that you want. Also, choose the Okta username format that you require. I suggest using User Principal Name so that you can avoid any external users having the same username as an internal user:
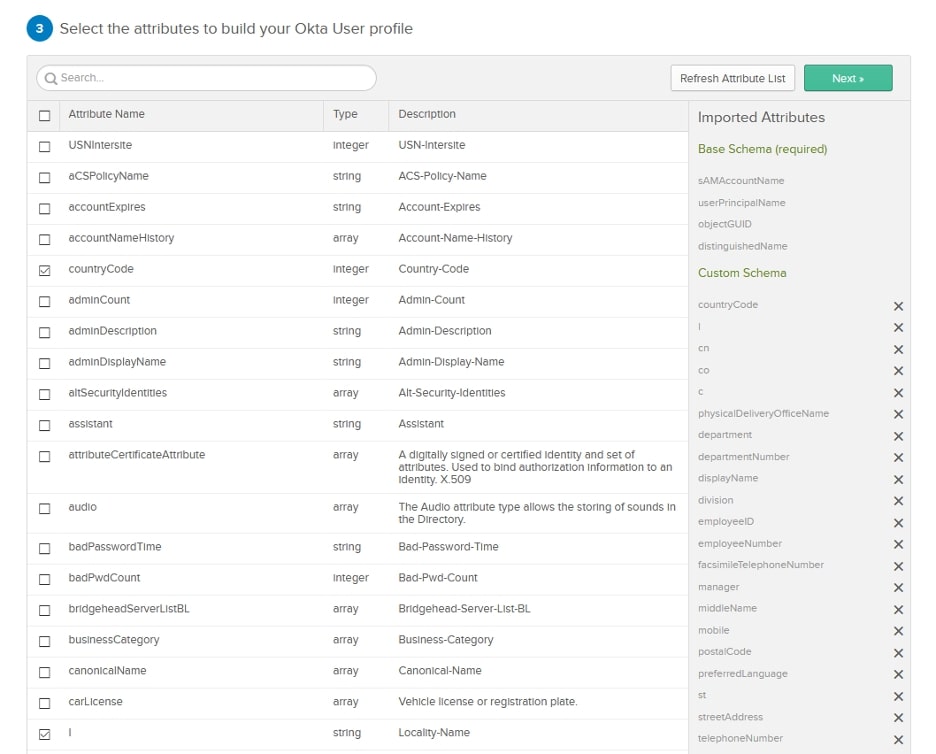
The next page will allow you to customize any attributes that you have in AD to Okta. I found that the default set of attributes were sufficient for my testing:
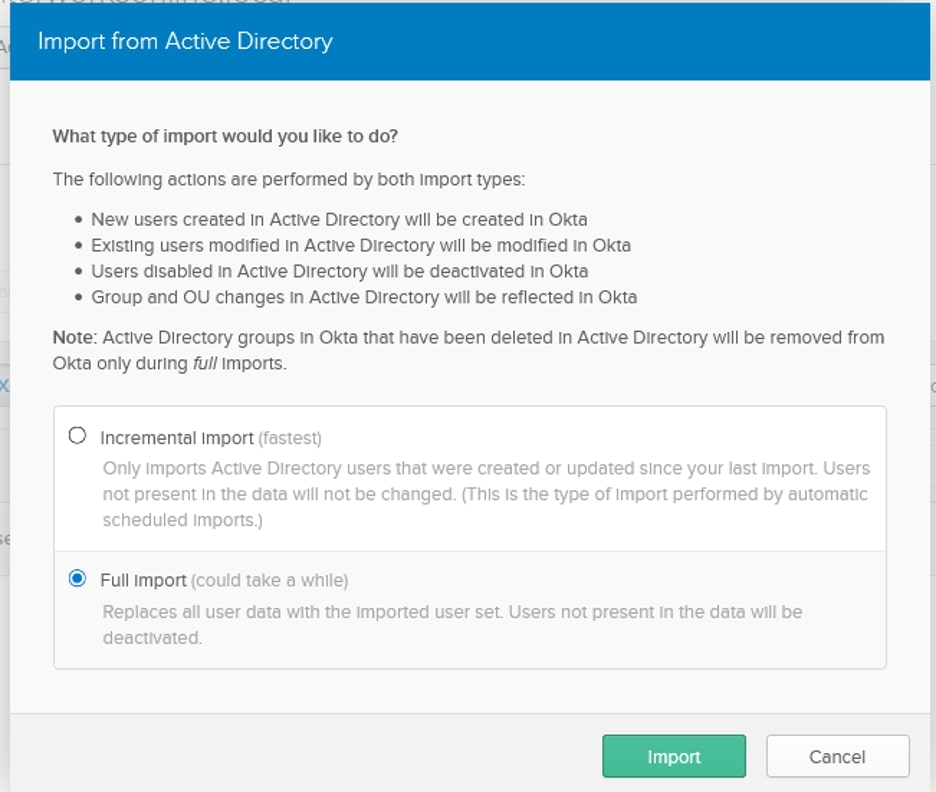
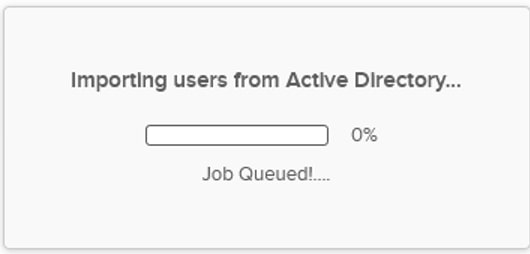
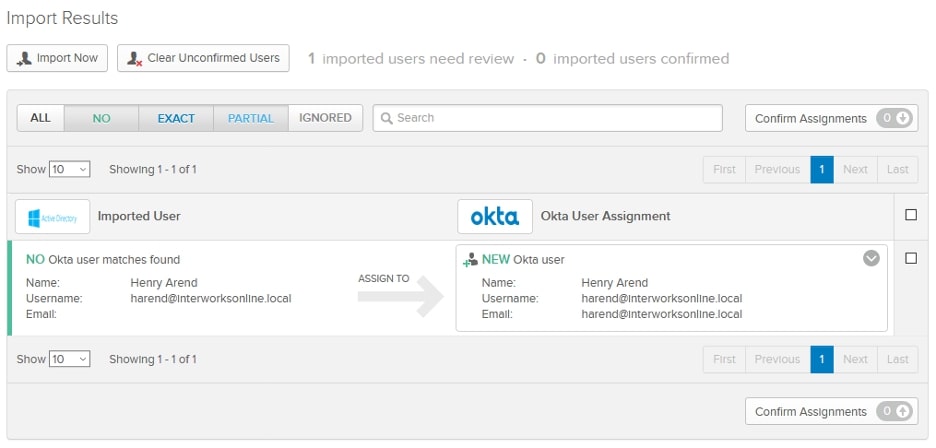
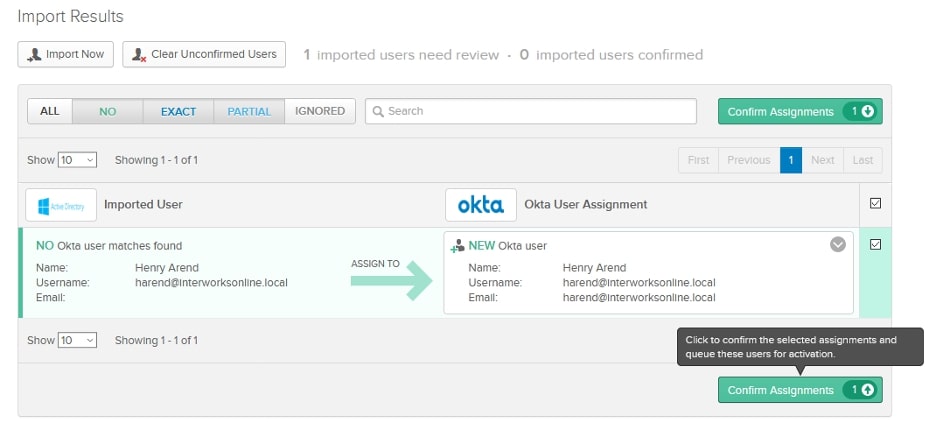
Okta will confirm that setting up your Active Directory agent was successful and give you some potential next steps. We can click Done ,and it will bring us to the provisioning page. You might see an error about some required attributes not being mapped, and you can either fix those mappings or ignore them. Clicking the Import tab will allow us to manually import some users. If no users are present, click the Import Now button and then click Full Import. You’ll get a message saying that a number of users were imported, and a number of groups were imported. You’ll be presented with an interface that allows you to map AD users to either an existing Okta user (your account will probably be one of these) or a new Okta account.
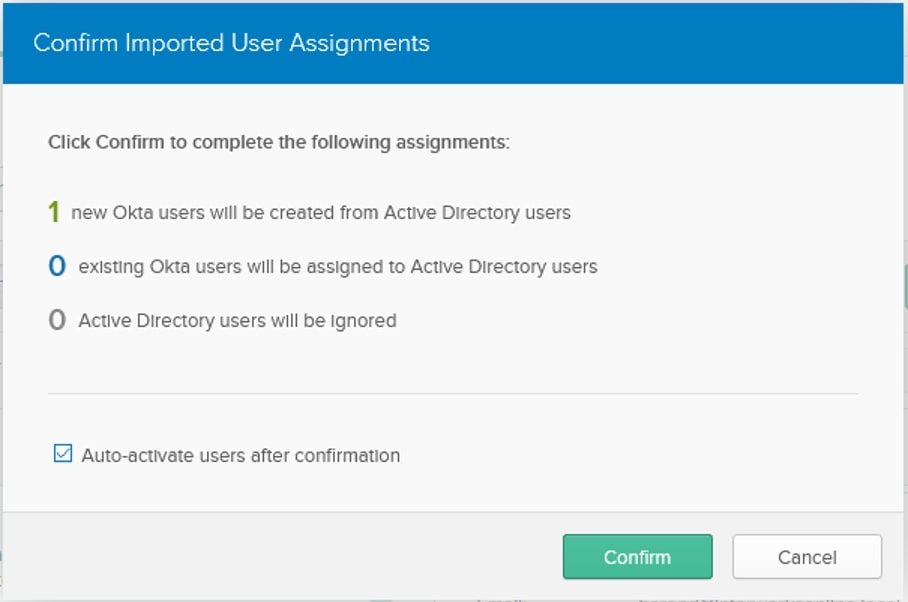
After mapping the users to the correct Okta users, check the box next to the Okta user assignment and click Confirm Assignments. You’ll get a confirmation about the number of AD users that were added to Okta, the number of AD users that were mapped to Okta accounts and the number of AD users that were ignored. Make sure that the Auto-activate users after confirmation checkbox is selected then click Confirm:
You’ll now see all the users that are imported into Okta:

Click on groups under Directory, and you’ll see all the AD groups that were imported into Okta:
![]()
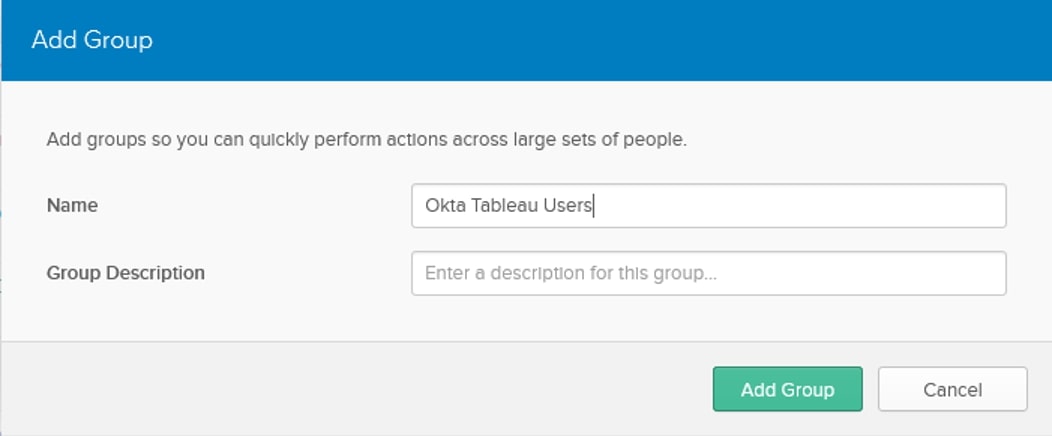
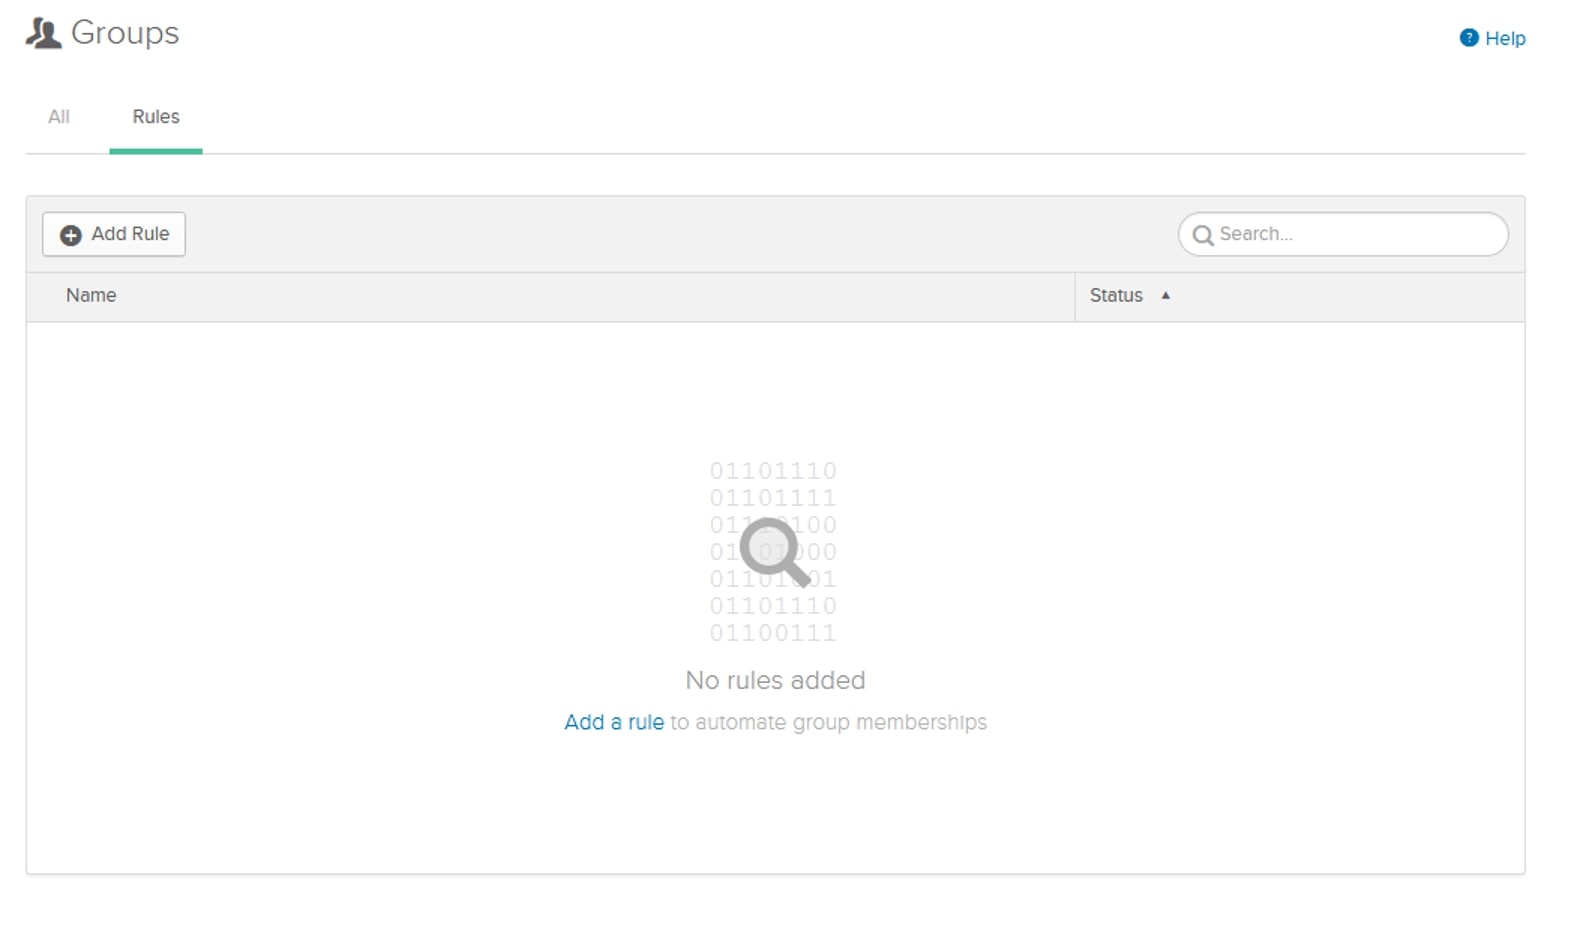
Now we can create some rules to add those users to an Okta group and import those into Tableau Server. Under Directory, click on Groups and add a group. Then head into the Rules tab, so we can set up the automation to add users to that group depending on AD group membership:
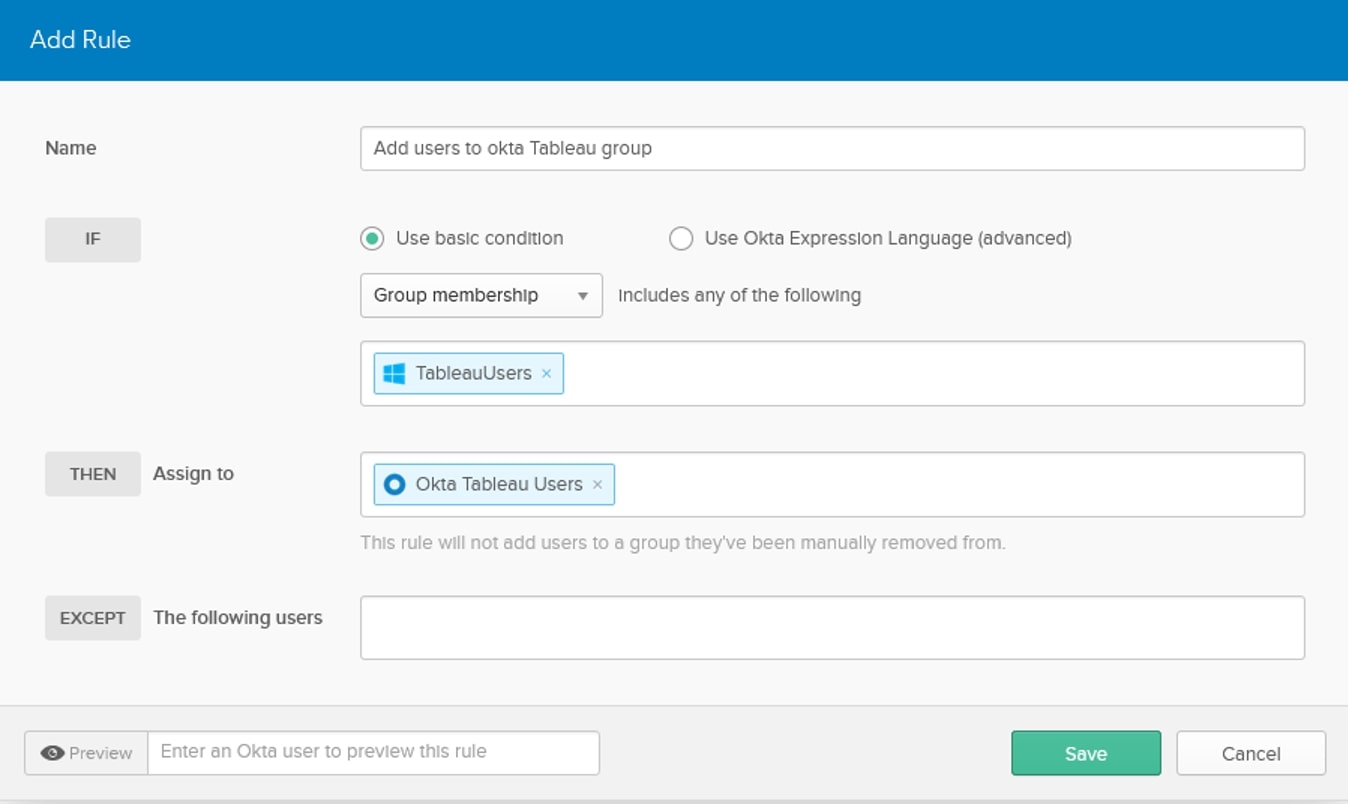
Add a rule, and give it a name that makes sense for your group. We want to change the If statement to match our logic to Group Membership and then type the name of the AD group into the box that pops up. In the Then section, type in your Okta user group name. You can verify that the correct source and destination groups are selected by checking that the If group has the Windows icon and the Then group has an Okta icon. Click Save and activate the rule to add users to the group:
We can now go check out Okta group and make sure users were added:
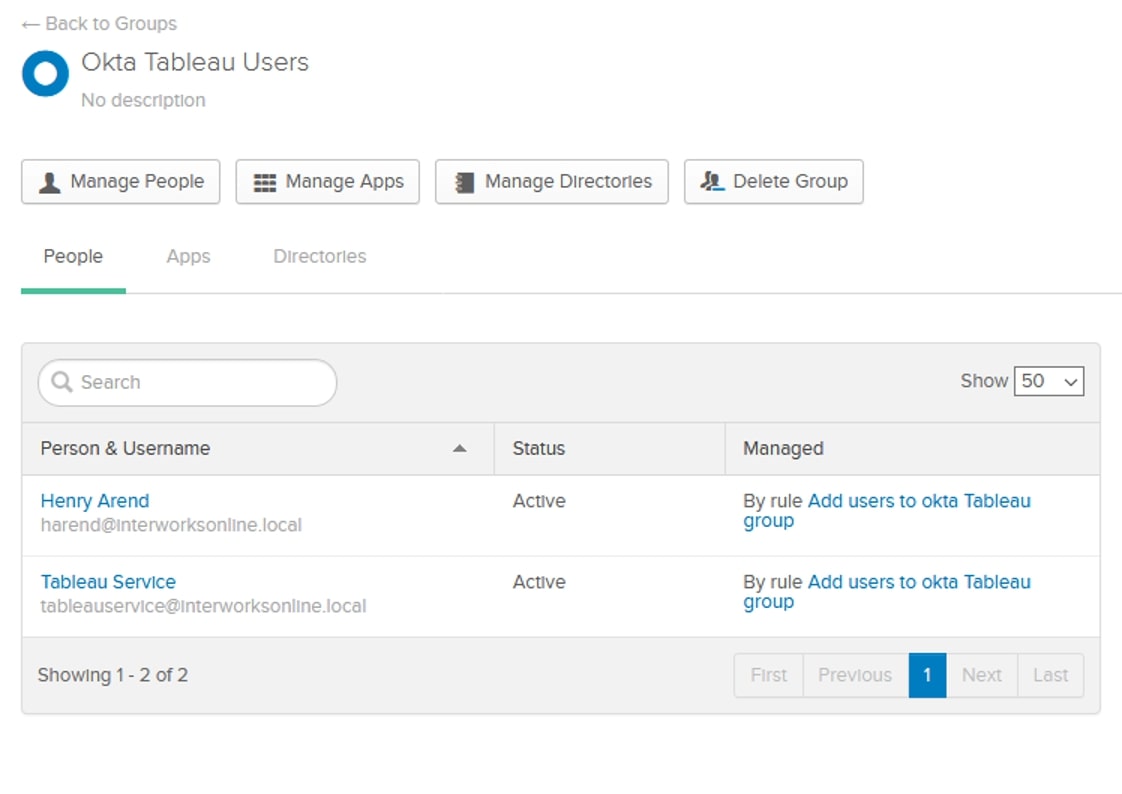
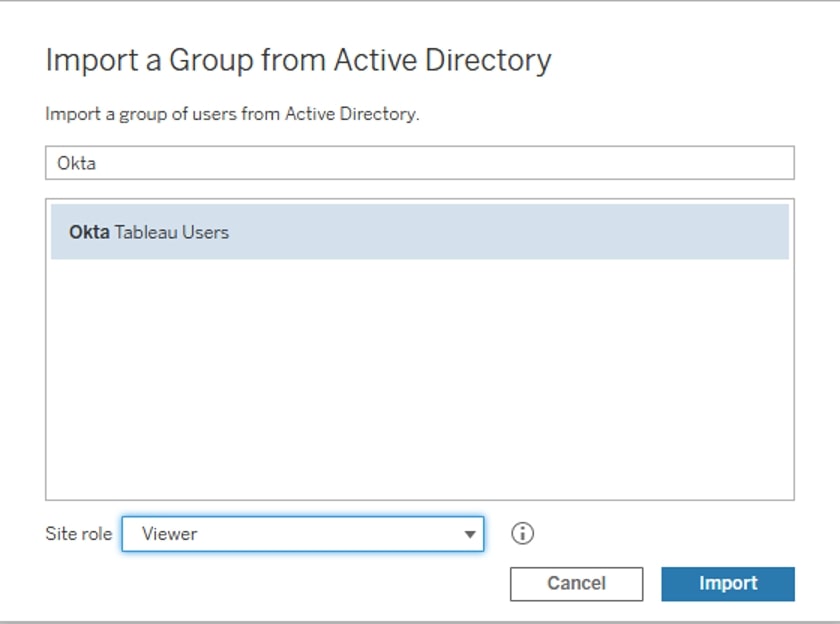
Once that group has been created, we can go to the Tableau Server web interface through a local browser and add the group like you normally would when adding AD groups:
Enabling SAML
Now that we’ve added our Tableau AD user groups, we can enable SAML for a seamless login experience.
Enable SSL for the Tableau Server if you haven’t already (instructions found here). Upload the SSL certificate and key to the server, and configure it using tsm security external-ssl enable –cert-file <path-to-file.crt> –key-file <path-to-file.key>. Apply the changes and the server will restart.
Ensure that your key is an RSA private key. You can verify this by opening the key in a text editor and looking at the first line. If it’s an RSA key, it will start with —–BEGIN RSA PRIVATE KEY—–. If the key is not already an RSA key, convert it using the openssl bundled with Tableau Server found in Tableau Server/packages/apache.<version code>/bin/openssl rsa -in <keyname>.key -out <keyname>-rsa.key.
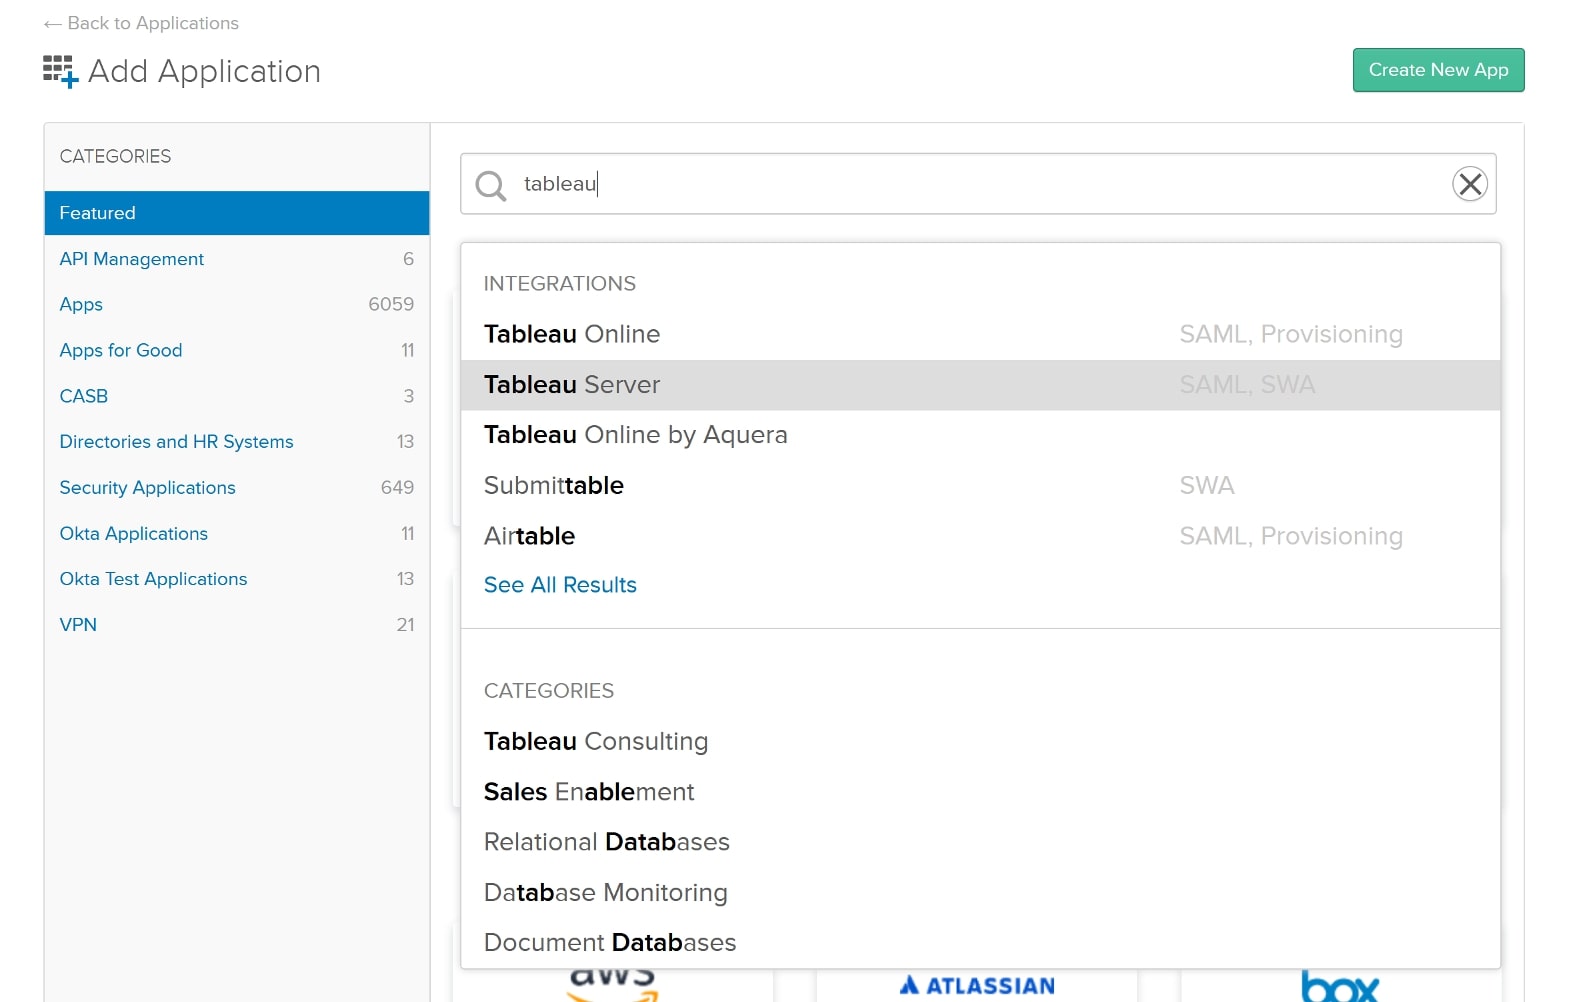
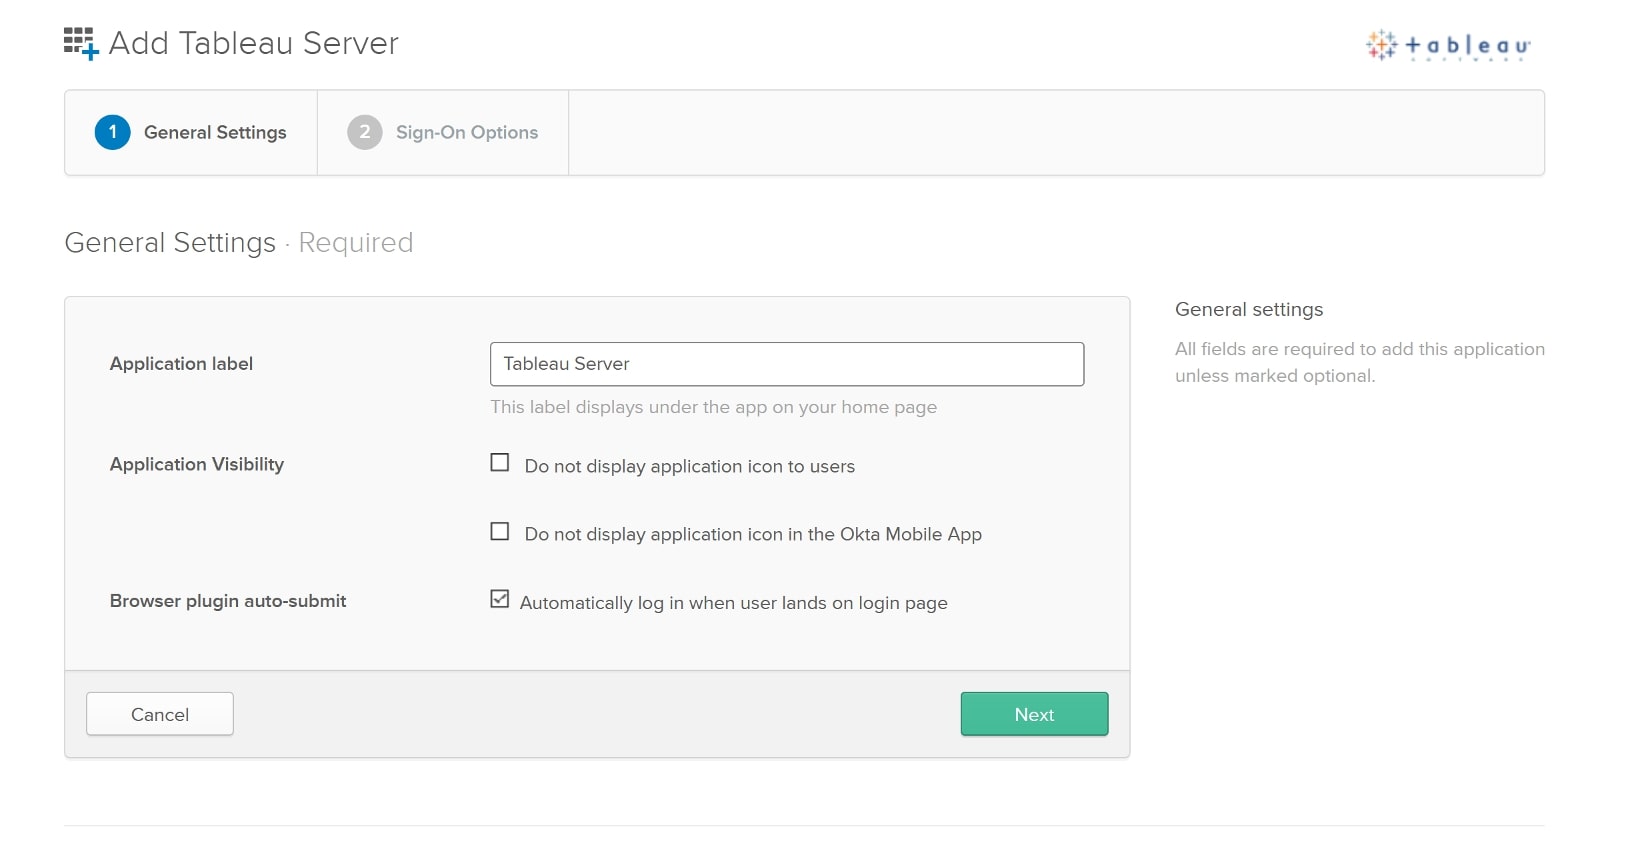
In order to configure SAML on the Tableau Server, we need to set up the application in Okta, so we can get the IdP metadata file. Under the Applications menu, click Applications, then Add Application. Search for Tableau Server and ensure you choose the item that supports SAML:

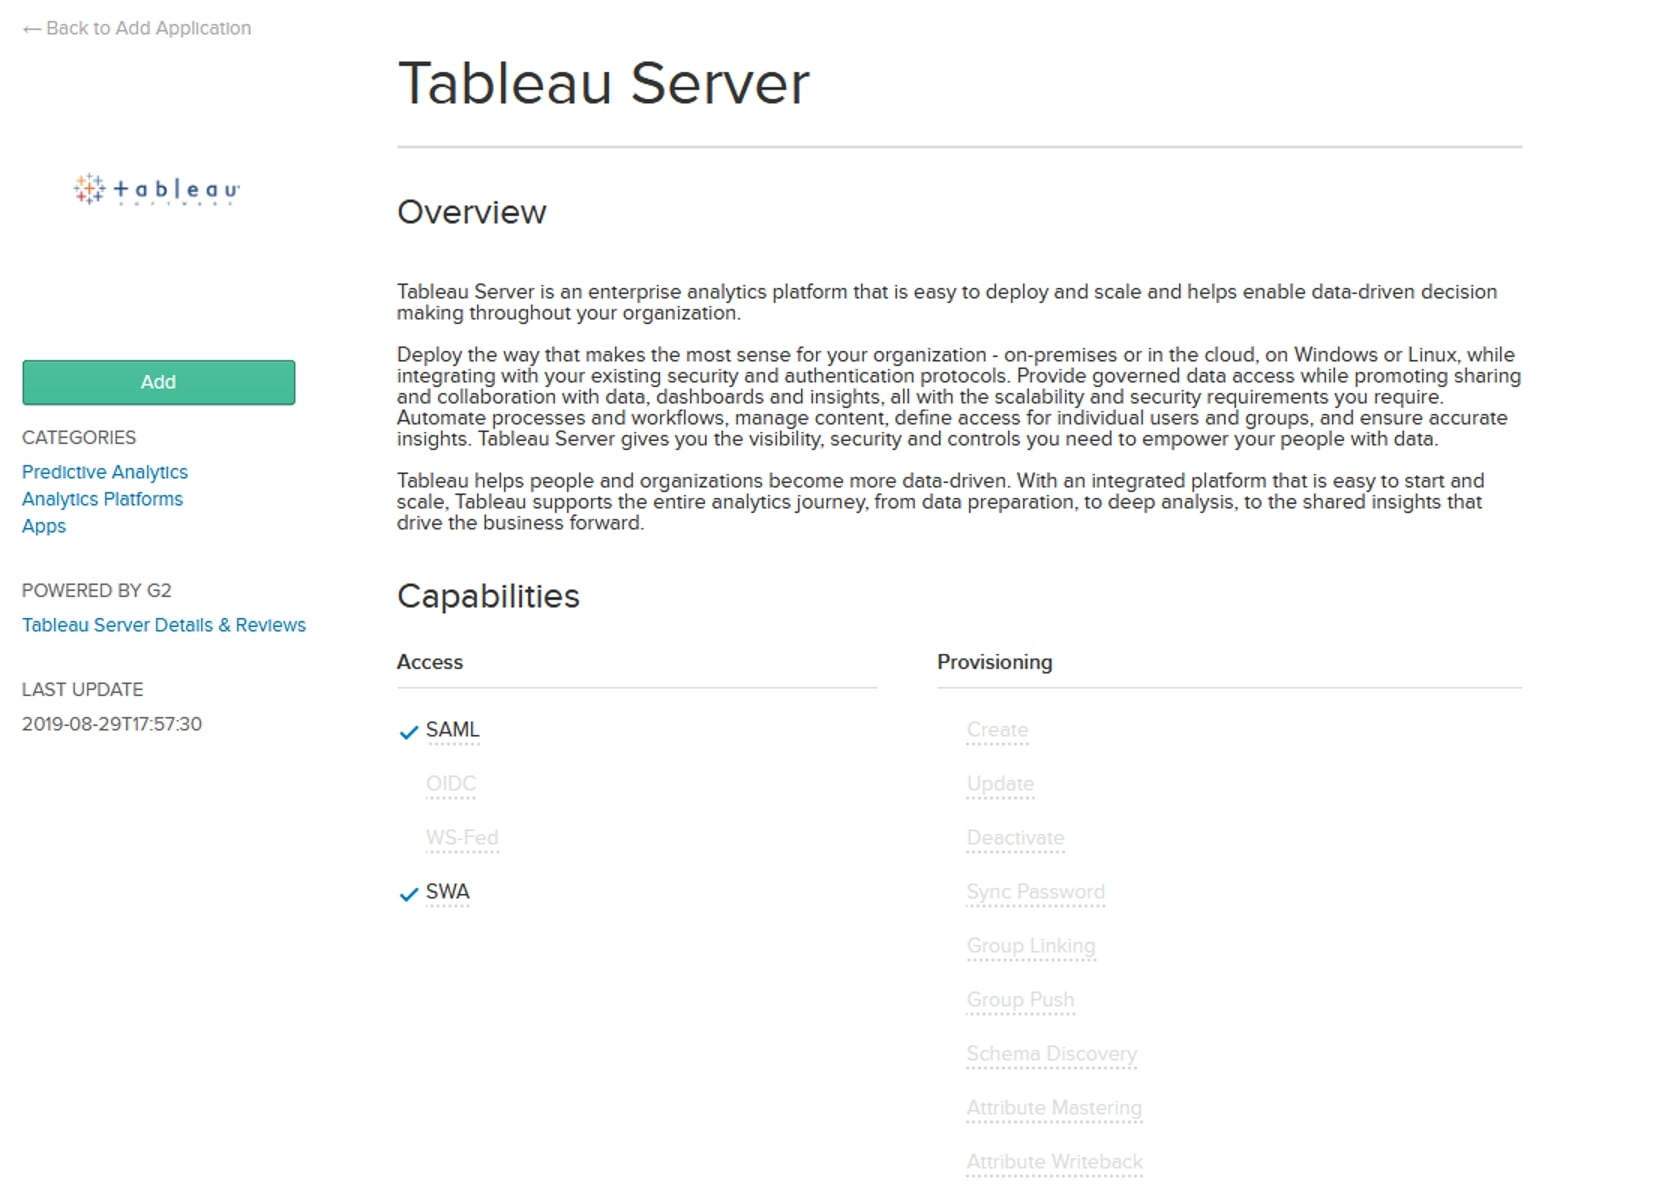
Create a label for the Tableau Server that suits your needs and click Next:
The only item that needs to be filled out is the SAML Entity ID. This should be the same as the URL used to navigate to your Tableau Server, i.e. if you get to your server by typing tableau.interworksonline.com into the URL bar then the entity ID will be https://tableau.interworksonline.com:

You’ll also want to ensure that the application username format matches what is stored in Tableau. I used UPN, so I can use either Okta username or UPN.
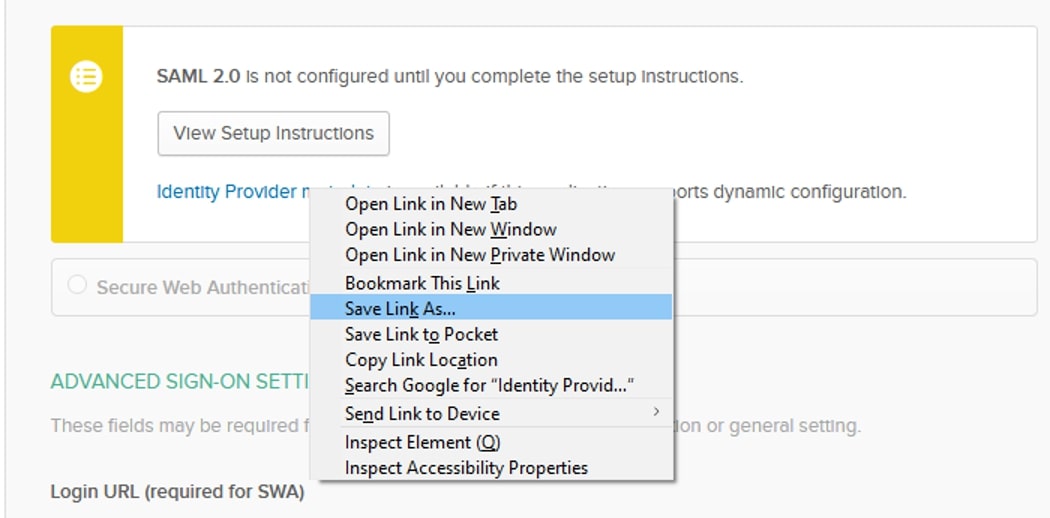
Once the Application is set up, we can download the metadata file. Inside the Sign On tab for the Application, right-click Identity Provider metadata and choose Save Link As… Choose somewhere to save the .xml file and then move it to the Tableau Server:
Upload the metadata.xml to the server. I try to put the metadata in the same location as the SSL cert/key since they’ll be used together in order to enable SAML. Use the following command to configure SAML tsm authentication saml configure –idp-entity-id https://<tableau-server-url> –idp-metadata <path-to-metadata-file.xml> –idp-return-url https://<tabelau-server-url> –cert-file <path-to-ssl-certificate> –key-file <path-to-key-file>
The idp-entity-id and the idp-return-url should be the same and include the https://. It will also match what we entered into Okta earlier. After ensuring the configuration completes successfully, we can enable SAML authentication by using the command tsm authentication saml enable. Apply the changes and the Server will restart.
Finally, Test the Tableau Server Connection
Once the server restarts, we can test access by connecting to the Tableau Server URL in an incognito window (making sure cached credentials aren’t being an issue), and you should be redirected to the Tableau Server.
Congrats! You did it. If you run into any issues, feel free to reach out in the comments below. Good luck!