Matillion 101 breaks down Matillion to its most fundamental levels and how its interactions with Snowflake and AWS can revolutionize your data practice and ETL processes.
If you’ve been following along in this Matillion series, you’ve already set up and logged into Matillion. From here, I’m going to talk through the first part of the first job I created in Matillion, leaning heavily on Holt’s recent post about setting up an API profile.
Pulling in Metadata to Matillion
For my first Matillion job, I wanted to pull all the data from XKCD comics into a single table in Snowflake. I’m a big XKCD fan, and a couple months ago, a friend shared with me that you can get all the comics and metadata through a JSON interface. More information can be found here, where you’ll see the structure of the URLs for each comic. It’s important to note for this Matillion project that each comic has its own URL, so we’ll need to incorporate an iterator to loop through all the URLs to get all the data we want.
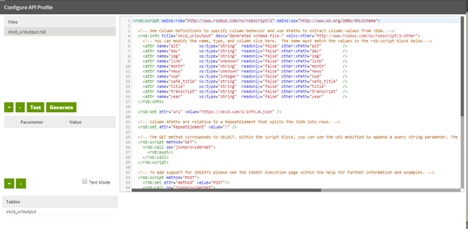
Following the instructions in Holt’s blog, I got my initial API profile set up, generated an RSD profile (shown below) and built an orchestration job that took the output from the one URL (https://xkcd.com/1/info.0.json) I put in the URI and dropped it into a table:
However, that’s only one URL. Now, I need to iterate through the other few thousand to get all the data. To iterate through this, I do three things:
- Create an environment variable that will allow me to pass my iterated values through to my API
- Update my API profile to include this new environment variable
- Update my API query properties to look for this new environment variable
Creating an Environment Variable
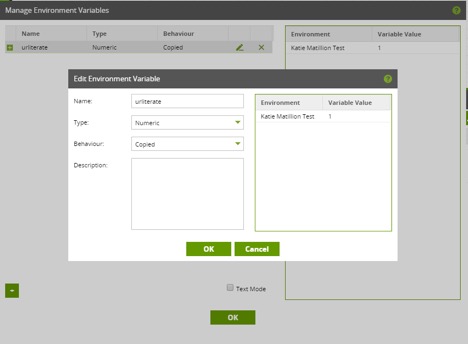
To create an environment variable, click on Project in the top-left corner and then Manage Environment Variables. Add a new one. Since the value I’m changing is a number to signify the comic number, I choose a type of numeric and name it urliterate:
Updating the API Profile to Include New Environment Variable
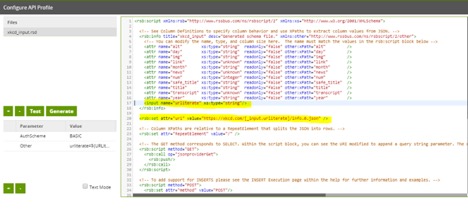
Next, I update the API profile. Click on Project > Edit API Profile. Here, I do three things. First, I create a parameter that lets Matillion know how I’m going to refer to our environment variable in the .rsd file. I add a new Other parameter and, for the value, specify that any time I write urliterate in my .rsd file, I’ll be referring to my urliterate Environment Variable, which is indicated by ${}:
urliterate=${URLIterate}
Next, as the Matillion support explains, “We are creating a dummy column for this parameter, so we can use the parameter in the API Component.” To do this, I name the input the same as our parameter value (urliterate) and specify the type (numeric) (Line 17):
<input name=”urliterate” xs:type=”numeric”/>
Lastly, on line 20, I specify where in the URL I use Environment Variable. Again, the Matillion support explains that “the required format to specify a parameter in the RSD file is”:
[_input.<parametername>].
I add that in to the URI value:
<rsb:set attr=”uri” value=”https://xkcd.com/[_input.urlterate]/info.0.json” />
Update the API Query Properties to Search for the Environment Variable
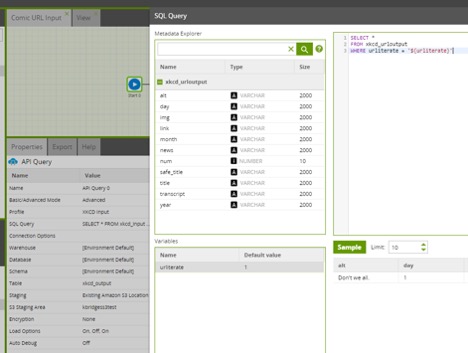
Now that the API profile is updated, I update it in my API query properties as well. For this API component, I want to circle through our urliterate values in the API profile (xkcd_urloutput). To do this, I input SQL to specify that I want all values from this table where urliterate=${urliterate}.
To see a SQL input option, change from Basic to Advanced mode in the API query properties. For the SQL query, I type:
SELECT *
FROM xkcd_urloutput
WHERE urliterate = ‘${urliterate}’
Now I’m ready to cycle through this environment variable. However, If I just drop an iterator on top of the API query tool, the results from each subsequent query are going to overwrite the first. To create a full table with all of the data, I set up a transformation job to take the output from one URL, write to a master table and then append subsequent records to that Master Table.
A Closer Look at the Iterator Process
Let’s break down that process a little more and what it’s going to look like.
Job 1 – Create an Output_Iterated table where we can append iterated records (and call Job 2):

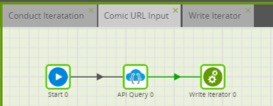
Job 2 – Have Matillion run through URL 1 (https://xkcd.com/1/info.0.json):
- Run API query
- Write to xkcd_output
- Call Job 3
Job 3 – Take xkcd_output table and write to Output_iterated table:
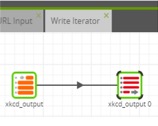
Let’s walk through each of those in a bit more detail.
Creating an Output_Iterated Table
The first job, Conduct Iteration, uses a Create Table component called Output Iterated. I manually input the column names in my XKCD dataset. Next in this job, I want to point Matillion to Job 2, which is the Comic URL Input orchestration job we created above, so I drag that in the workflow.
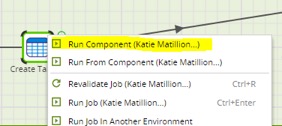
I’ll want to iterate Jobs 2 and 3, but we’ll come back to that more a little later. I need the result of Create Table components for the other jobs in this workflow, so I right-click on the Create Table component and run the component:
The second job was the result of the initial API query setup and calls a specific URL and writes out the results. With only one URL, the last component was an output table, but since I have multiple outputs that I need to append, I call Job 3.
Note: You will need to create the third job before you’re able to pull it into the second.
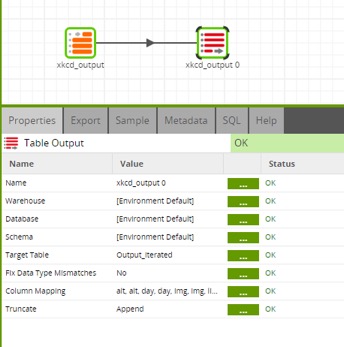
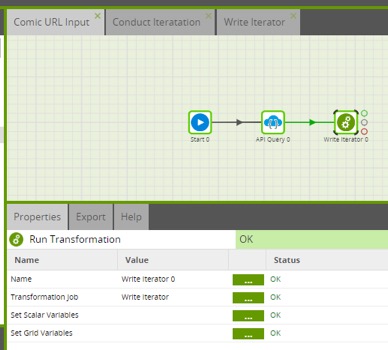
The last job is appending each individual API query to the master table; I take the xkcd_output that’s a result of the Comic URL Input and write it to the new table I created, Output Iterated. I ensure the column mapping between the two tables matches up in the Column Mapping properties:
Iterating Through the Full Process
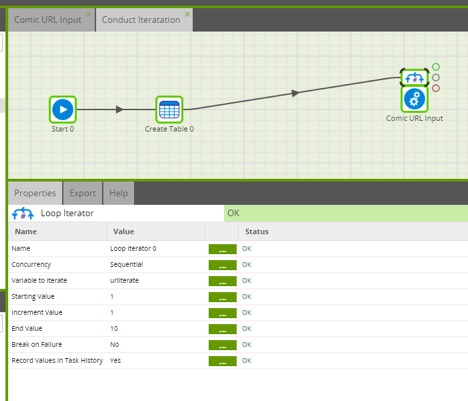
The final step is to iterate through this entire process. Since my API defines each unique URL with a number, the loop iterator was exactly what I needed to pass that value to the API query. Since I also needed to loop through writing out the data from that query, I put the iterator on the Comic URL Input orchestration job within the Conduct Iteration job.
Setting up the properties of iterator, I’ve already set up the environment variable I want to loop through (urliterate) and can now set our Starting Value, End Value and Increment Value. I start with 10 to test my iteration job:
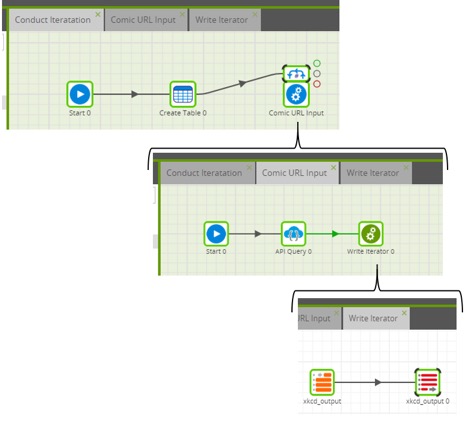
Now, my first Matillion project is complete! Below are the three jobs we’ve created:
How Our Matillion Jobs Work Together
When we run our Conduct Iteration job, we create a table (Output_Iterated) to write out our final inputs to and kick off the first URL. For that URL, we go to the Comic URL Input job, pull the data using the API query, write that to our xkcd_output table, which then in our Write Iterator job writes to our Output_Iterated table.
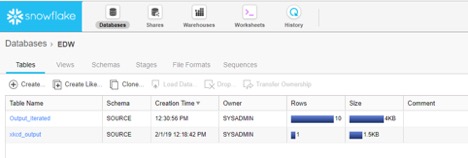
From there, we go back to the Conduct Iteration job and start the second URL, which the API query gets data from and writes to the xkcd_output file (overwriting the first URL) in the Comic URL Input job. We then take this second value and append it to the first in our Output_iterated table in the Write Iterator job. We continue this process through all 10 (or n) URLs. From there, this data is output into Snowflake and I have all data from all 10 URLs:
WOOHOO! Now, I can access this data altogether in Tableau or any other BI tool … any XKCD fans have fun ideas to explore?

