
There are a number of ways to pull Tableau dashboards into Salesforce, and each has various pros and cons. They also have different requirements when it comes to your Salesforce knowledge, development comfortability and what permissions you have enabled.
I’m not making any recommendations about which way is best. It depends on what you want to do and what you want it to look like in Salesforce. Hopefully, among these options you’ll find the best one that works for you. You’ll first need to publish your Tableau dashboard and have an active Salesforce account with the permissions to manage objects before you can set up any of these options. Let’s dive into them.
Web Tab
The Web Tab solution requires the least amount of development. You don’t even need to be a system admin, just be sure you have “Customize Application” permissions so you can modify navigation.
With this method, create a new web tab to add to your navigation bar that links to a specific dashboard or folder. All you need for setup is the permission mentioned above and the URL to the dashboard you want to display. You can follow the official walkthrough here.
This method keeps the dashboard whole and separate from specific Salesforce records. You can use this to show information that is not related to specific Salesforce records. One example would be, a dashboard showing staff availability so you know who is available for cases. This is not related to any specific case, but would be relevant to users in Salesforce.
Tabs are easy to make visible or hidden according to permissions set. An administrator will have to dictate permissions, but anyone with access will be able to see this tab in their Salesforce environment.
If you are a Lightning user, tabs can be added/removed from the app or navigation by using the App Manager. Go to Setup, type “App manager” into the quick find and click on New Lightning App to create a new app or edit one of your existing apps. You will be able to add your new web tab on the Select Items page and assign what permission levels should be required in order to see this app in the Assign to User Profiles page.
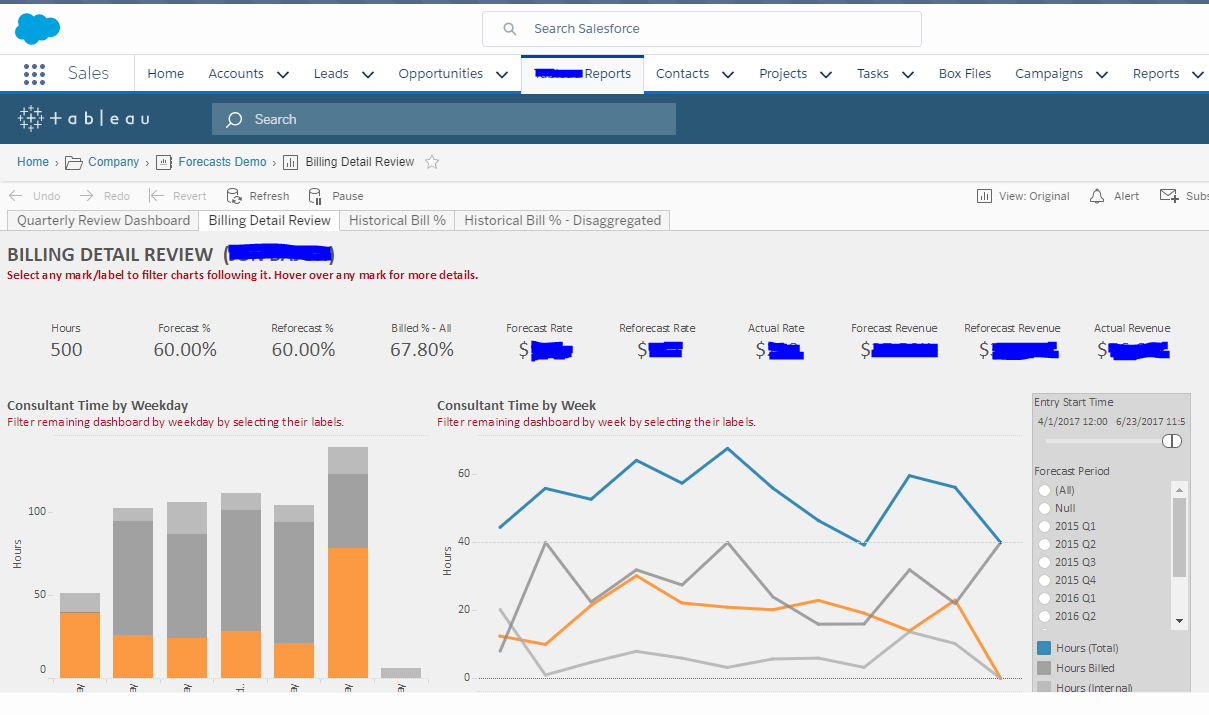
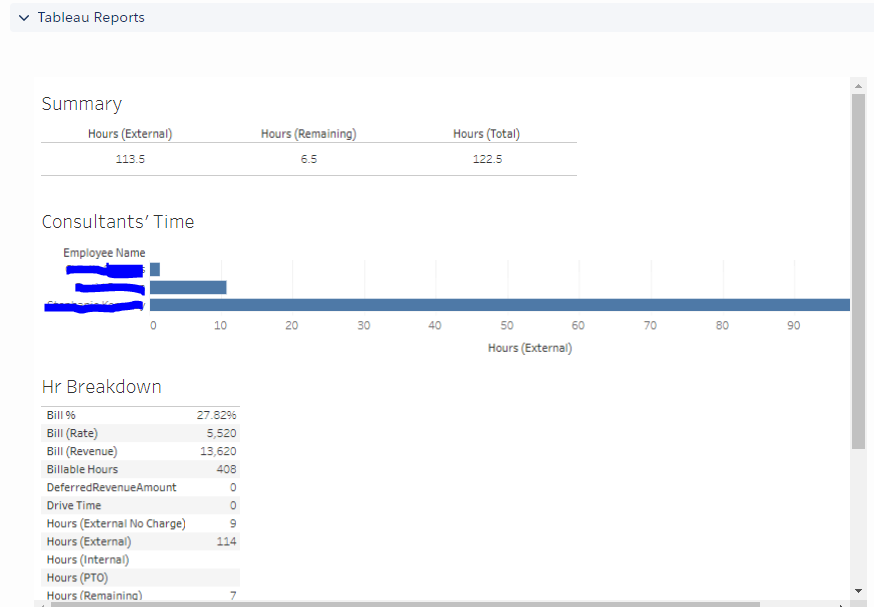
Visualforce Page
This method will allow you to filter your dashboard by a specific record as long as that Salesforce ID is part of the data source you built your dashboard with. The dashboard will appear in a section of the record page filtered by the record ID you want.
Note that filtering by ID is not something you HAVE to do. You can still pull the dashboard whole and unfiltered or set it up to show filters that the user can choose whether or not to use.
This method requires some development knowledge since a Visualforce page is built on code. Here is the code I used. The text in bold are the areas you would need to edit to reuse it.
<apex:page standardController="[OBJECT NAME]" showheader="false" sidebar="false">

  <apex:iframe src="[URL FOR TABLEAU DASHBOARD]?:embed=y&:showShareOptions=false&:toolbar=false&:display_count=no&:showVizHome=no&[DIMENSION TO FILTER BY]={! [OBJECT API NAME].fieldname }" height="200px" width="100%" scrolling="true">

  </apex:iframe>

</apex:page>
OBJECT NAME = This is not the API name, it is the name of the Object in Salesforce as it’s listed on that Object’s page in the Setup screen.
showheader=”false” sidebar=”false = This section is for how you want the iframe to appear. Do you want to show the header or sidebar from Tableau?
URL FOR TABLEAU DASHBOARD = This should start with “http” and end right before the “?” in the URL. Also, for this to work, the dashboard must be published and you must have access to it.
showShareOptions=false&:toolbar=false&:display_count=no&:showVizHome=no = This part refers to what information may show on this dashboard in Tableau (toolbar, share and home links) that you would like to appear in the iframe in Salesforce.
DIMENSION TO FILTER BY = If you want the dashboard to filter by Salesforce record ID, this is where you would indicate that in the code. The dimension name you enter here must be the exact name of the dimension of your Tableau data source. The dimension you indicate must also be a filter on the workbooks your dashboard is based on.
OBJECT API NAME.fieldname = This is the Salesforce API name and field name that you want to filter by. Please note, this should also be the same object whose page layout you want the dashboard to appear on. In other words, if you want your dashboard to be embedded into an Account page layout, you should pick an Account field to filter by.
The object name and the field name must be separated by a period to use this filter method. For example, ACCOUNT.ID would allow you to filter by Salesforce Account ID. The OBJECT API NAME.fieldname that you choose must match the DIMENSION you chose to use in Tableau.
height=”200px” width=”100%” scrolling=”true“= This designates how the iframe should appear on your Salesforce page. Should it take up all the section you allocated it to or only a percentage? How tall or long should the section be on your page? If the data doesn’t fit entirely in its section, do you want a scroll bar?
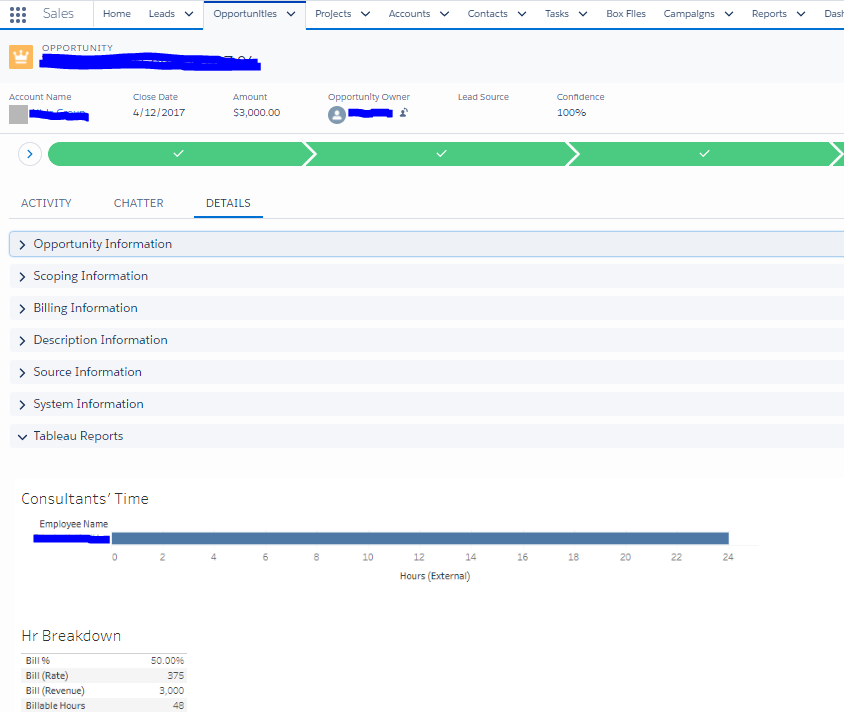
When you are done creating your Visualforce page, you will want to add it to your object’s page layout. You can do this by going to Setup > (open the object) > create new page layout. Creating a new layout allows you to work on this without interrupting other users and it allows you to control who should see your new layout. You can add it to groups of people with the same permissions and hide it from other permission sets.
Whenever you insert an iframe into a Salesforce page, it’s a good idea to put it in its own section. Also, you will want to keep an eye on the size of the information versus the size of that section. When you add a Visualforce page to a page layout, for example, it will ask you how wide and tall you want the section to be and whether or not you want to include scroll bars. It is a good idea to preview the page layout after inserting the iframe to see how it looks, and adjust the width and height accordingly.
Salesforce Canvas
There is a feature called Salesforce Canvas that can embed Tableau dashboards into the Account page. This case can even allow you to create unique vizzes for different accounts or opportunities.
This solution is the most code heavy. It will require someone who knows Linux, Javascript, Apache and Visualforce in Salesforce, just to name a few. However, this solution gives you the most versatility about what to include. You can choose to include tabs, a toolbar or any other user interface items from your viz and embed those in the Salesforce page as well.
Sparkler is built on Heroku, so you need a Heroku account to deploy/enable this solution. Sparkler is a canvas adapter app. You can use SAML, Trusted Tickets or Tableau Online authorization. You can map a Salesforce username or email address to a Tableau identity. If none of these methods work for your organization, you also have the option to create custom mapping for user authentication.
You will need the cooperation of your IT group and/or the ability to install software to a different location as your Tableau Server environment. The difference between a Visualforce page and a canvas app in Salesforce is that the canvas app allows you to retain the User Interaction features you put in your dashboard. For example, you can link to another record from within the dashboard and open it in the same Salesforce window
Another advantage is security. This means the content lives behind https security. Also, by using a connected app, you do not expose your session ID to any third-party applications you may be pulling in.
Also, with the level of communication between Salesforce and Tableau Server, you can create and have it find a viz specifically for that account. This is not a viz that is filtered by account ID, but a viz for each account that could look totally different.
You can download the free Salesforce Canvas Adaptor on Tableau’s website. Plus, you can find a video on how it works here.
On the Salesforce side, you will need to set up a Connected App that references the Sparkler information you set up. You will have the ability to share this app with any profiles you wish (and make it hidden from any you wish as well).
Force.com Canvas is a framework that allows you to take your existing web-based applications and expose them inside of Salesforce. The way it works is, inside Salesforce you define a Canvas app and its metadata such as the endpoint URL, icon logos and other app-specific information. Once that’s created, open a window inside the Salesforce UI and load your app UI inside it.
From there, this can be embedded on general page layouts. Instead of forcing your developers to learn Visualforce and Apex to rebuild an existing application, with Force.com Canvas, you can choose any language to create the source web app and the “How it will display in Salesforce?” question is already answered.